What are hosts and services?
Host templates
Host templates are a fundamental requirement for creating hosts. If a host is created, it must also contain a host template. All values defined in the host template are then automatically inherited by the host. These can, however, be overwritten individually if required.
Creating a host template
To create a host template, click on the “New” button in the host template overview.
| Field | Required | Description |
|---|---|---|
| Basic configuration | ||
| Container | Container in which the template is to be created | |
| Template name | Name of the template | |
| Template type | Specifies the type of template to be used | |
| Description | Description of the host template. Will be inherited as the host description | |
| Host groups | Assignment of one or more host groups | |
| Keywords | Tags | |
| Priority | Priority for filtering in lists | |
| Checking configuration | ||
| Checking period | Definition of the timeperiod in which checks should take place | |
| Enable active checks | Determines whether a host should have an Active or Passive check | |
| Checking command | The command to be executed for checking the host | |
| Checking interval | Defines the interval at which checks should take place | |
| Repeat interval | Defines the waiting period before a new check takes place after a non-UP status has been reached | |
| Max. number of checking attempts | Bestimmt die Anzahl der Prüfversuche, bevor ein Host in einen Hard State über geht | |
| Notification configuration | ||
| Notification period | Determines the time period in which notifications are sent for a host | |
| Notification interval | Defines the interval for notifications sent to this host | |
| Contacts | One or more contacts who will receive notifications about this host | |
| Contact groups | One or more contact groups that will receive notifications about this host | |
| Host notification options | Defines the statuses that must be reached before notifications are sent | |
| Various configurations | ||
| Host URL | Host URL | |
| Notes | Host template notes | |
| Flap detection enabled | (Flap detection) Detection of whether a host status changes frequently over a short period of time | |
| Host macro configuration | ||
| Prometheus exporters | ||
| Export | Prometheus exporters |
Template types
There are several host template types available in openITCOCKPIT. These distinguish a template as being either for a generic host or – for example – for an event correlation host.
A normal host is, as a general rule, created as a generic host.
A checking period is also a mandatory entry, as is a check command. For example, a standard check command for a host is “check-host-alive”. Arguments can also be passed directly to the command here.
Various checking intervals are then set.
Intervals
For host status notifications to work, the host configuration uses a check-and-retry interval and a maximum number of check attempts. These settings affect the time when a notification is sent. For example, the default is a scan interval of 1 hour, a retry interval of 1 minute, and a maximum of 3 scan attempts. In the worst case scenario, this can lead to a notification only being sent after 1 hour and 2 minutes.
As with the review period, you must also specify at least one contact or at least one contact group for the notification period.
Flap detection
Flapping occurs when a host or service status changes multiple times over a short period. This can be due to a variety of reasons such as network problems, problematic services or configuration problems. If this option is activated, a " flapping start" notification is sent and further notifications are suppressed when a flapping status is detected. When the status no longer shows as flapping, a "flapping stop" notification is sent and further notifications to the host are sent normally once again.
Prometheus exporters
To monitor the host with Prometheus, select your Prometheus exporter here.
Service templates
Service templates are a fundamental requirement for setting up services. If a service is created, a service template must also be specified. All values defined in the service template are then automatically inherited by the service, but can be overwritten individually if required.
Creating service templates
To create a service template, click on the "New" button in the service template overview.
| Field | Required | Description |
|---|---|---|
| Basic configuration | ||
| Container | Container in which the template is to be created | |
| Template name | Name of the template | |
| Template type | Specifies the type of the template | |
| Service name | Default name used when creating a service from the template | |
| Description | Description of the service template. Is inherited as the service description | |
| Service groups | Assignment of one or more service groups | |
| Keywords | Tags | |
| Priority | Priority for filtering in lists | |
| Checking configuration | ||
| Checking period | Defines the period in which checks should take place | |
| Enable active checks | Determines whether the service should be checked actively or passively | |
| Checking command | The command, executed to check the service | |
| Checking interval | Defines the interval at which checks should take place | |
| Repeat interval | Defines the waiting period before a new check takes place after a non-UP status has been reached | |
| Max. number of checking attempts | Determines the number of checking attempts before a service transitions to a hard state | |
| Notification configuration | ||
| Notification period | Determines the period during which notifications are sent for a service. | |
| Notification interval | Defines the time interval for notifications sent for this service | |
| Contacts | One or more contacts who will receive notifications about this service | |
| Contact groups | One or more contact groups that receive notifications about this service | |
| Service notification options | Defines the statuses that must be reached before notifications are sent | |
| Various configurations | ||
| Service URL | Service URL | |
| Notes | Notes regarding the service template | |
| Flap detection enabled | (Flap detection) Detects whether a service status changes frequently over a short period of time | |
| Status volatile | Forces notifications to be sent for each check result that does not come back as OK. | |
| Event handler configuration | ||
| Event handler | Service event handler configuration | |
| Service macro configuration |
Template types
openITCOCKPIT offers several types of service templates. These distinguish between templates for either a generic service, event correlations, Checkmk, Prometheus or the openITCOCKPIT agent.
Whether generated via a module or the agent, services are always of the corresponding template types.
Generic templates
Template for a normal service. This is the standard service type in openITCOCKPIT
EVC templates
Event correlation service template. Available via EventcorrelationModule
Checkmk templates
Template for a Checkmk service. Available via CheckmkModule
Prometheus templates
Template for a Prometheus service. Available through PrometheusModule
Agent templates
Template for an openITCOCKPIT Agent service.
A checking period is also a mandatory entry, as is a check command.
Various checking intervals are then set.
Intervals
For service status notifications to work, the service configuration uses a check-and-retry interval and a maximum number of check attempts. These settings affect the time when a notification is sent. For example, the default is a scan interval of 1 minute, a retry interval of 1 minute and a maximum of 3 scan attempts. In the worst case scenario, this can lead to a notification being sent after 3 minutes.
As with the review period, a notification period must also be specified. Unlike the host templates, no contact or contact group must be stored here.
Service template group
Service template groups are collections of service templates that you can either create yourself or are available through installable modules. Service template groups that are available via modules are appropriately summarised for the respective subject area.
Service template groups can be assigned to a host or host group. This means that for all service templates in a given service template group, the corresponding services are created on the assigned host or in the assigned host group.
Creating a service template group
| Field | Required | Description |
|---|---|---|
| Container | Container in which to create the service template group | |
| Name | Service template group name | |
| Description | Description of the service template group | |
| Service templates | The Service templates to be added to the service template group |
Assigning service template groups
There are three different ways to assign service template groups in openITCOCKPIT.
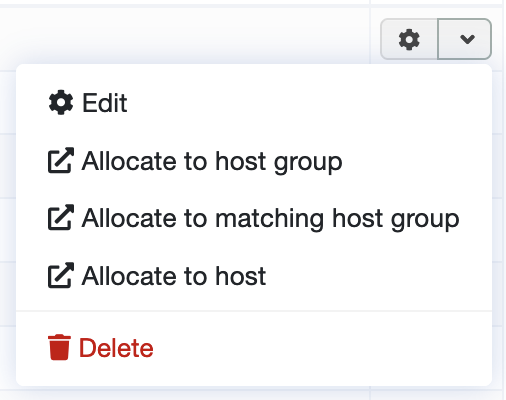
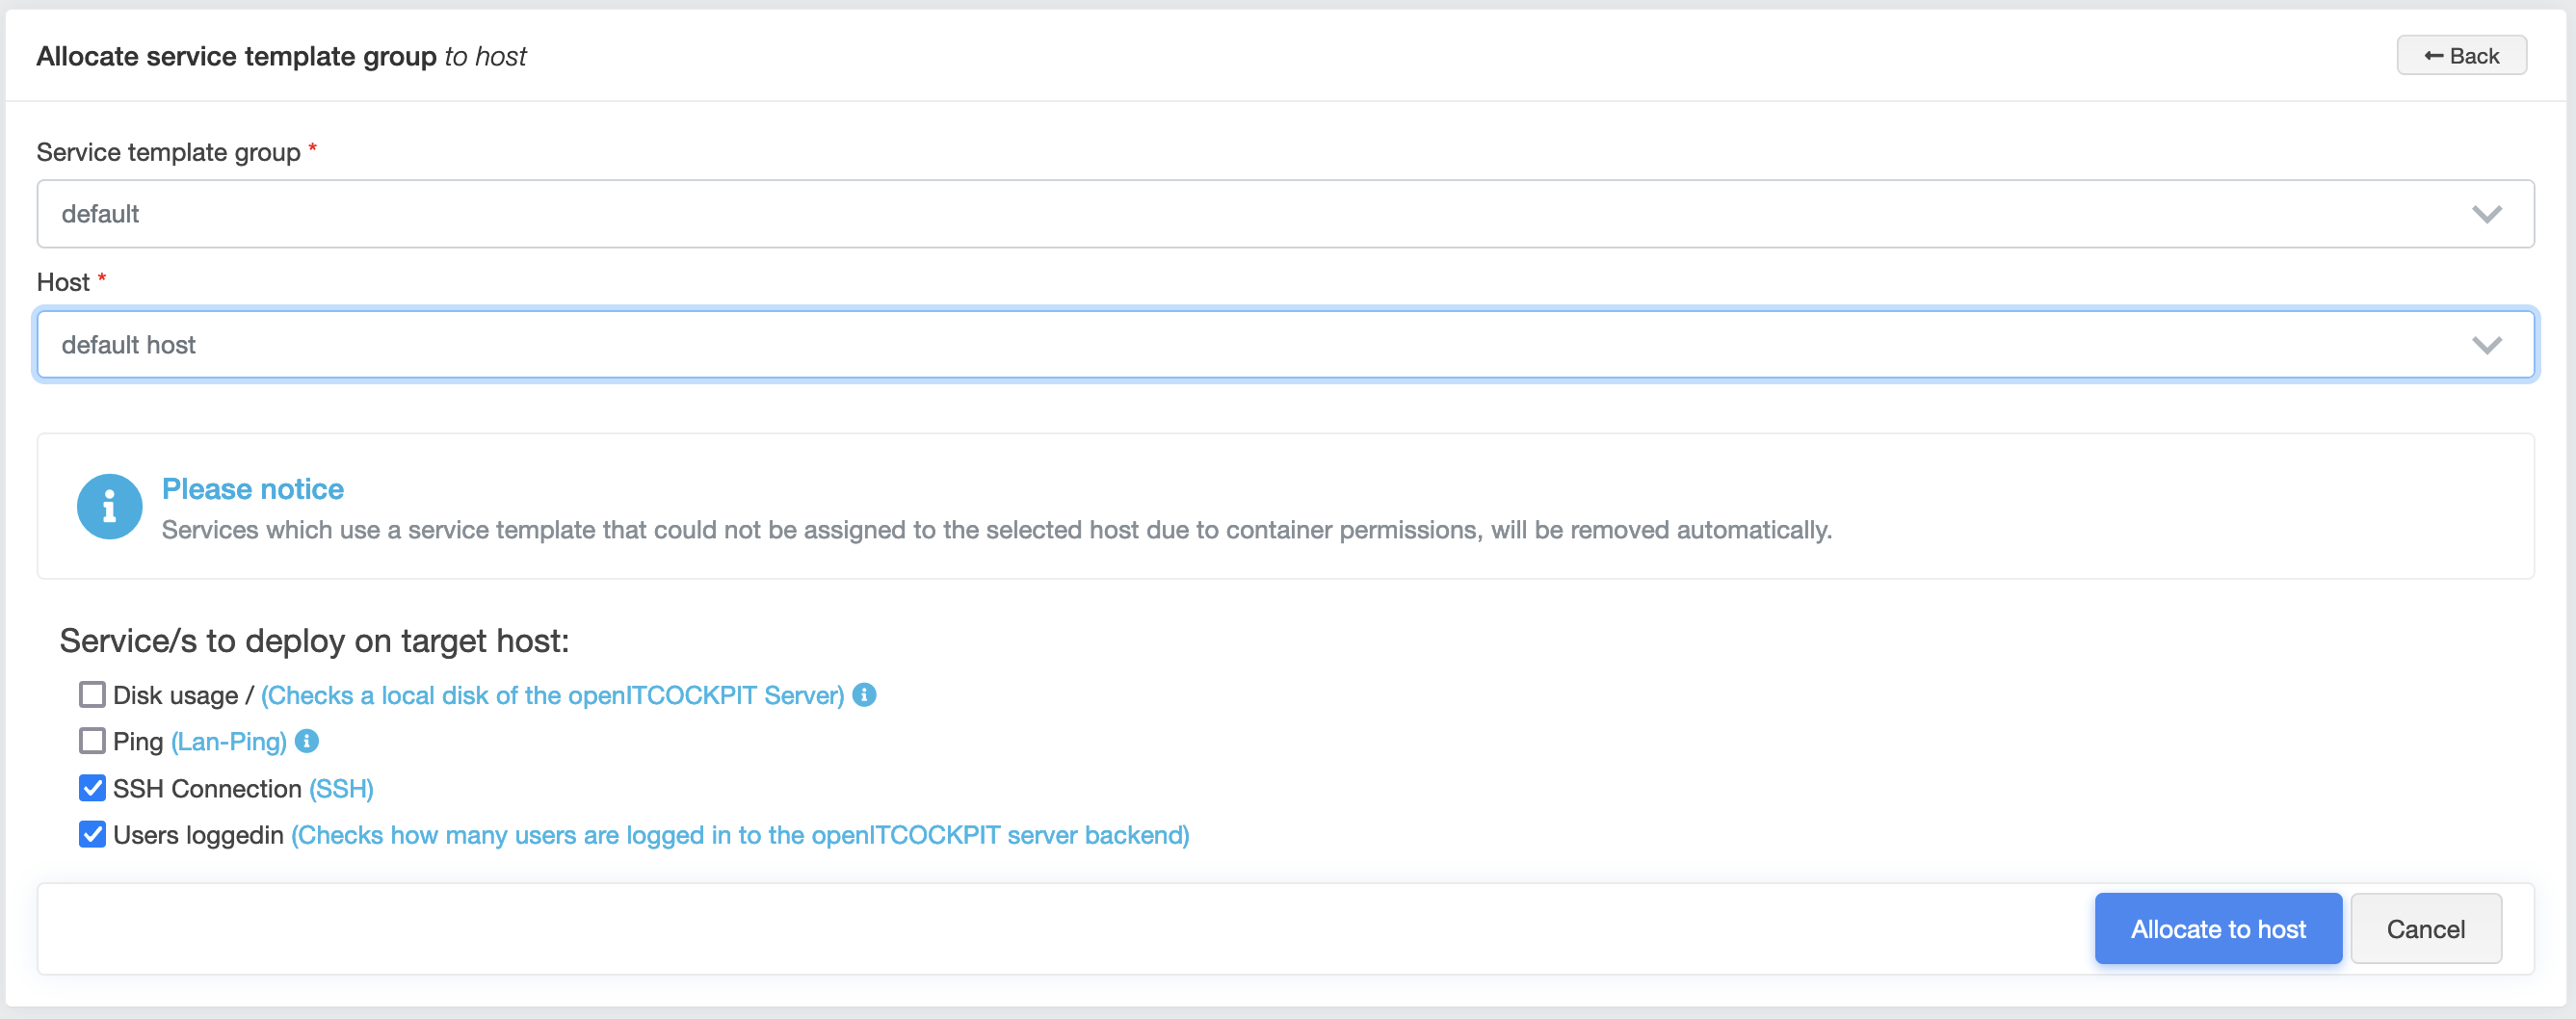
Assign to host
Here the current service template group is assigned to a single host. When selecting the host, all the services to be created are listed and can also be deselected using the selection box.
If one of the services in this service template group already exists on the target host, it will not be created again by default, but you can select it again in the list if you wish to create it again.
Assign to a host group
Here the current service template is assigned to the hosts in a host group. When selecting the host group, all associated hosts and the services to be created for each individual host will be listed. It is also possible to deselect individual services.
If one of the services in this service template group already exists on one of the hosts, it will not be created again by default, but you can select it again in the list if you wish to create it again.
Allocate to the appropriate host group
"Allocate to Matching Host Group" creates services on the hosts of a host group with the same name. The host group name must be the same as the service template group name. With this method you do not have the option to select and deselect the services as with the other two methods.
Hosts
Create Host
To create a host, first click on the “New” button in the host overview. In the form that opens, first select a container and a host template you would like to use in creating your host. All other fields relevant to the host will then appear.
Danger
Please note that it is not possible to make any subsequent changes to the host's container!
You can then assign a host name and host address. Alternatively, you can assign a host address and have the host name completed automatically via DNS lookup.
Any values inherited from the host template can be overridden if required. If you would like to restore the template value, see Reset the host or service field to default values
When saving, you have the option to directly create new services for the host. These can either be created using the openITCOCKPIT Agent, Checkmk or they can be created manually.
| Field | Required | Description |
|---|---|---|
| Basiskonfiguration | ||
| Container | Container in which the host is to be created. | |
| Shared Containers | Containers in which the host should also be visible | |
| Host template | Host template used for creating the host | |
| Host name | The name of the host | |
| DNS lookup | If activated, an attempt is made to resolve the host name or host address | |
| Host address | IP address or FQDN of the host | |
| Description | Description of the host template. Will be inherited as the host description | |
| Host groups Assignment of one or more host groups | ||
| Parent host | Parent host relationship | |
| Keywords | Tags | |
| Priority | Priority for filtering in lists | |
| Satellite | Available when DistributeModule is installed. Satellite selection end | |
| Checking configuration | ||
| Checking period | Definition of the period in which checks should take place | |
| Enable active checks | Determines whether a host should have an Active or Passive check | |
| Checking command | The command, to be executed for checking the host | |
| Checking interval | Defines the interval at which checks should take place. See intervals | |
| Repeat interval | Defines the waiting period before a new check takes place after a non-UP status has been reached. See intervals | |
| Max. number of checking attempts | Determines the number of attempts to check a host before it transitions to a hard state. See intervals | |
| Notification configuration | ||
| Notification period | Determines the time period in which notifications are sent for a host. | |
| Notification interval | Defines the interval for notifications sent to this host | |
| Contacts | One or more contacts who will receive notifications about this host | |
| Contact groups | One or more contact groups that will receive notifications about this host | |
| Host notification options | Defines the statuses that must be reached before notifications are sent | |
| Various configurations | ||
| Host URL | Host URL | |
| Notes | Host | template notes |
| Flap detection enabled | (Flap detection) Detects whether a host status changes frequently over a short period of time | |
| Host macro configuration | ||
| Prometheus exporters | ||
| Exporters | Prometheus exporter |
Shared containers
It is possible to make hosts "visible" in other containers using shared containers. This is useful for giving host access to users who do not have permissions to the host's original container. This option is also available in the host overview under the “Share” option.
Intervals
For host status notifications to be sent, the host configuration uses a check-and-retry interval and a maximum number of check attempts. These settings affect the time when a notification is sent. For example, the default host template specifies a scan interval of 2 hours, a retry interval of 1 minute, and a maximum number of scan attempts of 3. In the worst case scenario, this can lead to a notification only being sent after 2 hours and 2 minutes.
Flap detection
Flapping occurs when a host or service status changes multiple times over a short period. This can be due to a variety of reasons such as network problems, problematic services or configuration problems. If this option is enabled, a " flapping start" notification will be sent when a flapping status is detected and any other notifications will be suppressed. When the status no longer shows as flapping, a "flapping stop" notification will be sent. Other notifications to the host will once again be sent normally.
Prometheus exporters
To monitor the host with Prometheus , select your Prometheus exporter here.
Services
Creating services
To create a service, first click on the "New" button in the service overview. In the form that opens, select the target host on which the service is to be created. Then select a service template. All other fields relevant to the service will then appear.
Any values inherited from the service template can be overridden for the service being created if required. If you would like to restore the template value, see Reset the host or service field to default values
| Field | Required | Description |
|---|---|---|
| Basic configuration | ||
| Host | The host on which the service is to be created | |
| Service templates | The service template from which the service is to be created | |
| Service name | Name of the service to be created | |
| Description | Description of the service | |
| Service groups | Assignment of one or more service groups | |
| Keywords | Tags | |
| Priority | Priority for filtering in lists | |
| Checking configuration | ||
| Checking period | Definites the period in which checks should take place | |
| Enable active checks | Determines whether the service should be checked actively or passively | |
| Checking command | The command executed to check the service | |
| Checking interval | Defines the interval at which checks should take place. See intervals | |
| Repeat interval | Defines the waiting period before a new check takes place after a non-UP status has been reached See intervals | |
| Max. number of checking attempts | Determines the number of checking attempts before a service transitions to a hard state See intervals | |
| Notification configuration | ||
| Notification period | Determines the period during which notifications are sent for a service. | |
| Notification interval | Defines the time interval for notifications sent for this service | |
| Disable inheritance | Disables inheritance of contacts and contact groups. These can then be set individually for this service | |
| Contacts | One or more contacts who will receive notifications about this service | |
| Contact groups | One or more contact groups that receive notifications about this service | |
| Service notification options | Defines the statuses that must be reached before notifications are sent | |
| Various configurations | ||
| Service URL | Service URL | |
| Notes | Notes regarding the service template | |
| Flap detection enabled | (Flap detection) Detects whether a service status changes frequently over a short period of time | |
| Status volatile | Forces notifications to be sent for each check result that does not come back as OK. | |
| Event handler configuration | ||
| Event handler | Service event handler configuration | |
| Service macro configuration |
Intervals
For service status notifications to work, the service configuration uses a check-and-retry interval and a maximum number
of check attempts. These settings affect the time when a notification is sent. For example, the CHECK_PING template
specifies a check interval of 5 minutes, a retry interval of 1 minute, and a maximum number of 3 check attempts. In the
worst case scenario, this can lead to a notification only being sent after 7 minutes.
Notifications
Notifications for a service behave exactly like those for a host
Flap detection
Flapping occurs when a host or service status changes multiple times over a short period. This can be due to a variety of reasons such as network problems, problematic services or configuration problems. If this option is enabled, a " flapping start" notification will be sent when a flapping status is detected and any other notifications will be suppressed. When the status no longer shows as flapping, a "flapping stop" notification will be sent. Other notifications to the host will once again be sent normally.
Resetting host or service field to default values
Hosts and services always inherit their values from a host or service template. All these values can be overridden in the host or service form.
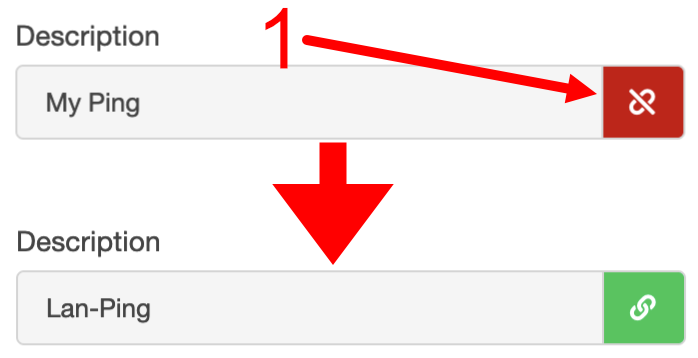
Values inherited from the host or service template are shown with a green button behind the input field. When this is the case, these values will match those in the template.
If an inherited value has been overwritten, the button will be displayed in red. You can restore the default template value by clicking on the red button (1) behind the input field.
Creating hosts and services using the import module
Host defaults
Host defaults define, for example, which containers and services should be assigned to the hosts that are being imported. This depends, however, on the import source.

First, a container must be selected for the data that is being imported and a name given for the default setting.
You must then select the settings that should be automatically assigned to the imported hosts.
This affects the host template, shared containers and whether the hosts should be created on the master system or on a satellite.
You also have the option of ensuring that service template groups conform with one another.
To do this, first select the field to match. There you can choose between host name, description, address and software.
Once this has been done, specify the regular expression you want to use to match the previously selected field.
Then specify the desired service template group.
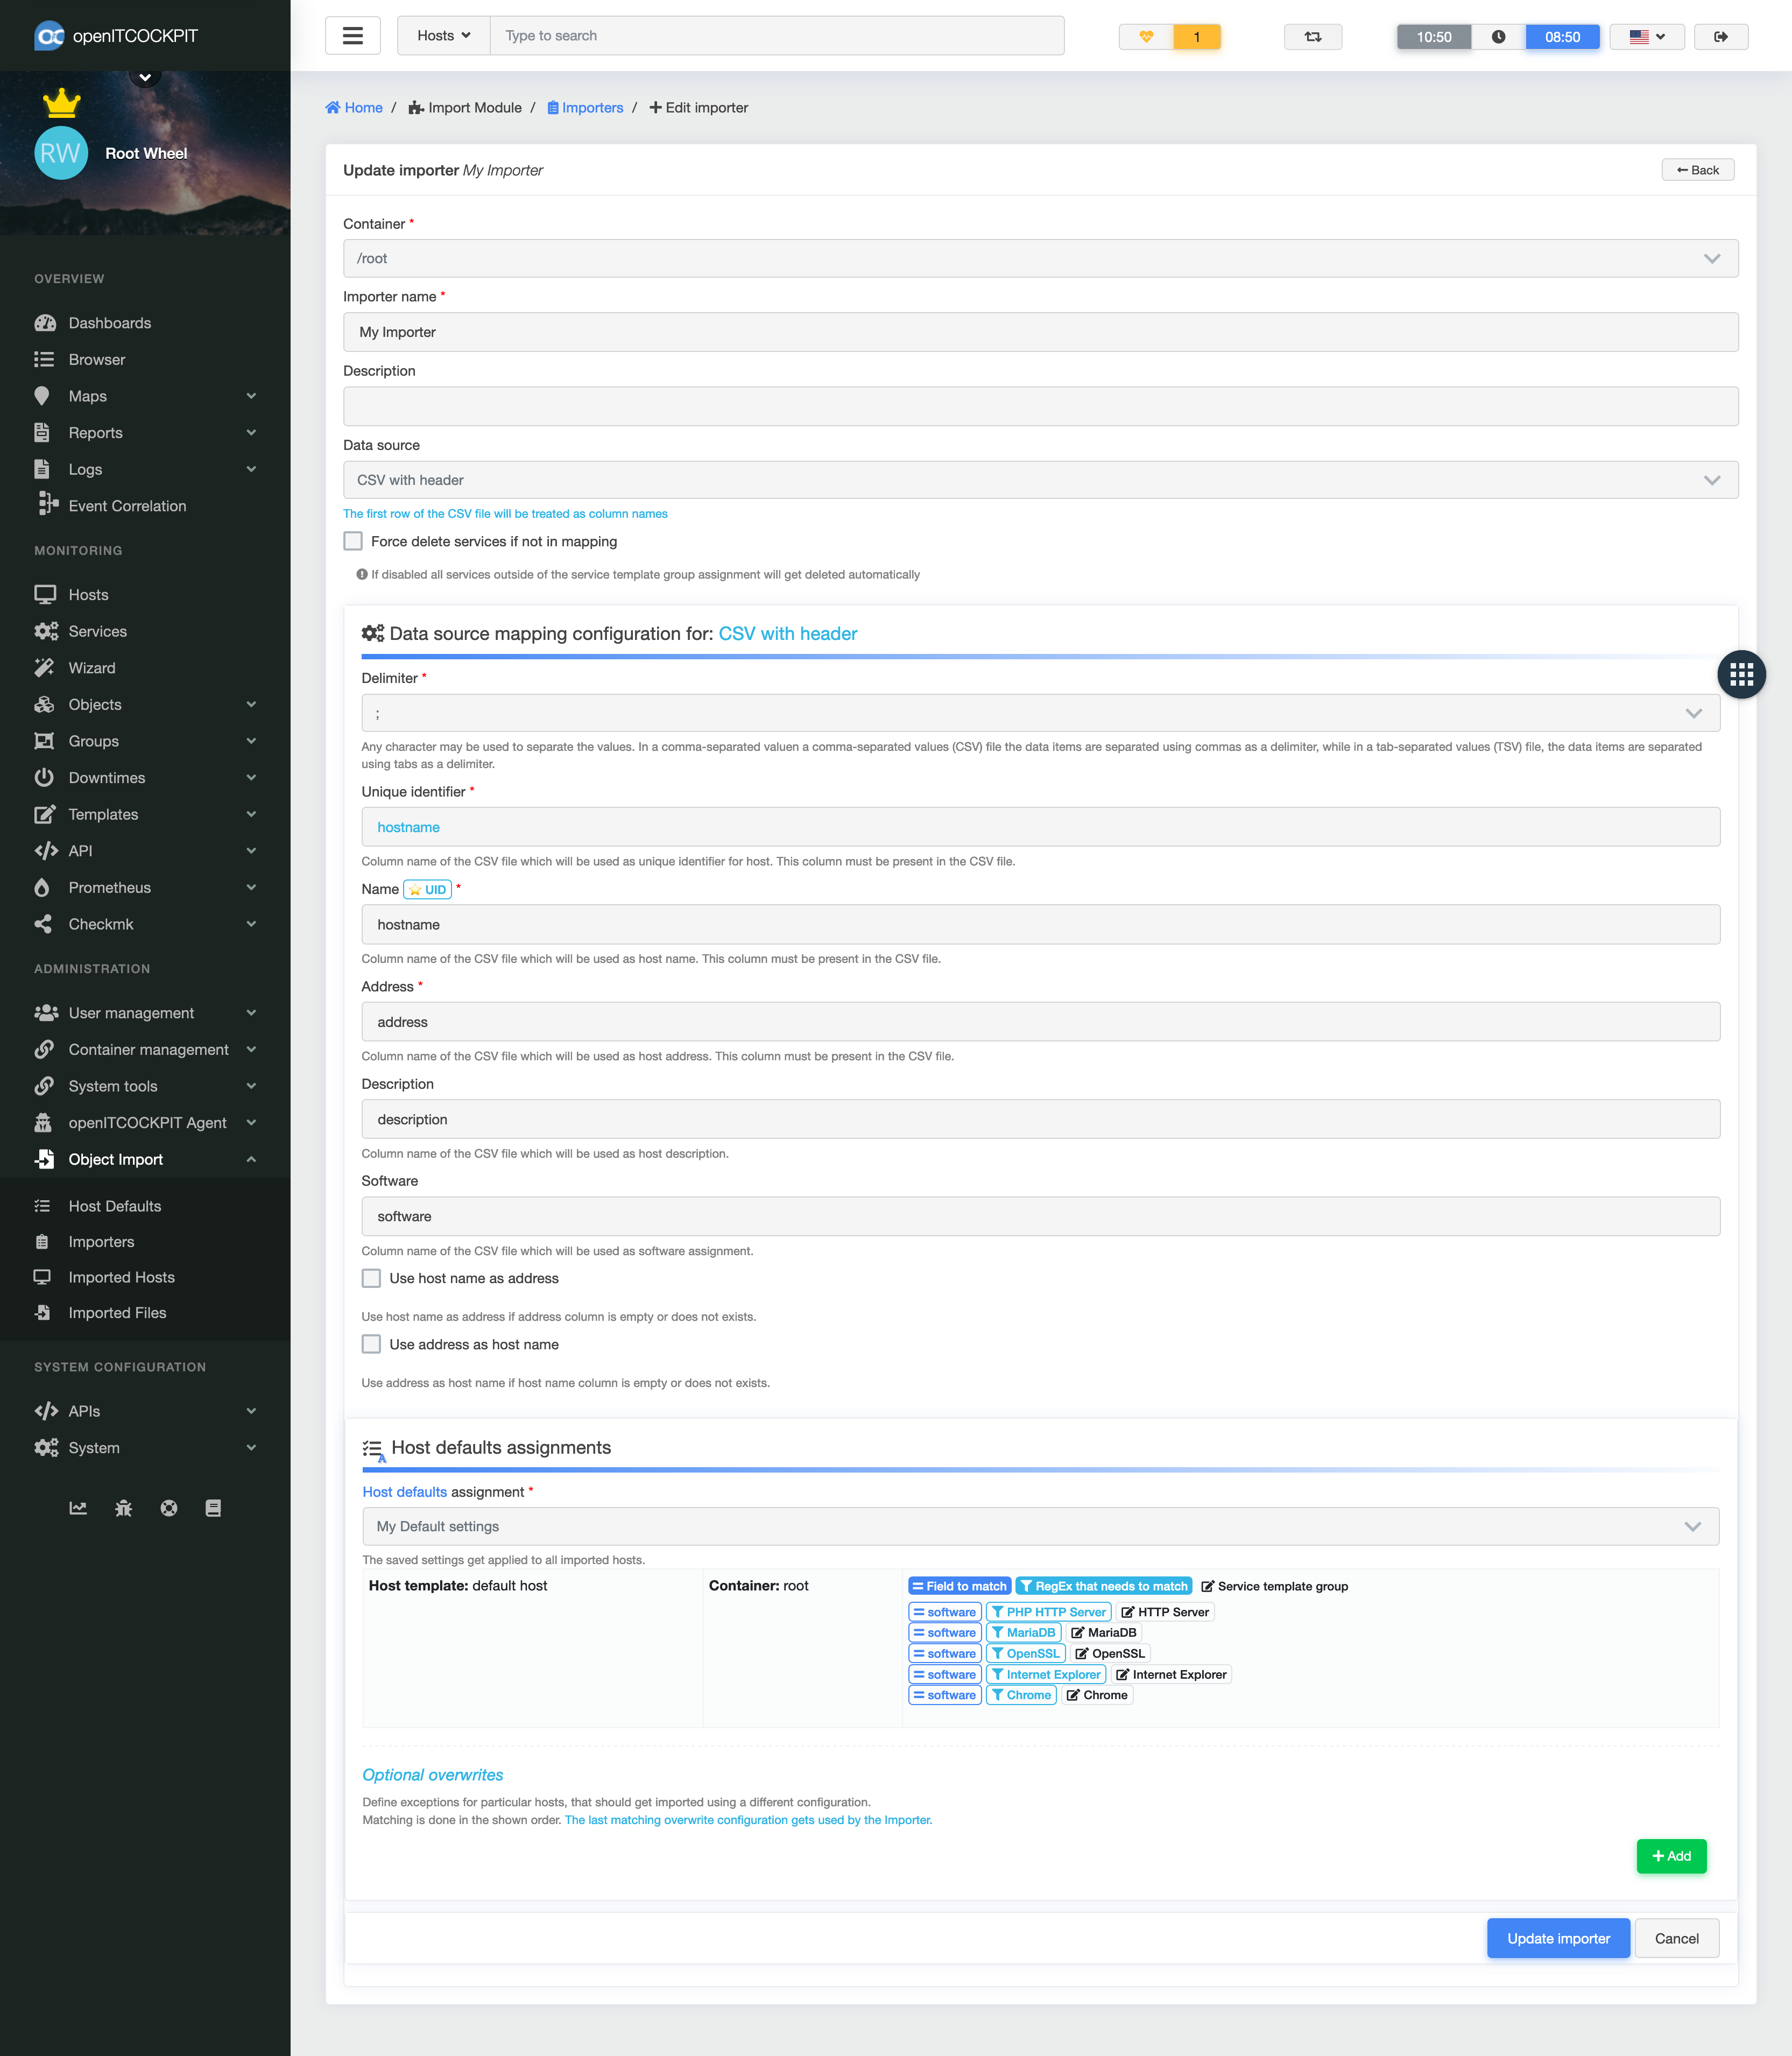
Importer
An importer provides the basis for importing hosts. The data source and the configuration of the data source assignment are defined here. The standard default host settings are required for creating an importer and these must be created before the importer itself is created.
The following data sources are available:
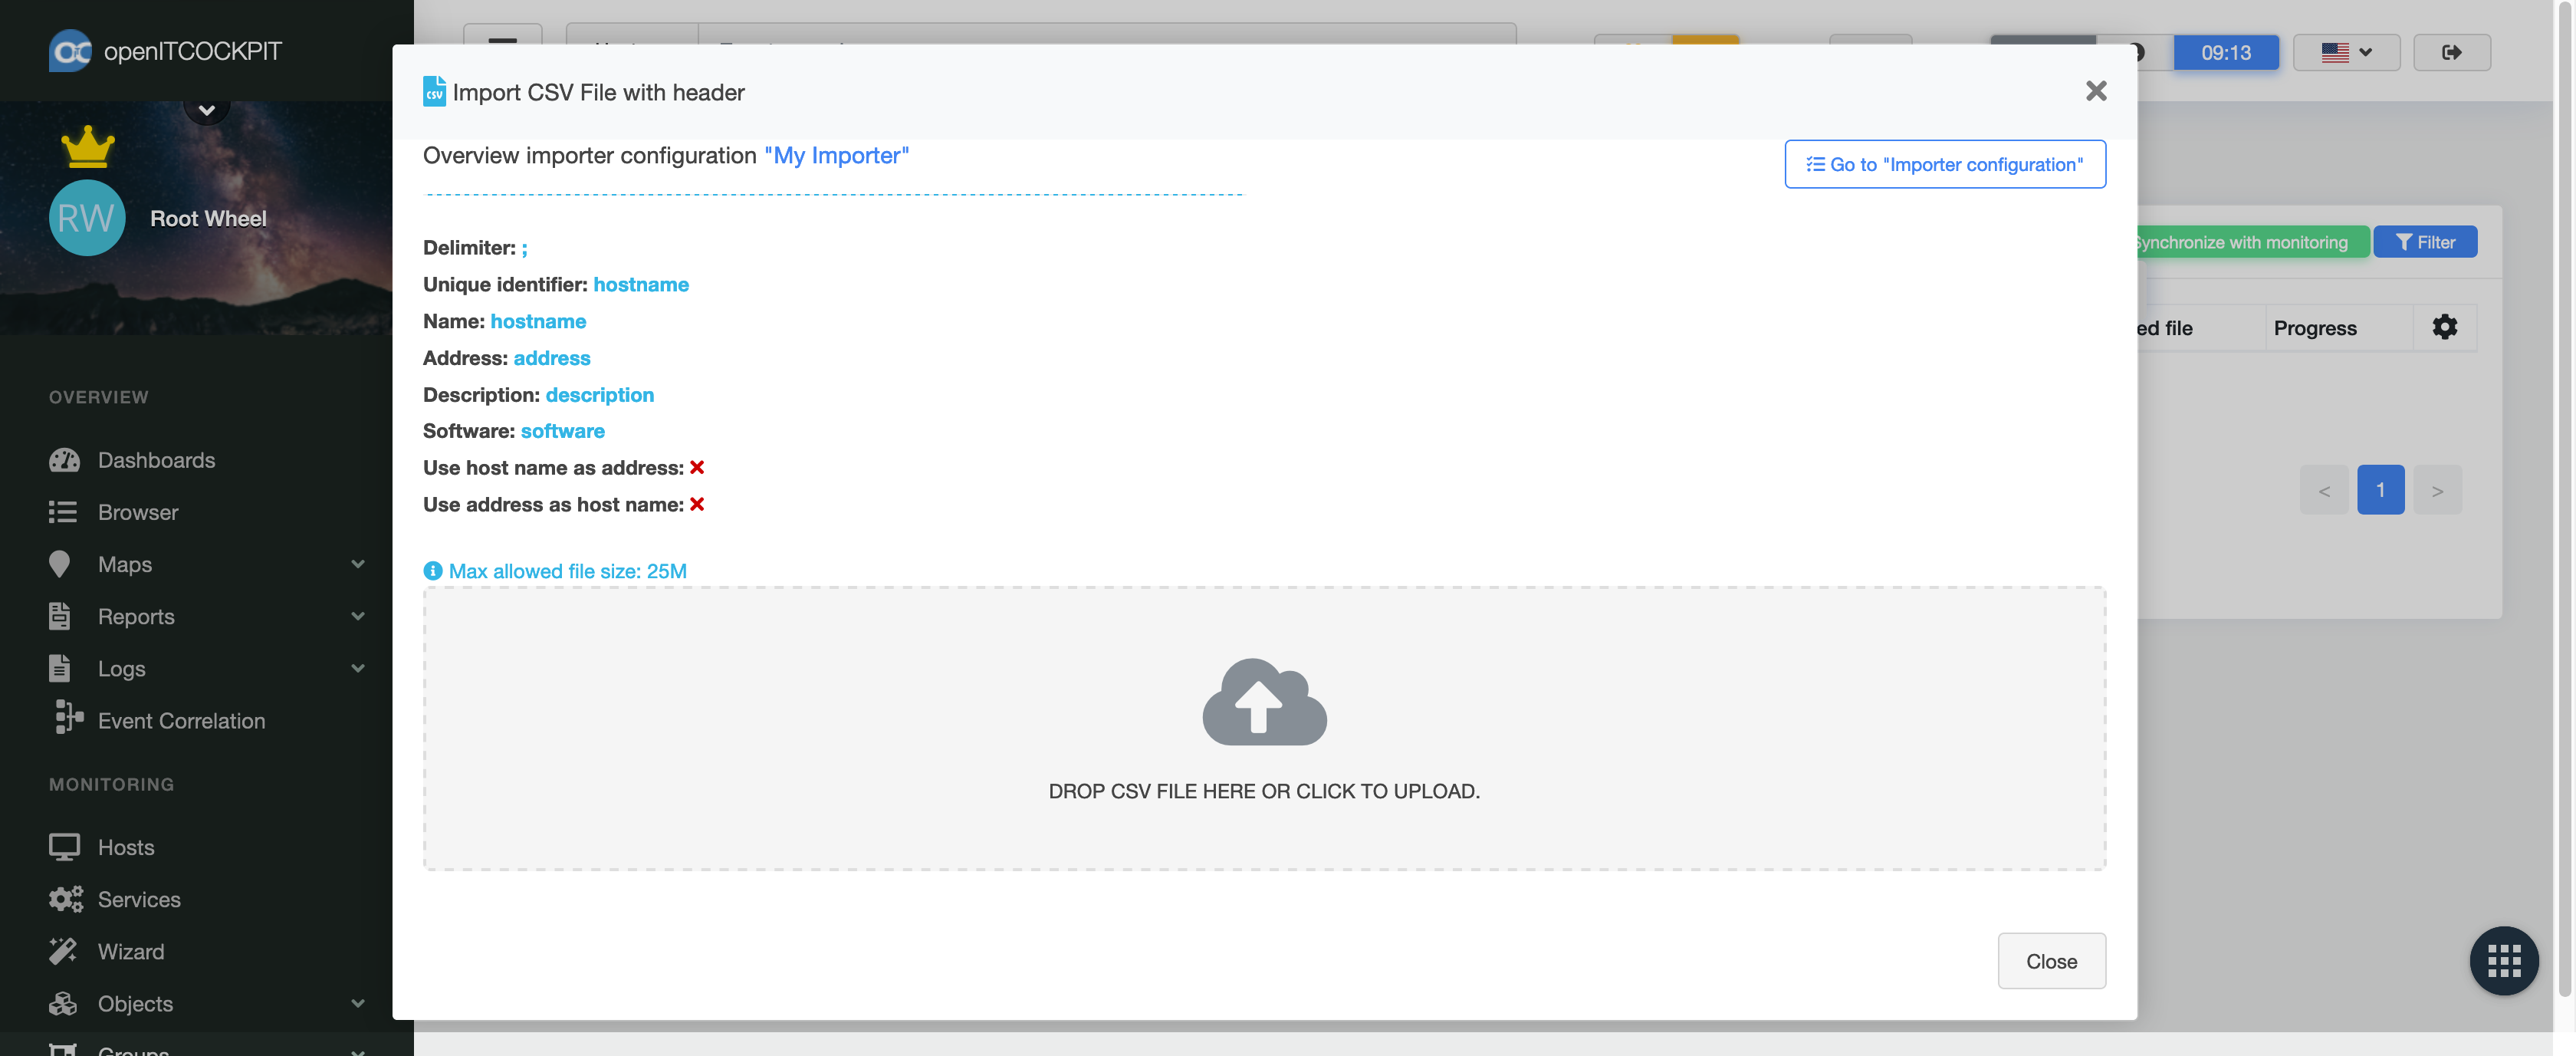
CSV with Header
The CSV file that you want to import must have a header. This means the columns used in the table have their own individual headings. For the import to succeed, the file must have a separator character/delimiter, unique identifier, host name and host address header fields.

CSV without Header
The difference between a CSV file with a header and one without is that the columns in a non-header CSV file do not have headings. For these files you will have to number the columns.

A = 0, B = 1, C = 2, D = 3
Assigning default host settings
The host defaults must be set when the importer is created. This ensures that the imported hosts are assigned default settings.
Imported hosts
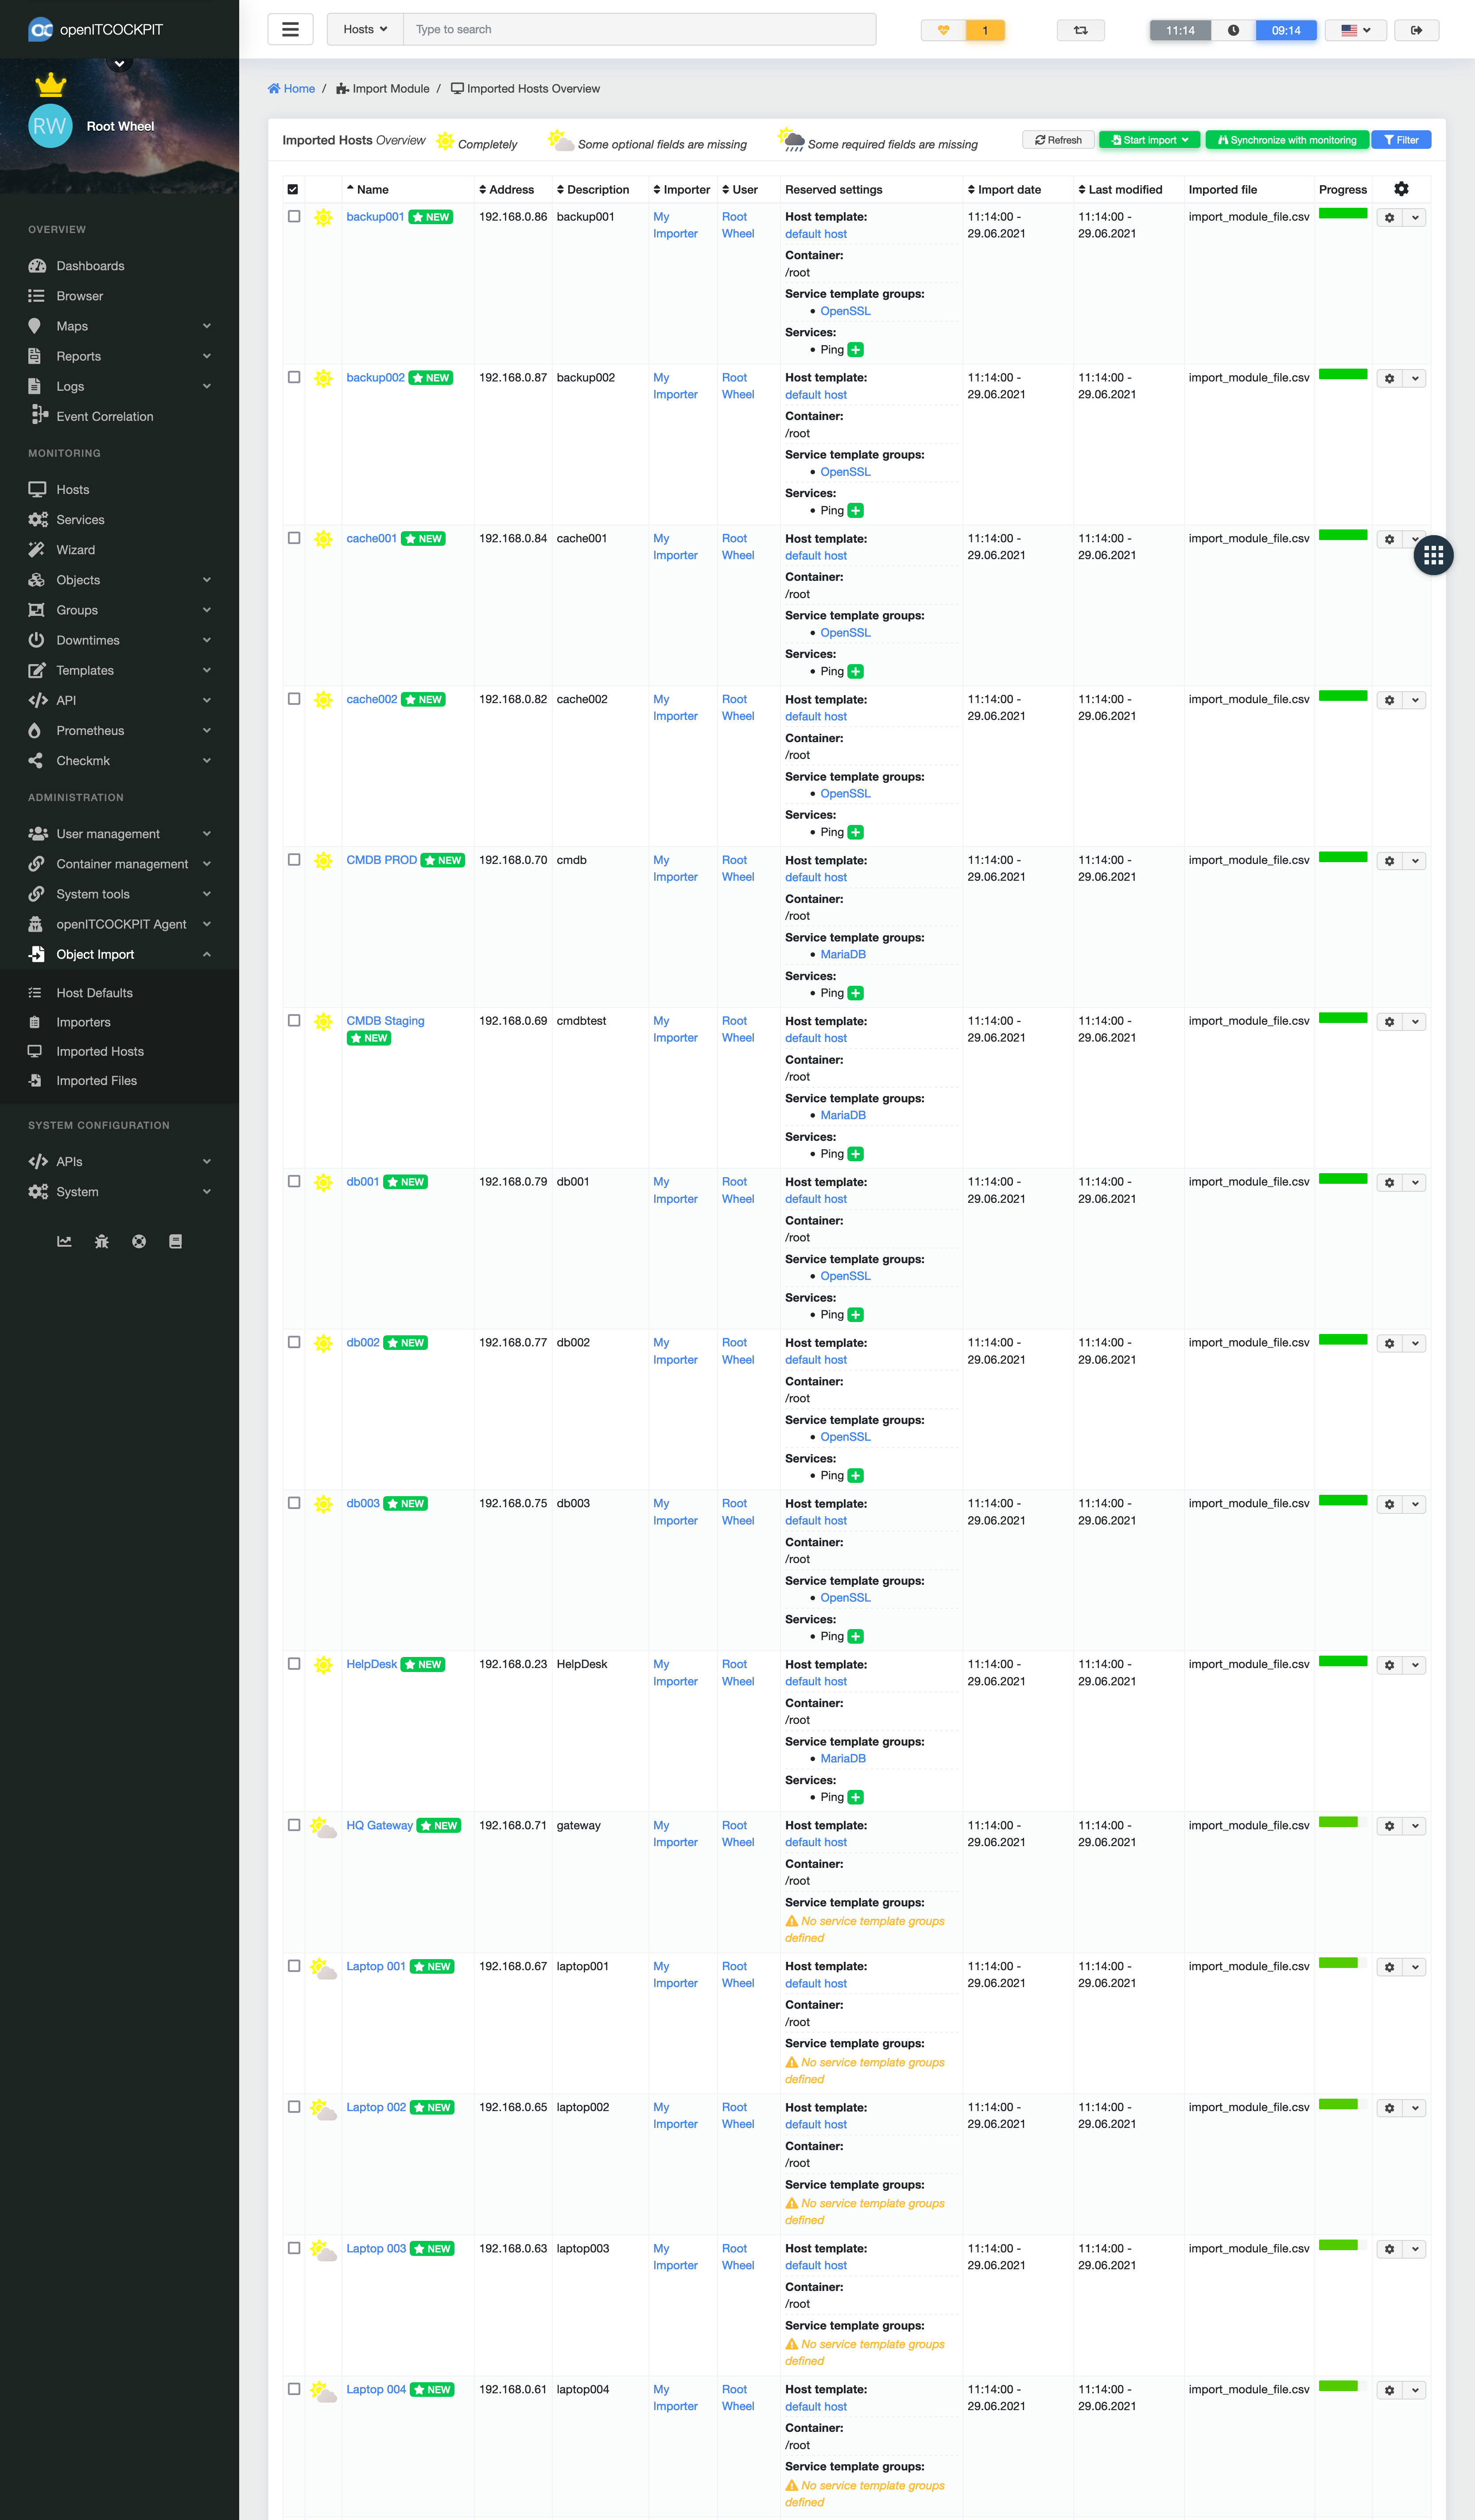
All newly created hosts or hosts already included in the monitoring setup are displayed in the list. All upcoming changes for services, if any, will be displayed accordingly. The completeness of the entries is indicated by a variety of weather symbols. The data can be supplemented at any time by editing the host to be imported. If there are certain hosts that should not be included in your monitoring activities, you can delete these manually. When synchronising with the monitoring schedule, hosts that have all the required fields, including the associated services, will be included in the configuration table. This must now be exported and all configuration objects will be monitored.
All importers available on the system are listed in the upper area under "Start import". After clicking on one of these importers, the appropriate module will open. In the example below, this is a CSV importer.
Hostgroups
Creating a host group
To create a host group, first click on the “New” button in the host group overview.
There you can select a container and enter a name for the new host group.
You will then have two options for adding hosts to the host group.
The first is the targeted creation of individual hosts. To do this, select the corresponding hosts from the "Hosts" list.
The second option is to add hosts via their respective host template. All hosts created using the selected host templates are automatically added to the host group.
You can now save your work and the host group will be created.
| Field | Required | Description |
|---|---|---|
| Container | Container in which the host group is to be created | |
| Name | The name of the host group | |
| Description | The description of the host group | |
| Host group URL | The URL of the host group | |
| Keywords | Tags | |
| Hosts | Hosts to add to the host group | |
| Host templates | The Host templates to add to the host group |
Expanded view
To get to the expanded view for a host group, click on the down arrow next to the gear icon in the host overview. From there, select "Expanded View".
An overview page then appears containing all the hosts for the selected host group. There you have the ability to carry out various actions such as resetting the checking time, creating planned maintenance times, confirming host status or activating / deactivating notifications.
Clicking on the "+" symbol for a host in the list opens an expanded view containing the host's services and overall status.
If the SLA module is installed, an additional tab called "SLA Hosts Status" is displayed, which shows an overview page that displays all hosts in the host group with their current SLA availability status in the form of a heat map.
Service groups
Creating service groups
As with host groups, service groups are created using the "New" button in the service group overview.
There you can select a container and assign a name to the service group.
You will now have two options to add services to a service group:
The first is the targeted addition of individual services. To do this, select the corresponding hosts from the " Services" list.
The second option is to add services via your service template. All services created from the selected service templates are automatically added to the service group.
You can now save your work and the service group will be created.
| Field | Required | Description |
|---|---|---|
| Container | Container in which the service group is to be created | |
| Name | The name of the service group | |
| Description | A description of the service group | |
| Service group URL | The URL for the service group | |
| Keywords | Tags | |
| Services | Services to be added to the host group | |
| Service templates | The Servicevorlagen to be added to the service group |
Expanded view
To see an expanded view of a service group, click on the down arrow next to the gear icon in the service overview. From there, select "Expanded View".
An overview page then appears containing all the hosts for the selected host group.
There you will have the ability to carry out various actions such as resetting the checking time, creating planned maintenance times, confirming service status or activating / deactivating notifications.
Parent-child relationships
The monitoring engine is able to determine if a host is in a DOWN or UNREACHABLE state. These statuses are very different and can help to quickly determine the (network) problem.
Defining parent-child relationships
In order for the monitoring engine to be able to distinguish between UNAVAILABLE and UNREACHABLE, how the hosts are
connected to each other must be defined. To do this, the path that the data packets take from the monitoring engine must
be tracked. Each switch, router or server that the data packet passes through is referred to as a "hop". And each "hop"
must be defined as a parent-child relationship. Defining a parent-child relationship in openITCOCKPIT is very easy to
do. Assuming that all hosts (switches, routers, servers, etc.) that are on the way to the target host have already been
included in the monitoring, the relationship is entered in the host configuration. To do this, edit your desired host
and enter the corresponding parent host in the Parent Host field.

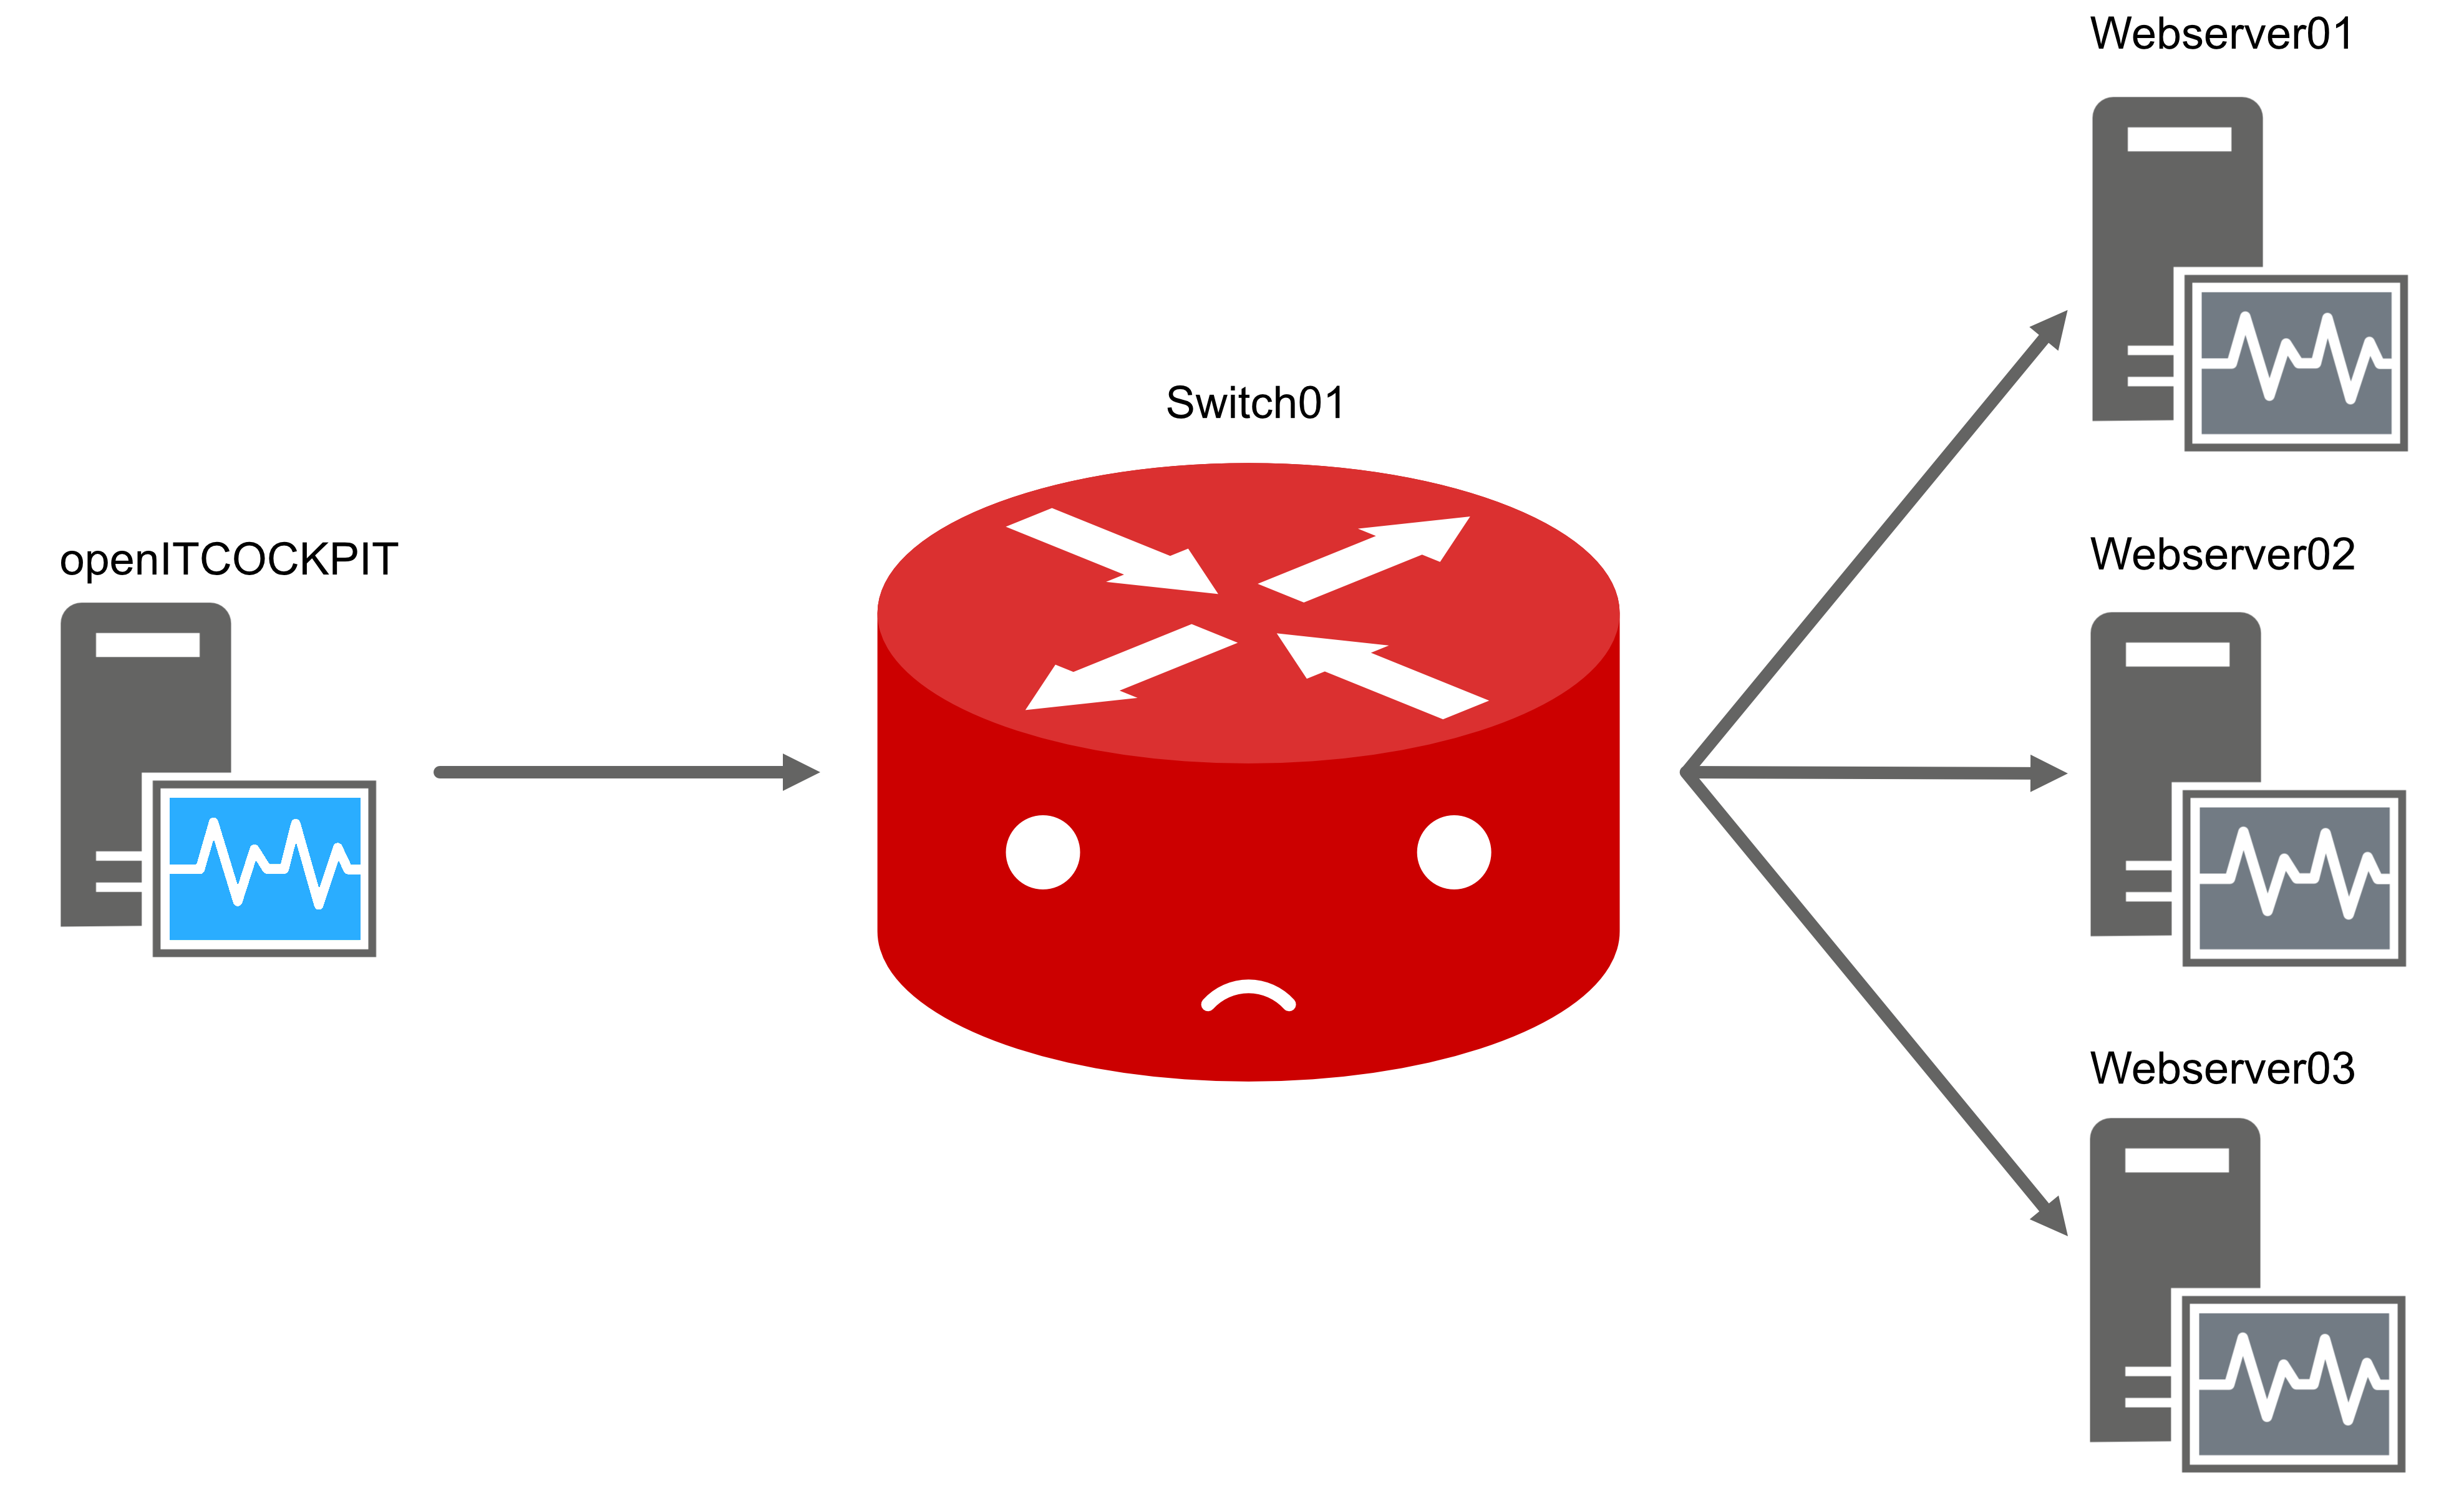
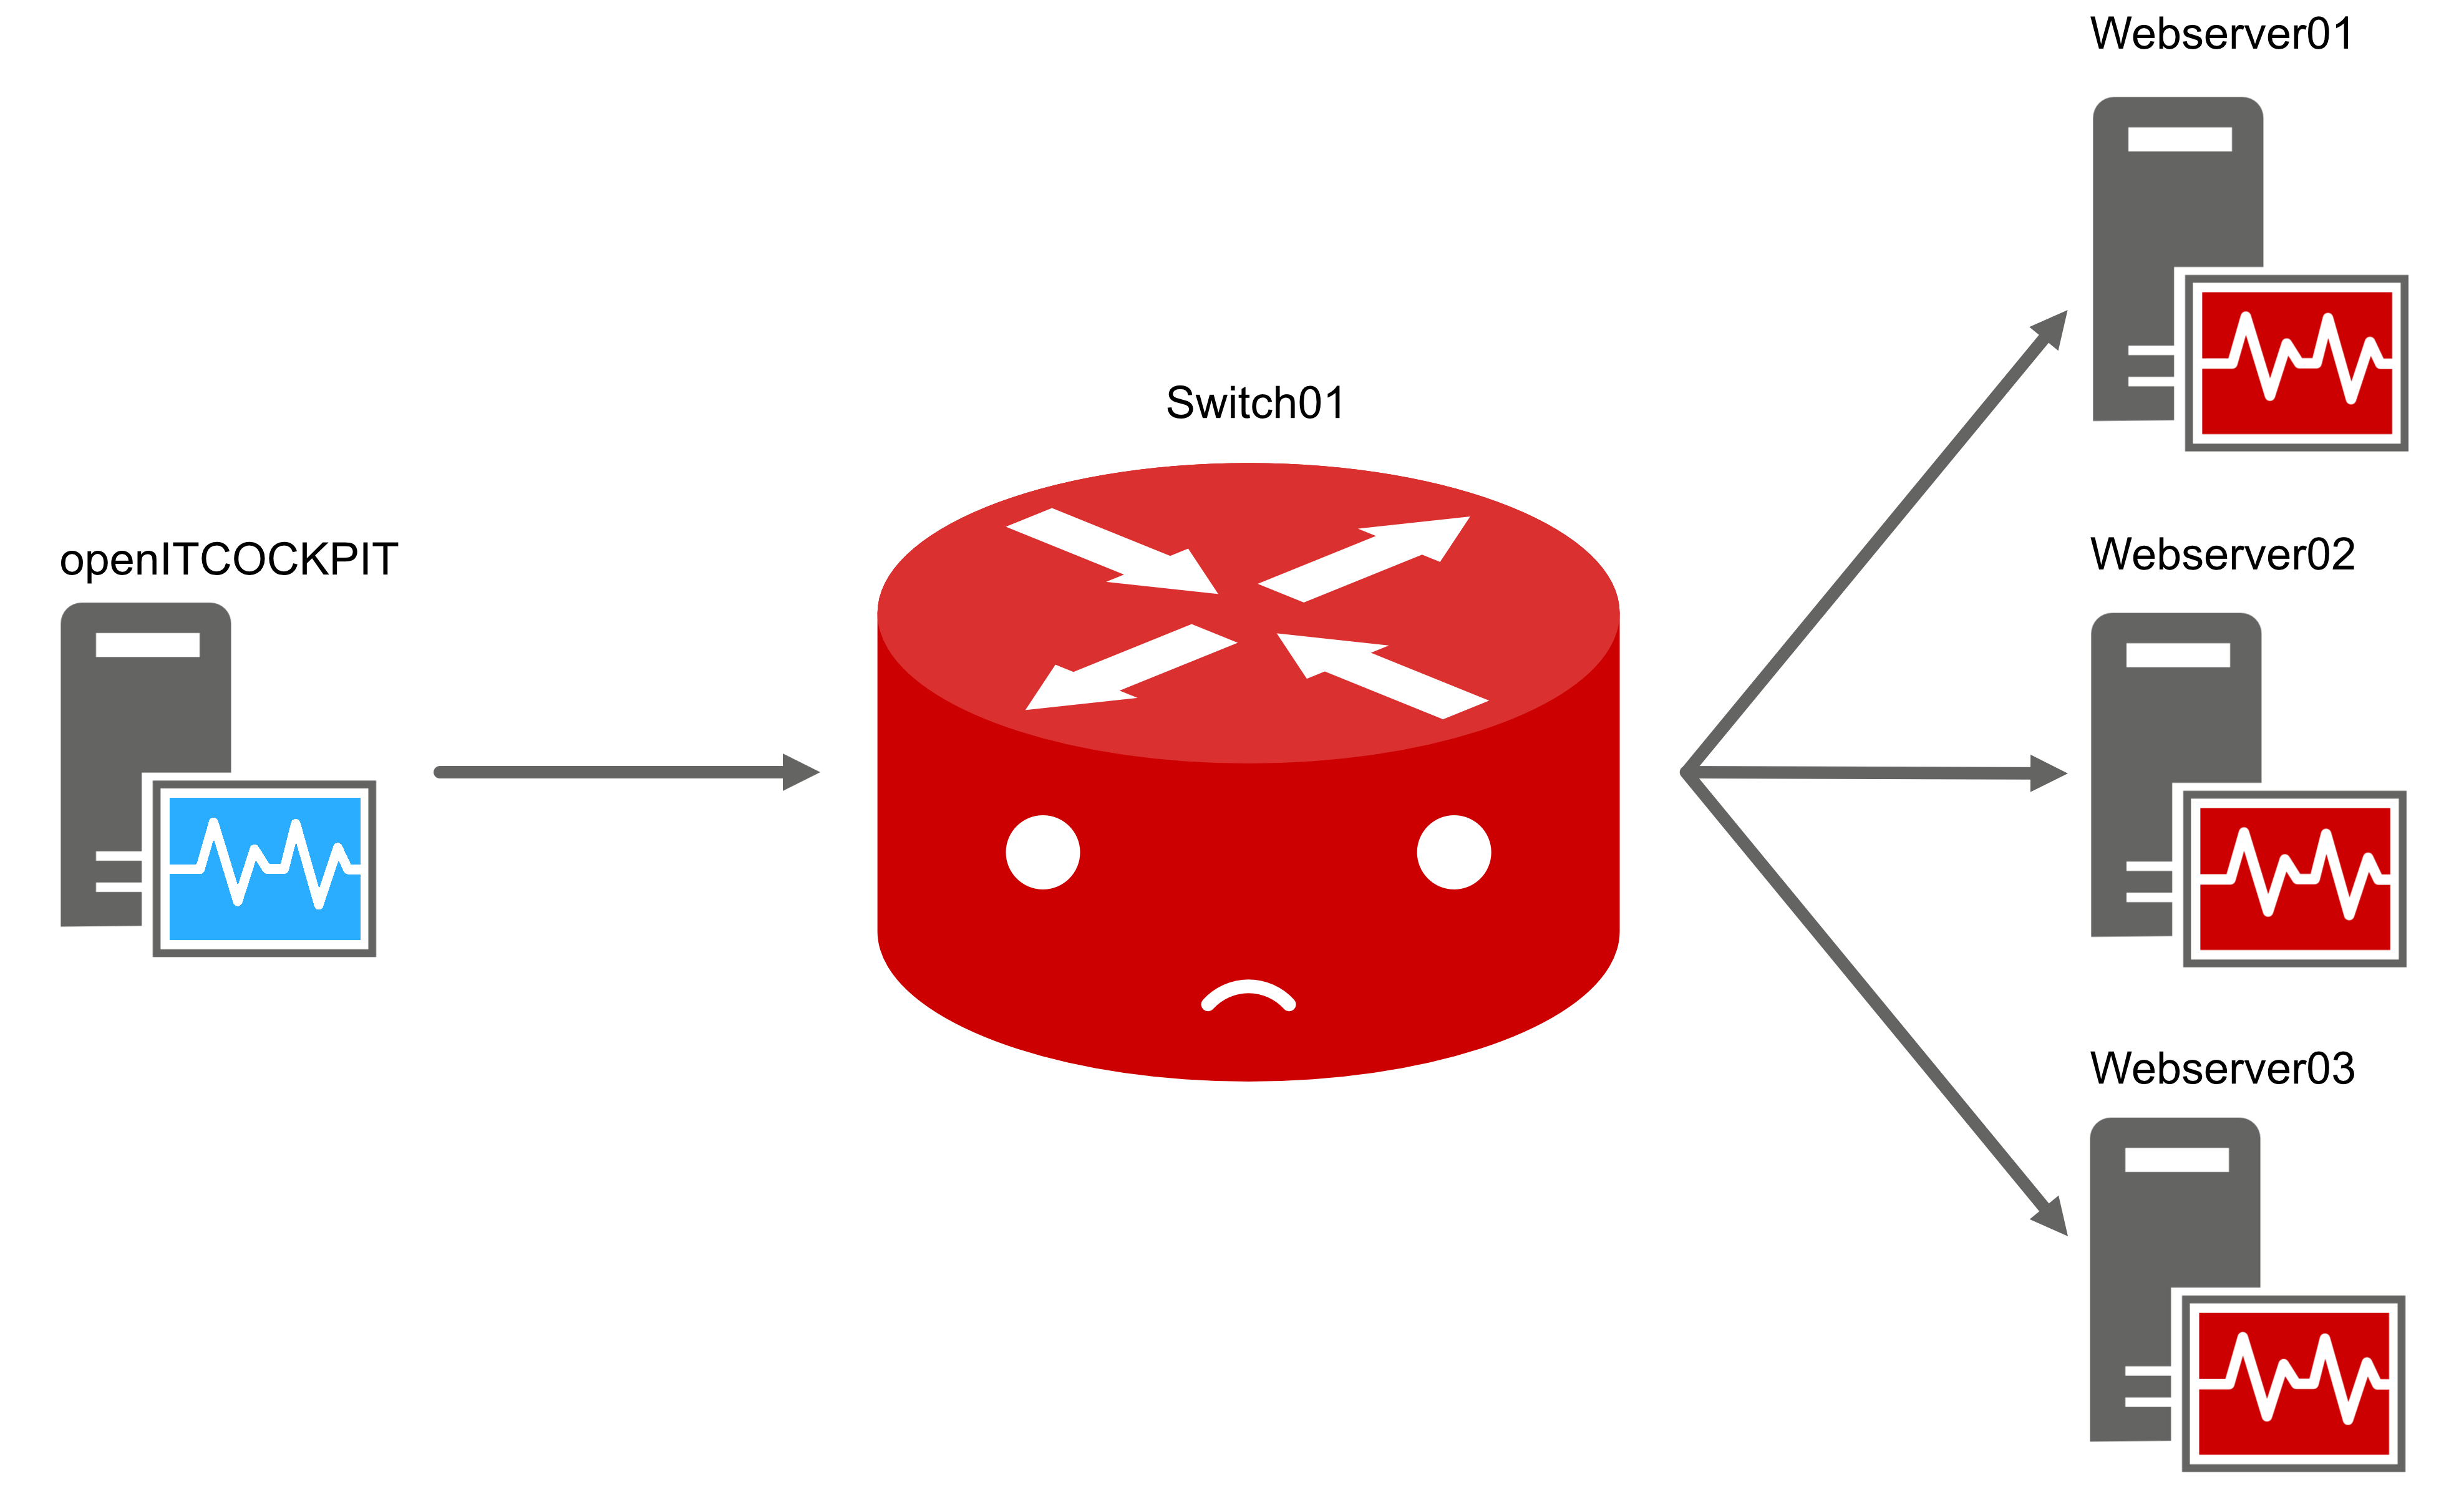
Example:
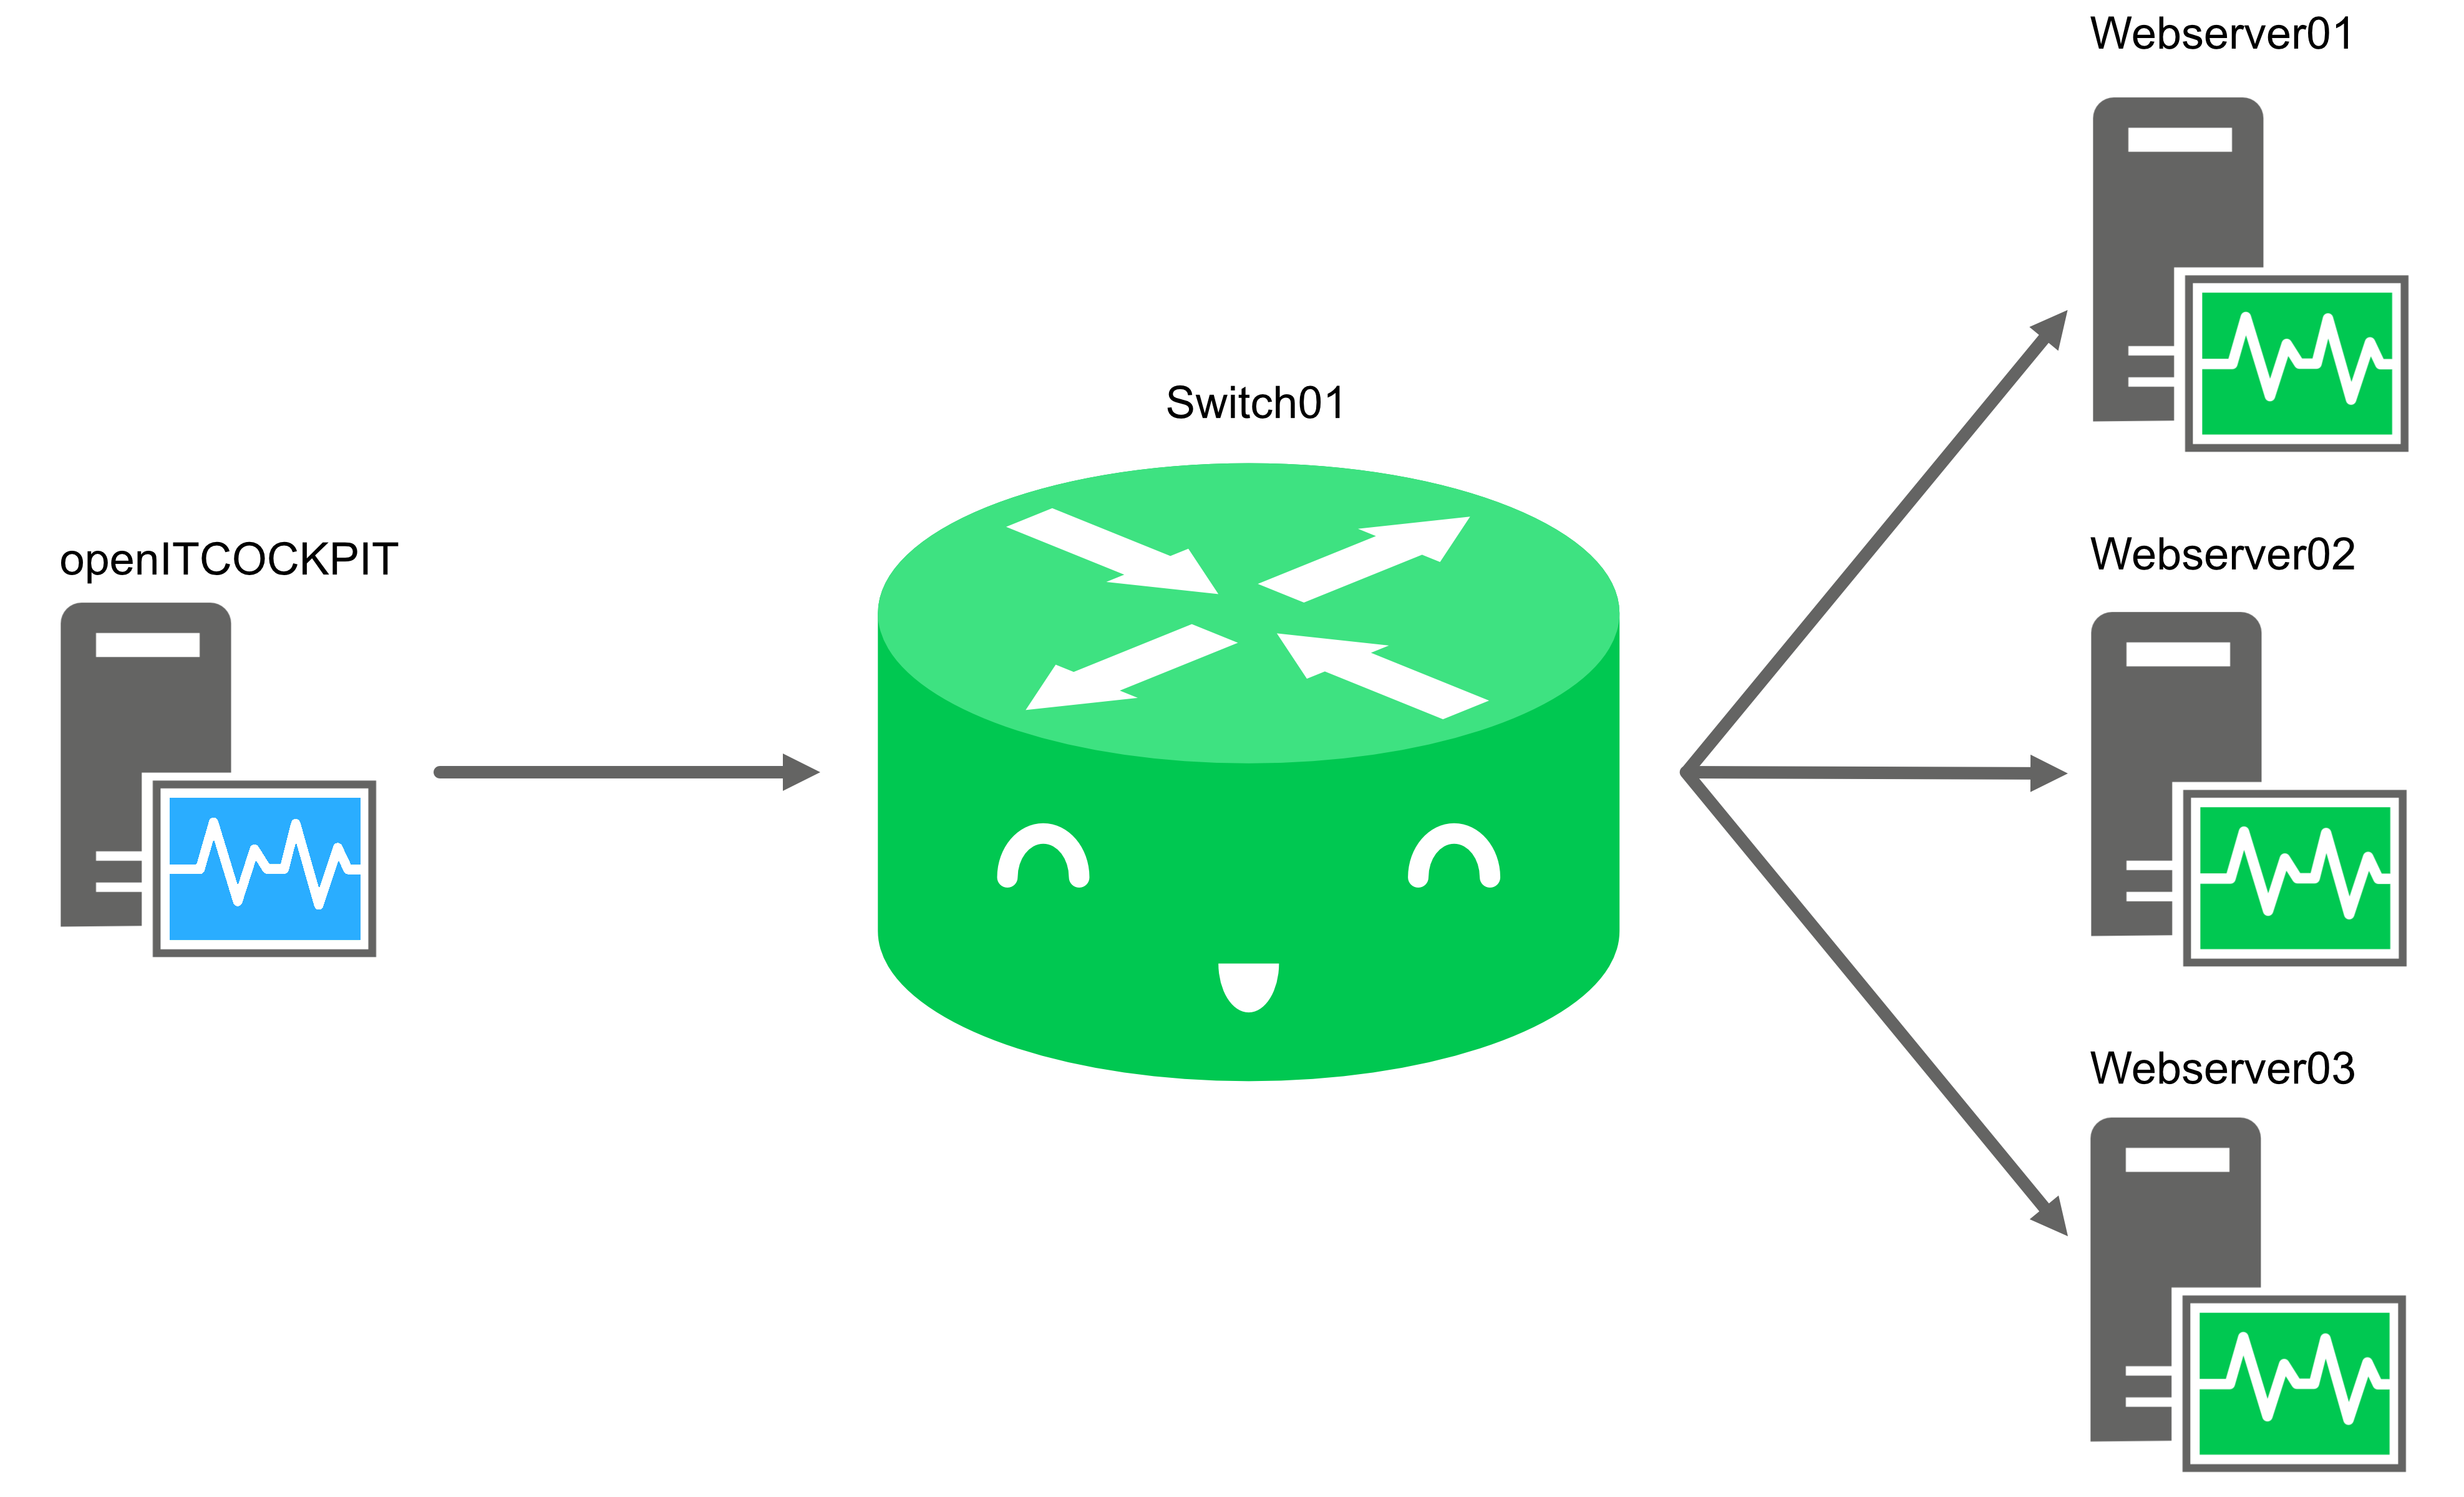
The web servers 01-03 are located behind a switch. Should the switch fail, this does not mean that the web servers have also failed. Without a parent-child relationship, all web servers would now be in an UNAVAILABLE state as the path to these hosts is blocked by the failed switch (UNAVAILABLE).
Without a parent-child relationship:
With a parent-child relationship, the web servers would now be displayed as UNREACHABLE because the monitoring engine cannot reach the web servers. The switch, however, would remain in the UNAVAILABLE state.
With a parent-child relationship: