Mobile Webseite EE
End of Life
The openITCOCKPIT mobile website in its current form is marked as deprecated starting with version 5.6.1. Please use the Mobile App for iOS and Android devices.
The End of Life is planned for version 5.7.0. After that, there will be a new version of the mobile website, which will share its codebase with the Mobile App.
Installation
The Mobile Website is designed to run on its own server.
To create an instance of the Mobile Website you need an openITCOCKPIT Enterprise License, which entitles you to install the Mobile Website. Please contact us via our sales contact form
Once the requirements are met, you will need Docker on your new system.
Authentication and downloading the image
Before you can download the Docker image, you must register with our Docker Registry:
docker login https://cr.openitcockpit.io
The command prompts you to enter a username as well as a password. As username please enter the e-mail address which is registered with your openITCOCKPIT Enterprise license key. As password enter your license key.
After successful authentication you can download the Docker image:
docker pull cr.openitcockpit.io/openitcockpit-mobile
Starting the Docker container
You can start the container with the following command:
docker run --rm -it -p 4443:443 -p 8898:80 --name mobile cr.openitcockpit.io/openitcockpit-mobile
After that you can open the page with your mobile device:
https://<hostname oder IP adresse>:4443
Known Problems
Info
Due to API adjustments, version 1.7 of the mobile website requires at least openITCOCKPIT version 4.8.1 as backend.
Usage
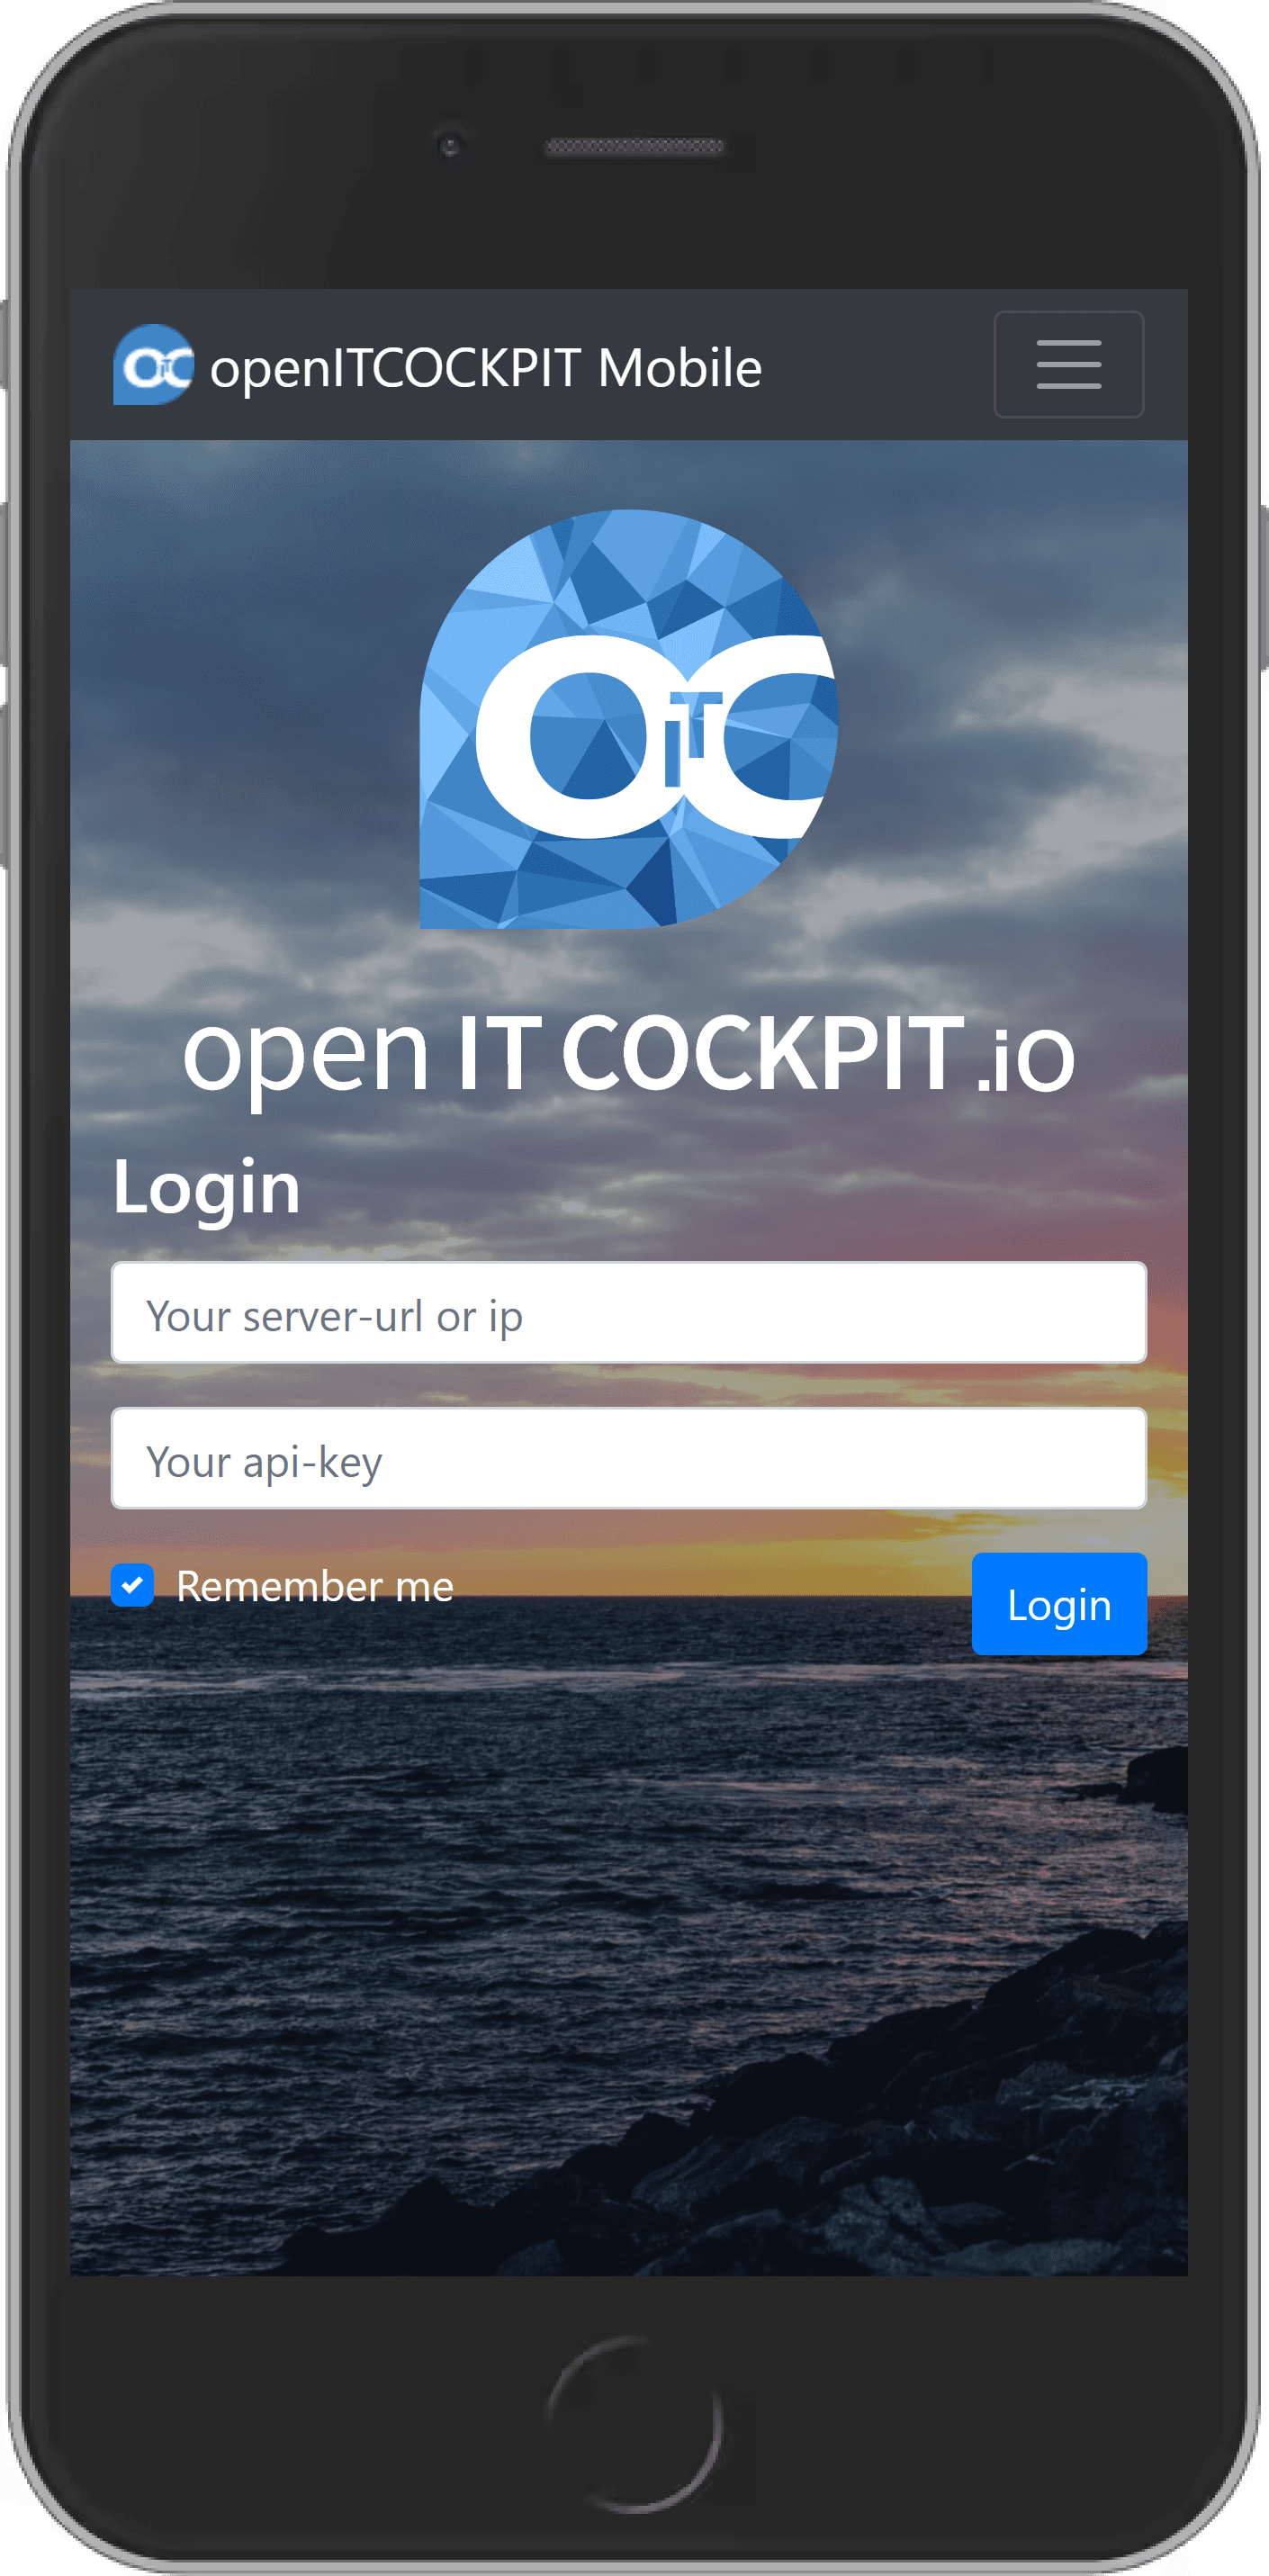
Login
After the successful installation you are able to open the website with your smartphone or tablet. You will be redirected to the login page.
You are now being asked to enter the server URL or IP-Address of your openITCOCKPIT System in the field
Your server-url or ip
API Key creation
To be able to log in into the mobile website it is required to create an API key first.
For easier transfer of the API key to the mobile device you can scan the QR-Code which is displayed in the API key
creation overlay in openITCOCKPIT. Copy the displayed key and paste it in the field Your api-key.
After the successful login you will be redirected to the dashboard.
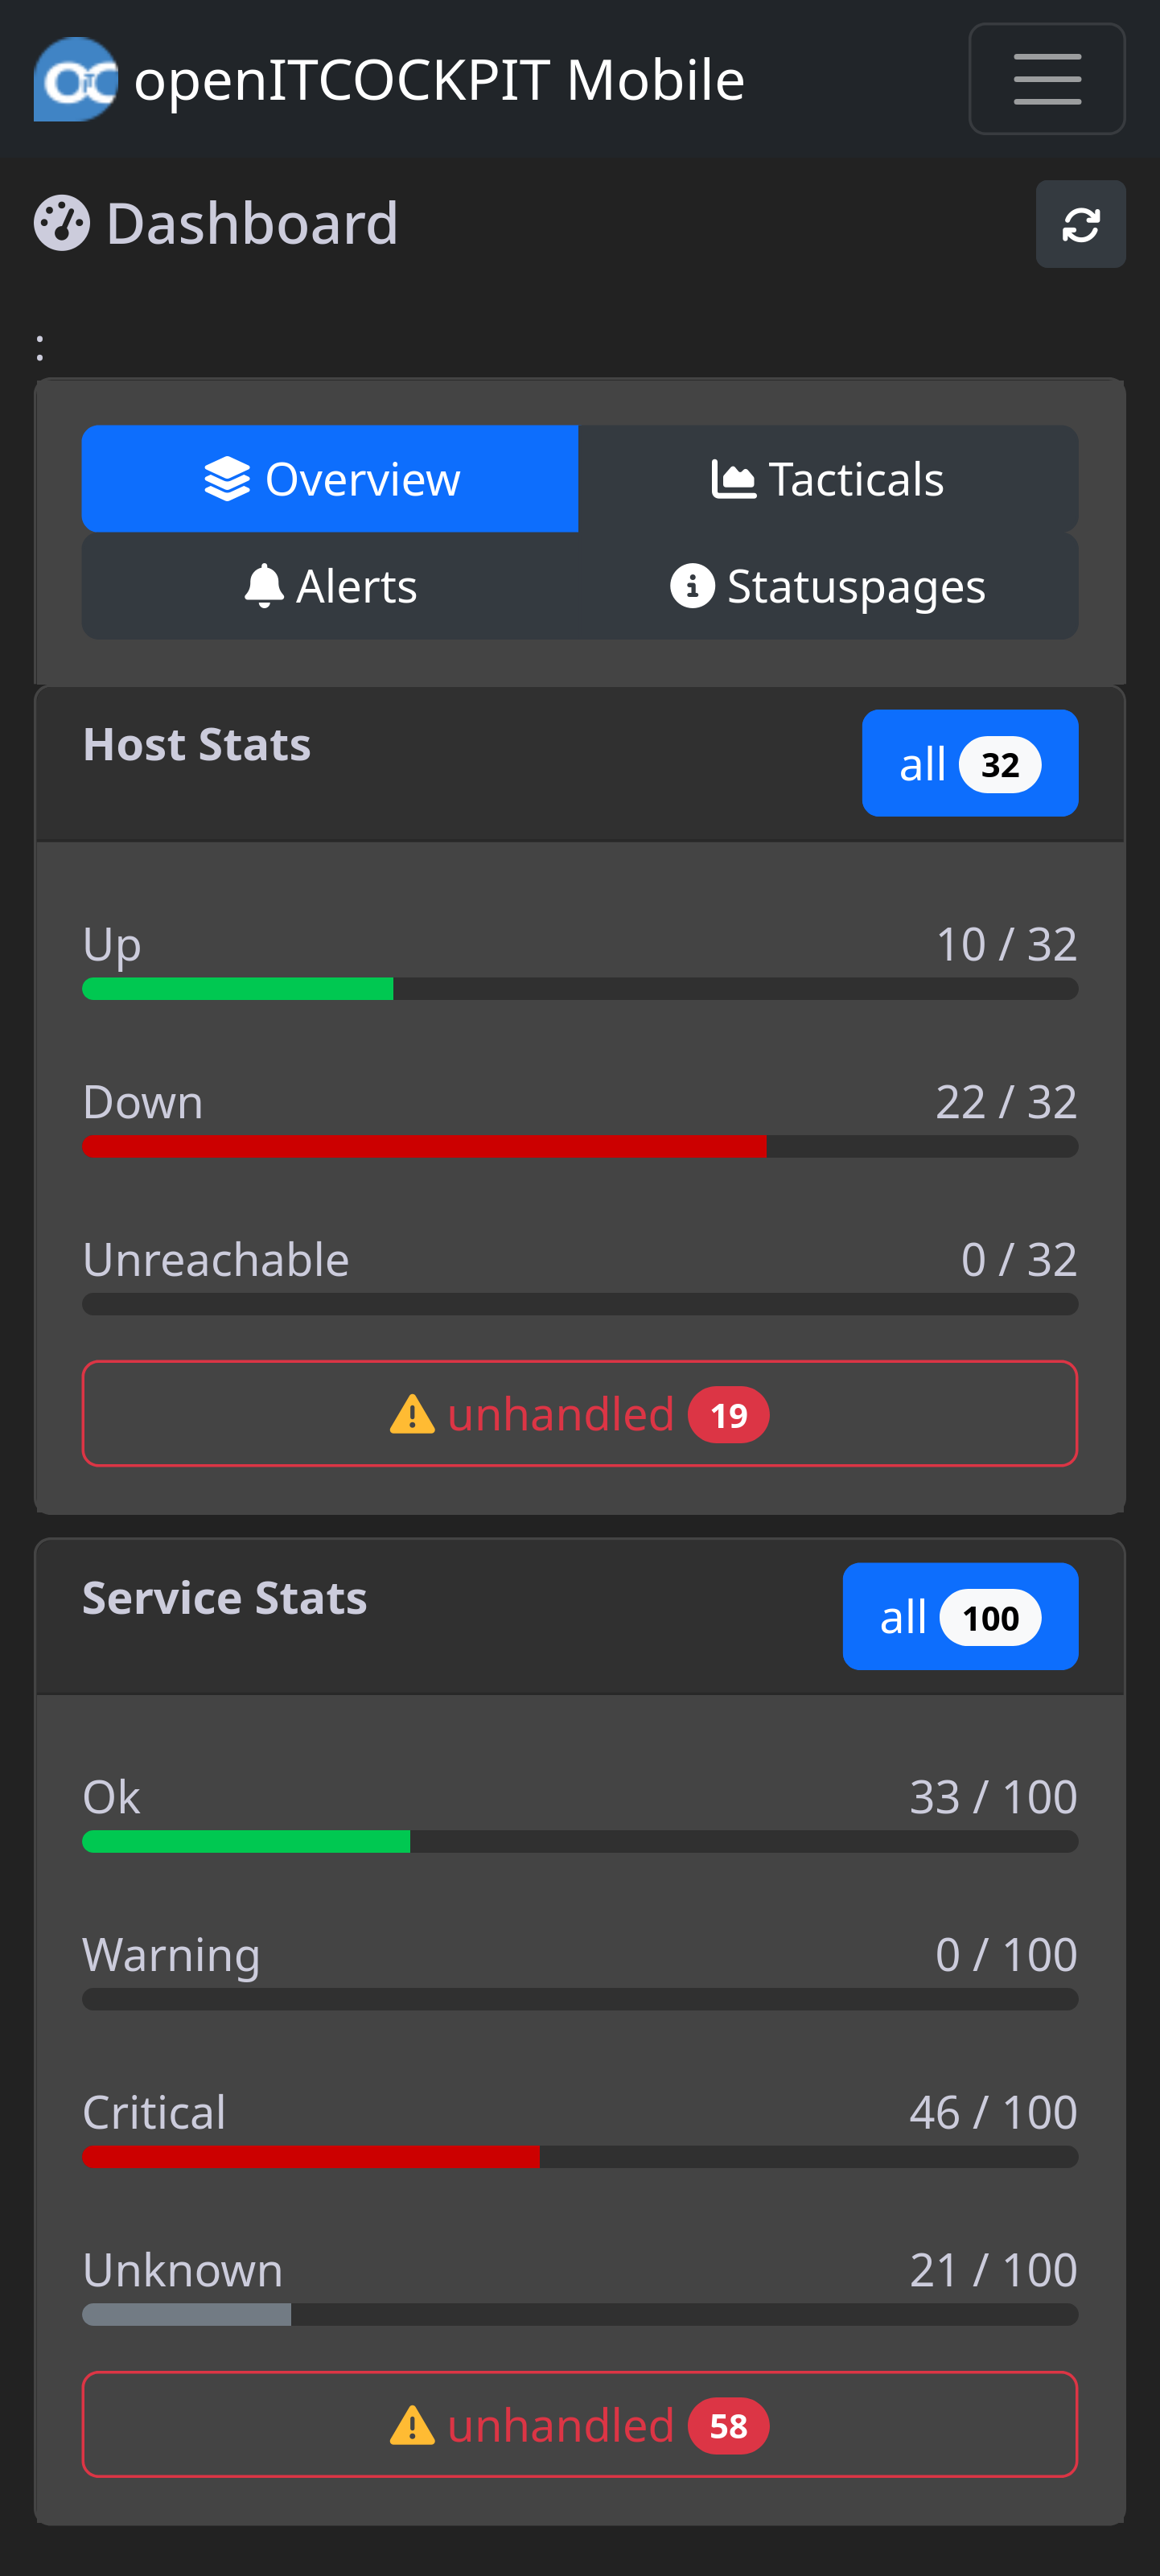
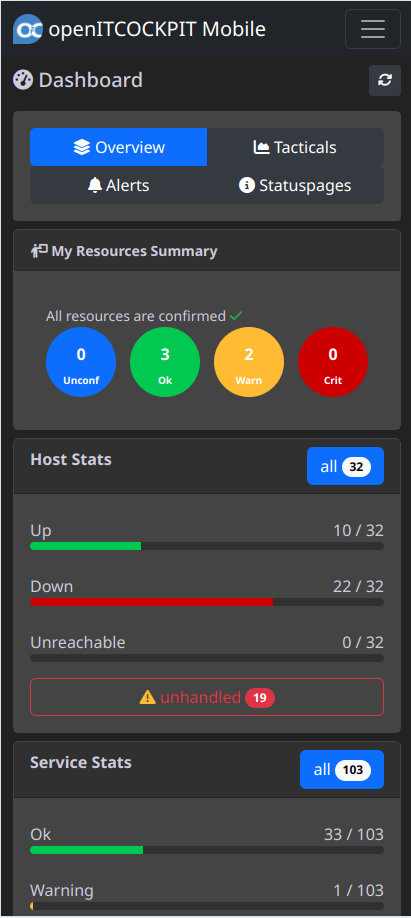
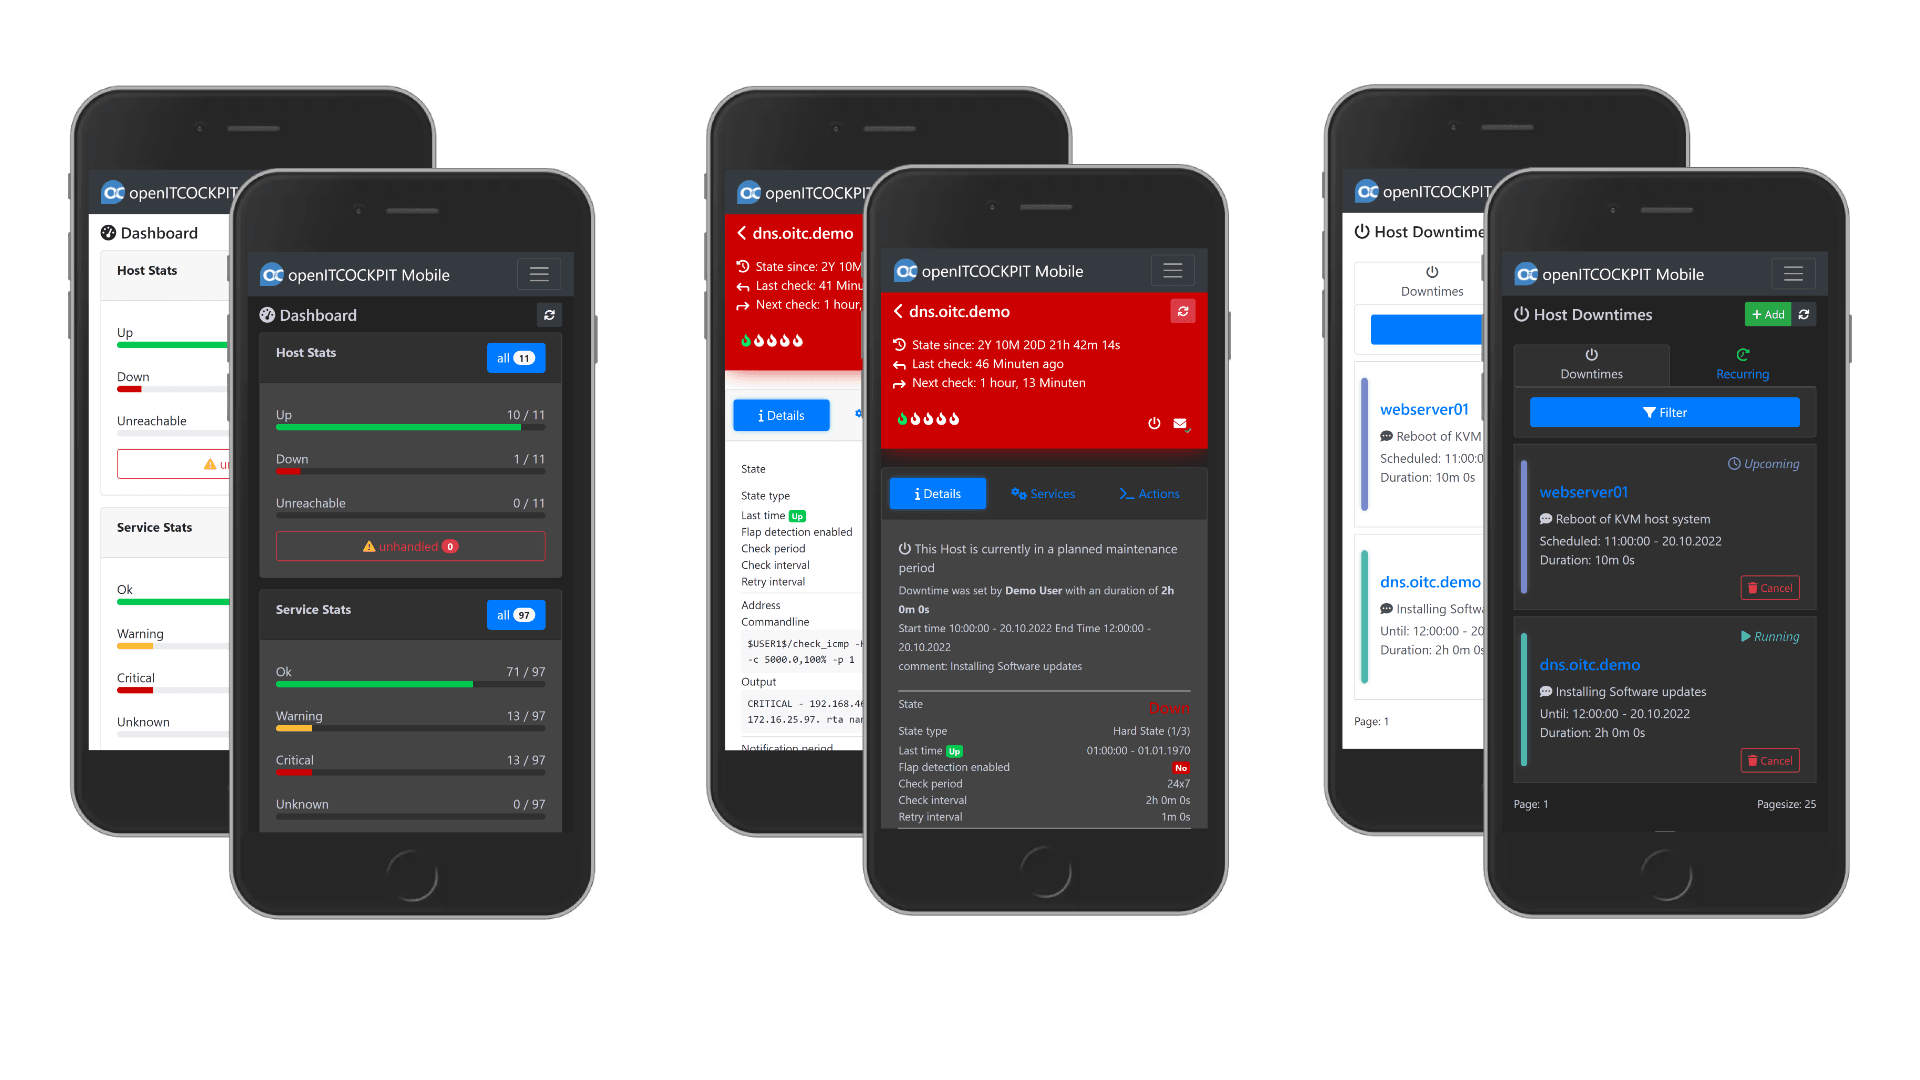
Dashboard
 |
| 
The dashboard enables a quick overview of the condition of your infrastructure.
With any element that is displayed on the dashboard pages, it can be deepened by clicking on the corresponding detail pages.
On each side that can be deepened on the top left there is a back sign (<), which can be returned to the dashboard, this can also be done over several recesses.
Overview
The overview shows the number of hosts and services that fall into the respective status. Untreated hosts and services are displayed in their respective columns. With a click on the respective status, you can get to the accordingly filtered host or service list.
Resource summary overview widget *
If the user has a resource summary overview widget in his openITCOCKPIT Server Dashboard, this is also displayed on this page - even before the overview. With click on the entries - larger 0 - it can be deepened to the corresponding resources.
Info
The resource overview widget only appears on the mobile dashboard overview, even if it is also available in the OpenitCockpit Server Dashboard.
Taktical Overviews *
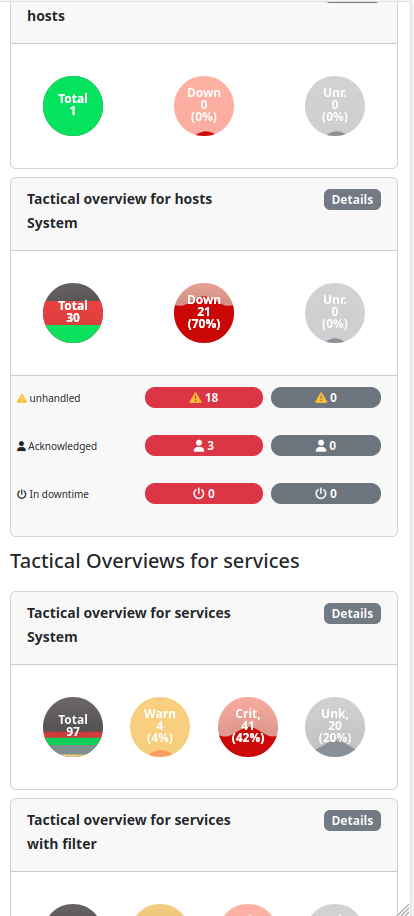
Info
Only he tactical overviews , which are configured in the User's openITCOCKPIT Server Dashboard, will be displayed here.
Among the tactical overviews, the tactical overviews configured in the openITCOCKPIT-Backend are displayed. With click on the statusicons - larger 0 - it can be deepened to the corresponding list (hosts, services), the same applies to the details buttons. If there are no configured in the server dashboard, then no one is displayed here!
Alerts (Notifications)
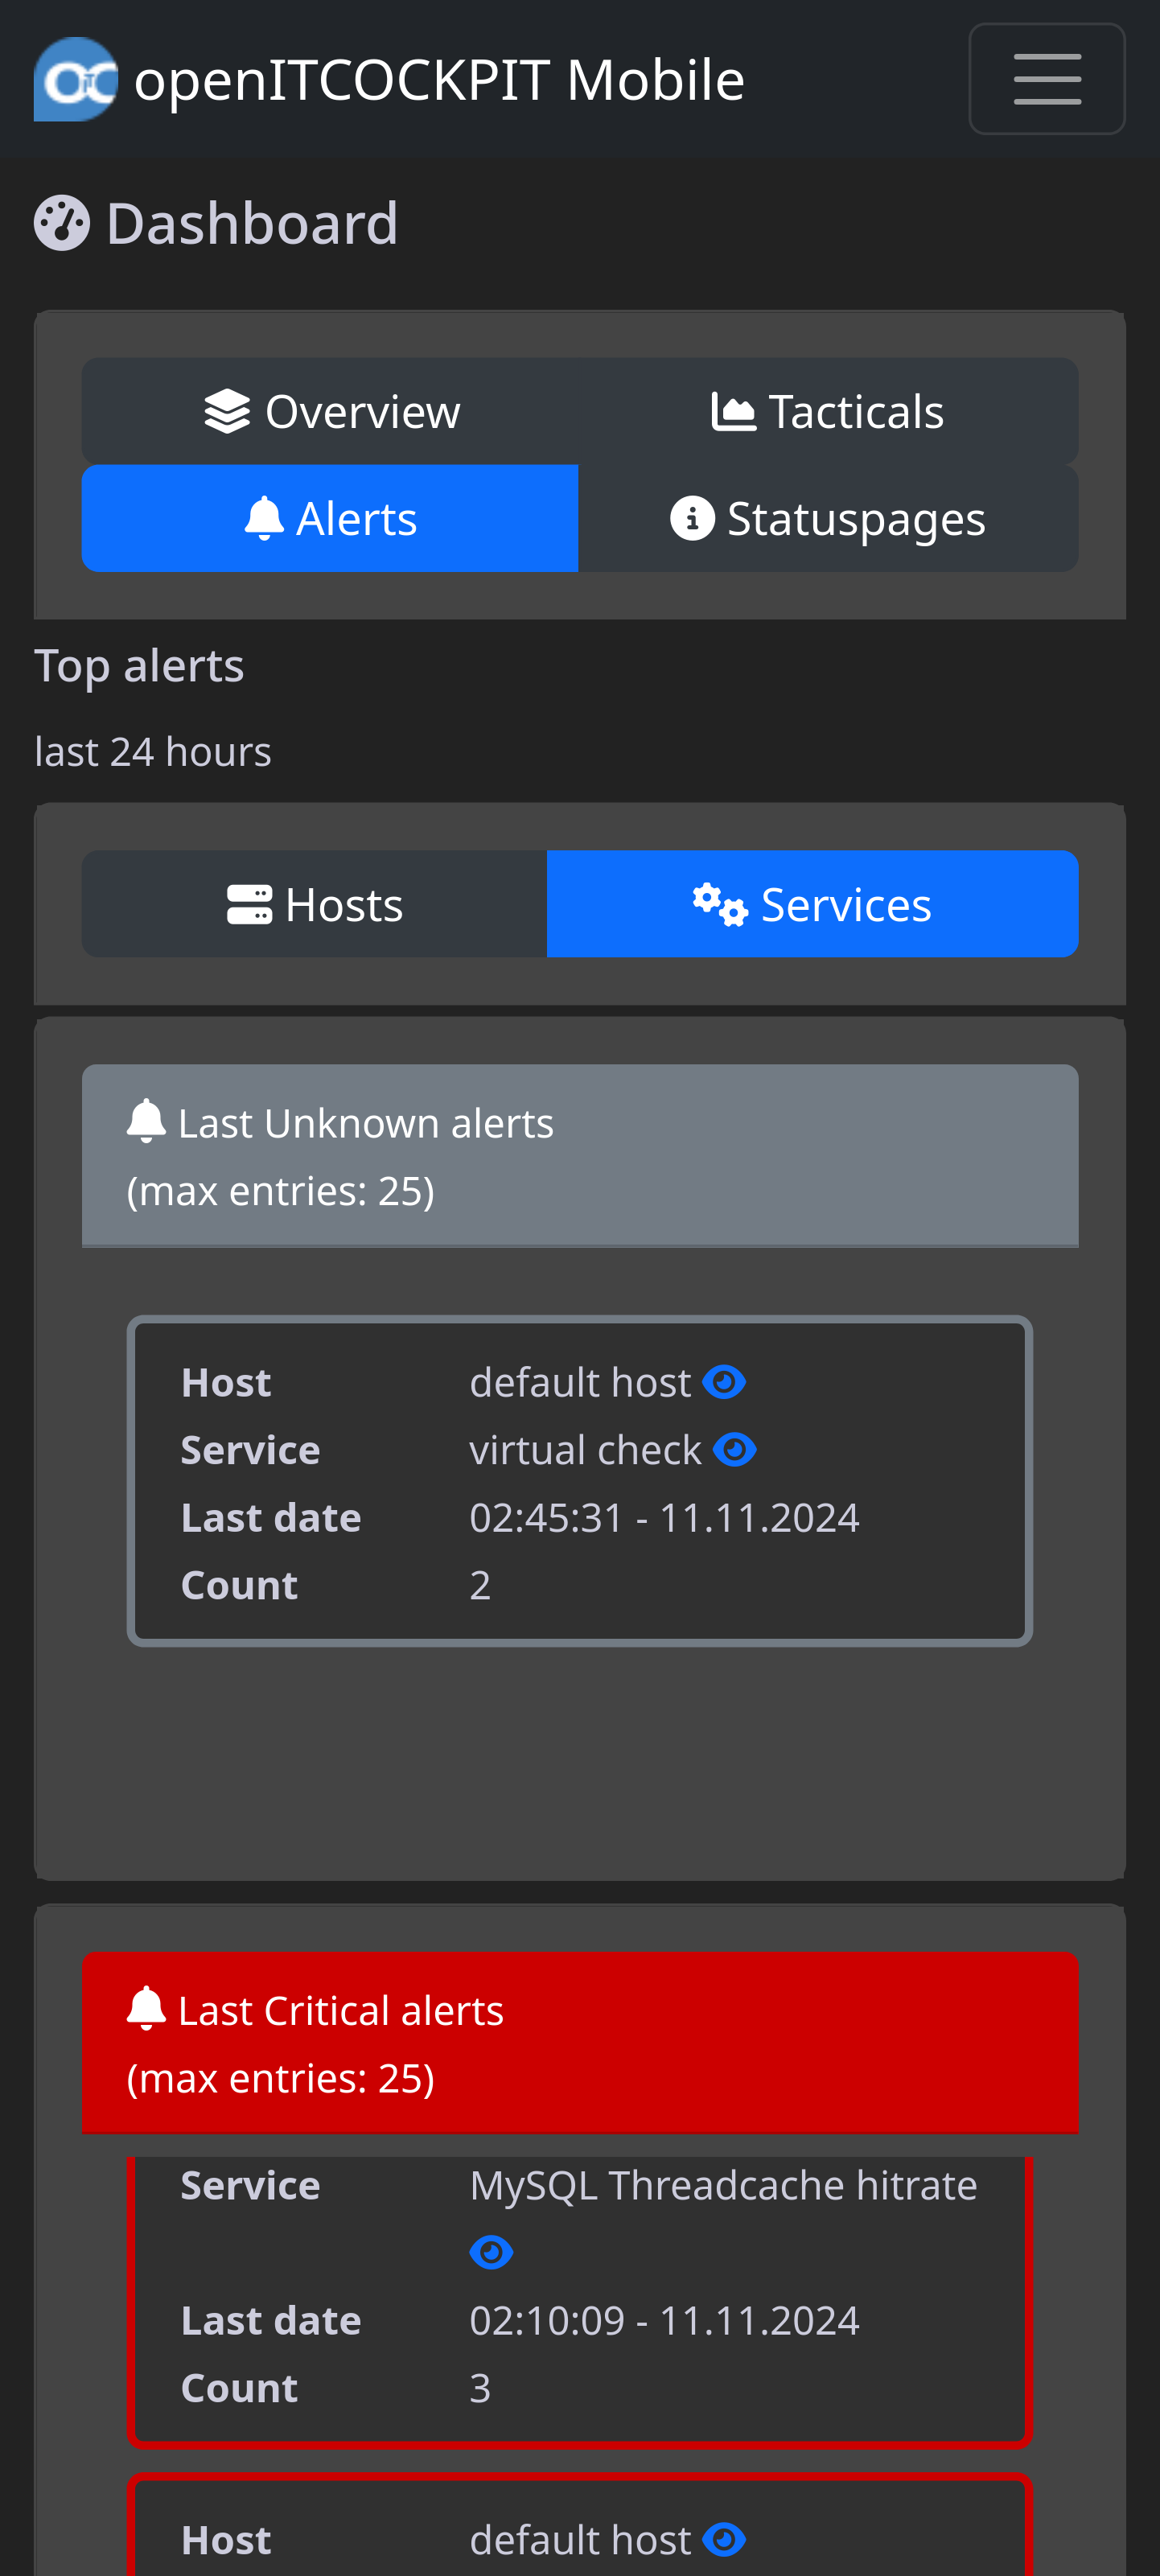
Here the notifications of the last 24 hours with the stabbing status are displayed. A corresponding widget is only displayed
If there were notifications during this period.
The respective widget includes a list through which scrolling can be scrolled - a maximum of 25 entries are displayed.
The list is sorted by the number and the last (current date) of the notification (s). Number does not mean the number of noticeable contacts,
but the number of notifications for this host (service) itself.
The evaluation of the alarms is available from openITCOCKPIT version 4.8.3.
Statuspages

If status pages are configured in the openITCOCKPIT backend, they are sorted here according to the highest cumulative status (see reporting-> status pages).
Functions
Set Resourcestatus
If the SCM modules are installed for the OpenitCockpit server, the resource list is also shown on the mobile page.
The resource status can then be replaced there.
 |
| 
Detailed information can be called up for the resource groups 
Reset Check time Host Service
Select the desired host or service from the list and click on the Actions tab. After that click on the
Reset check time button. The action will be executed immediately and does not require any further information.
More information regarding Reset check time
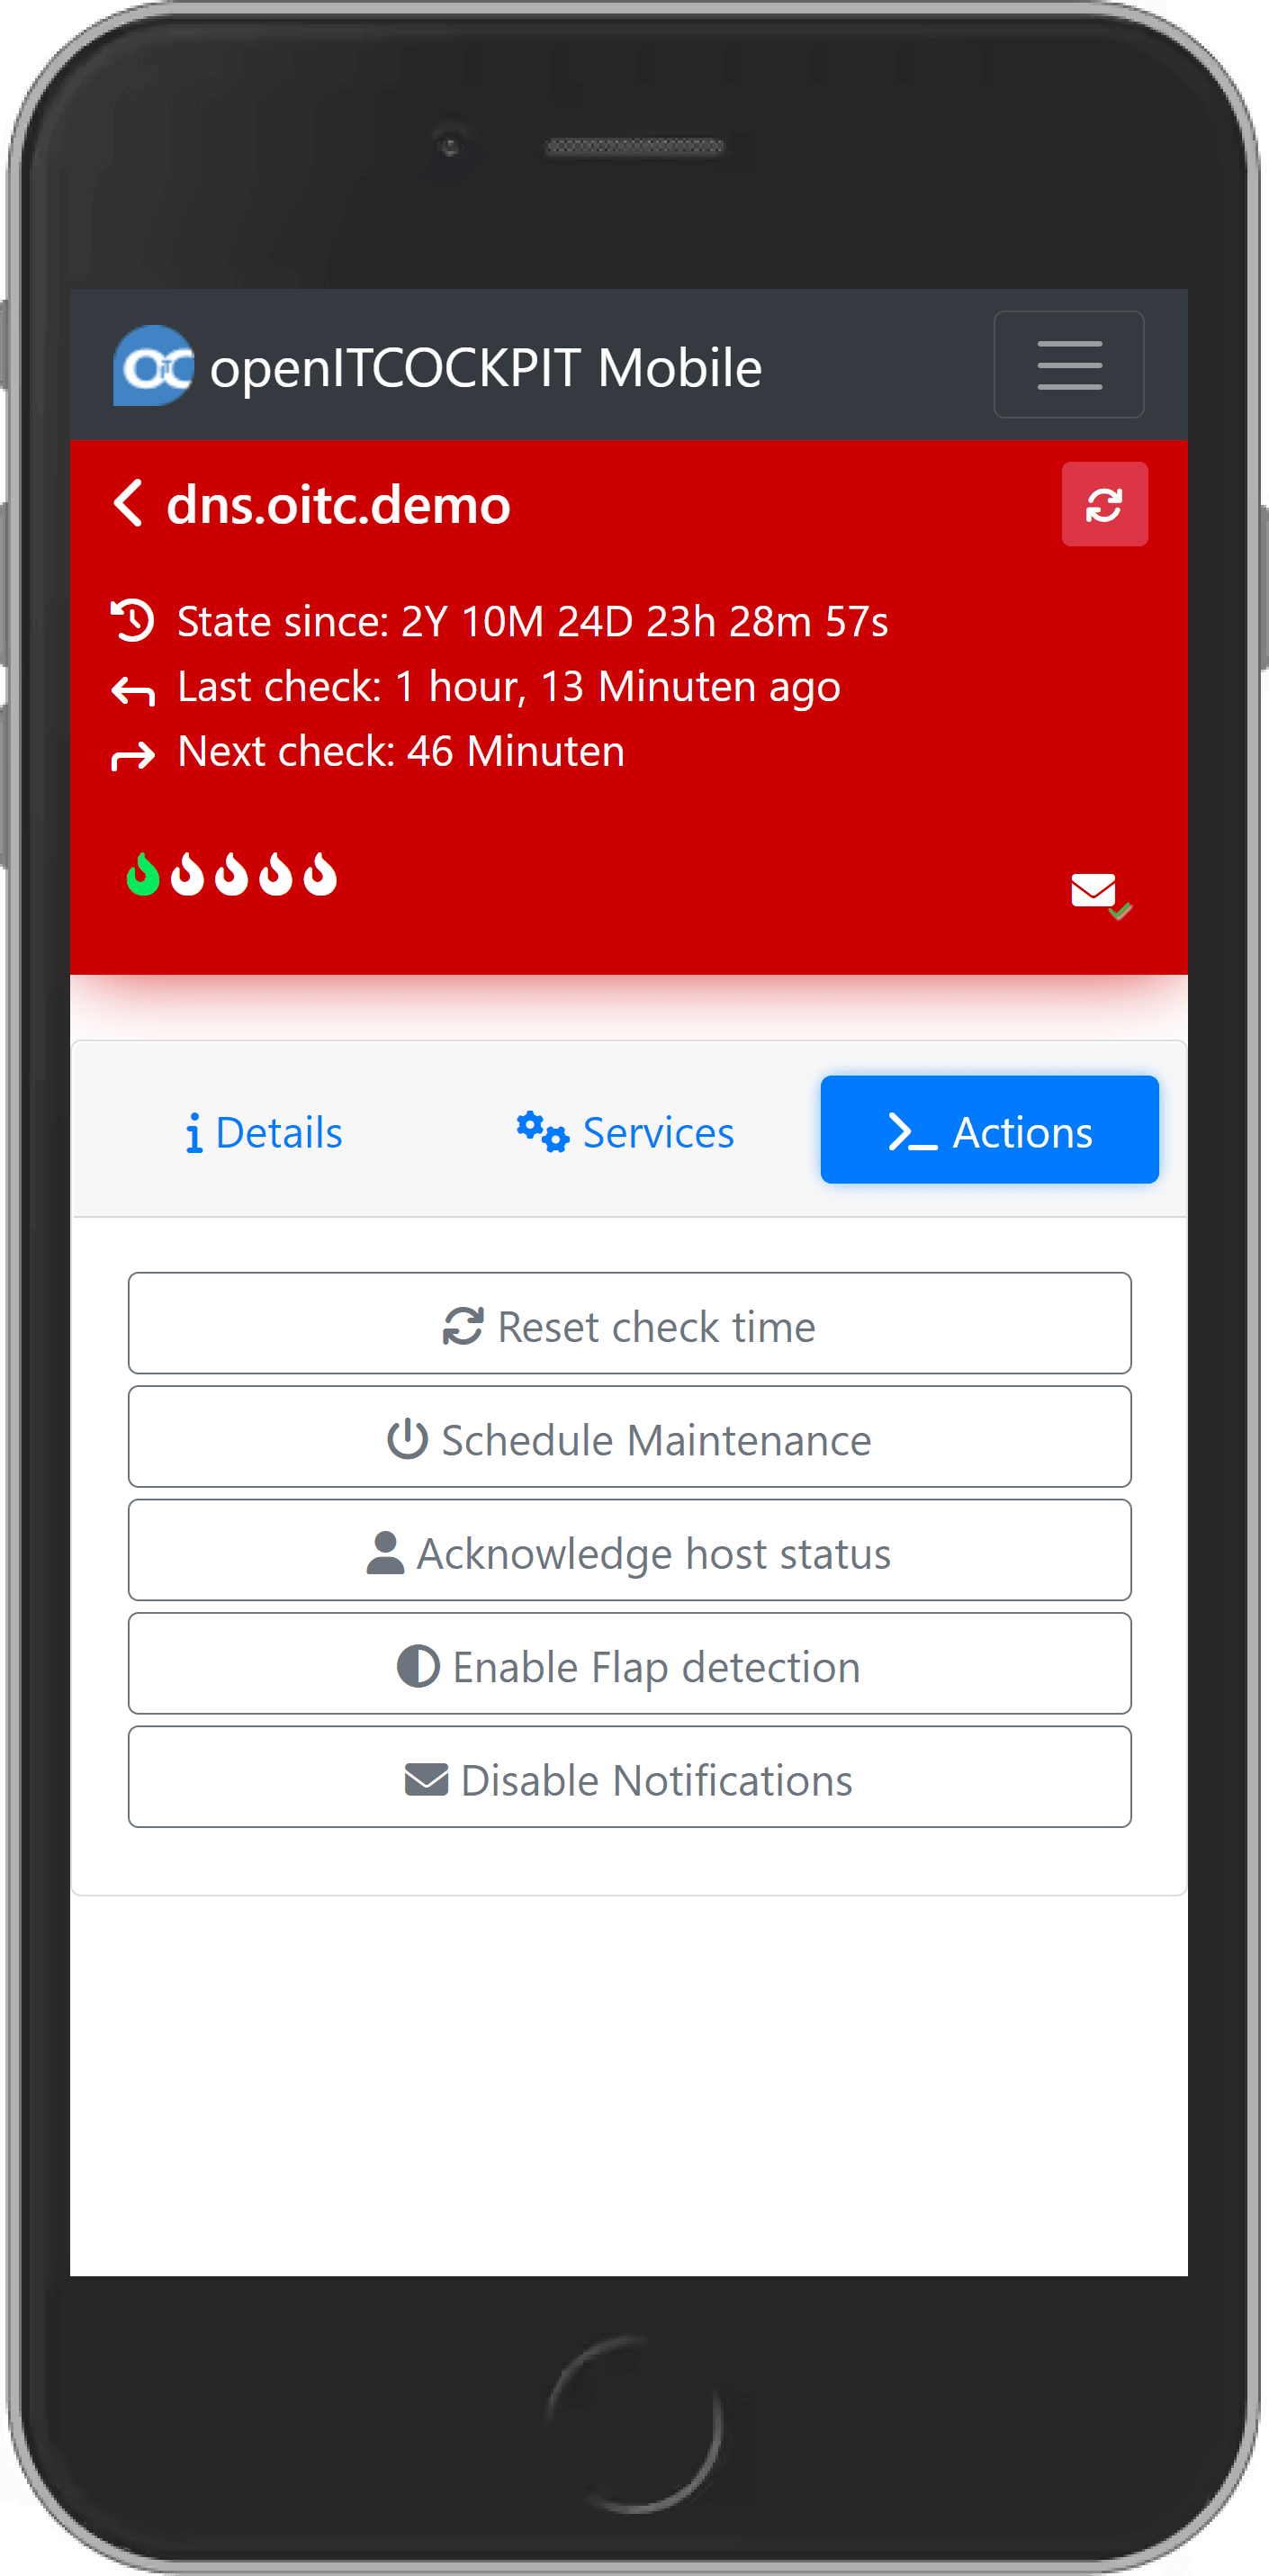
Schedule Maintenance Host Service
Select the desired host or service from the list and click on the Actions tab. After that click on the
Schedule Maintenance button.
After that proceed as it is described in Create downtime
In this action you are not able to create recurring downtimes. Crating recurring downtimes is described in the Create recurring downtime section
More information regarding Schedule Maintenance
Acknowledgement state Host Service
Select the desired host or service from the list and click on the Actions tab. After that click on the
Acknowledge button. If the selected object is already acknowledged you will see a Remove Acknowledgement button.
If you selected a host you have the possibility to acknowledge the state not only for the host but for the services too.
More information regarding acknowledge state
Enable/Disable Flapping Host Service
Select the desired host or service from the list and click on the Actions tab. After that click on the
Enable Flap detection button. If you see a Disable Flap detection button, the flap detection is already enabled
More information regarding flap detection
Enable/Disable Notifications Host Service
Select the desired host or service from the list and click on the Actions tab. After that click on the
Enable Notifications button.
With this option you can temporarily enable or disable notifications for the host, service or host including its services
Passive transfer check result Service
Select the desired host or service from the list and click on the Actions tab. After that click on the
Passive transfer check result button.
More information regarding passive transfer check result for services
Send custom service notification Service
Select the desired host or service from the list and click on the Actions tab. After that click on the
Send custom service notification button.
More information regarding send custom service notification
Massactions
Massactions are available for nearly all functions. To execute an action simultaneously on multiple hosts and / or
services, you will need to navigate to the respective host or service list and click on the Select button. There will
be checkboxes displayed for every list item. Now you can select the desired objects and click on the Actions button.
The selected action will be executed for all selected objects.
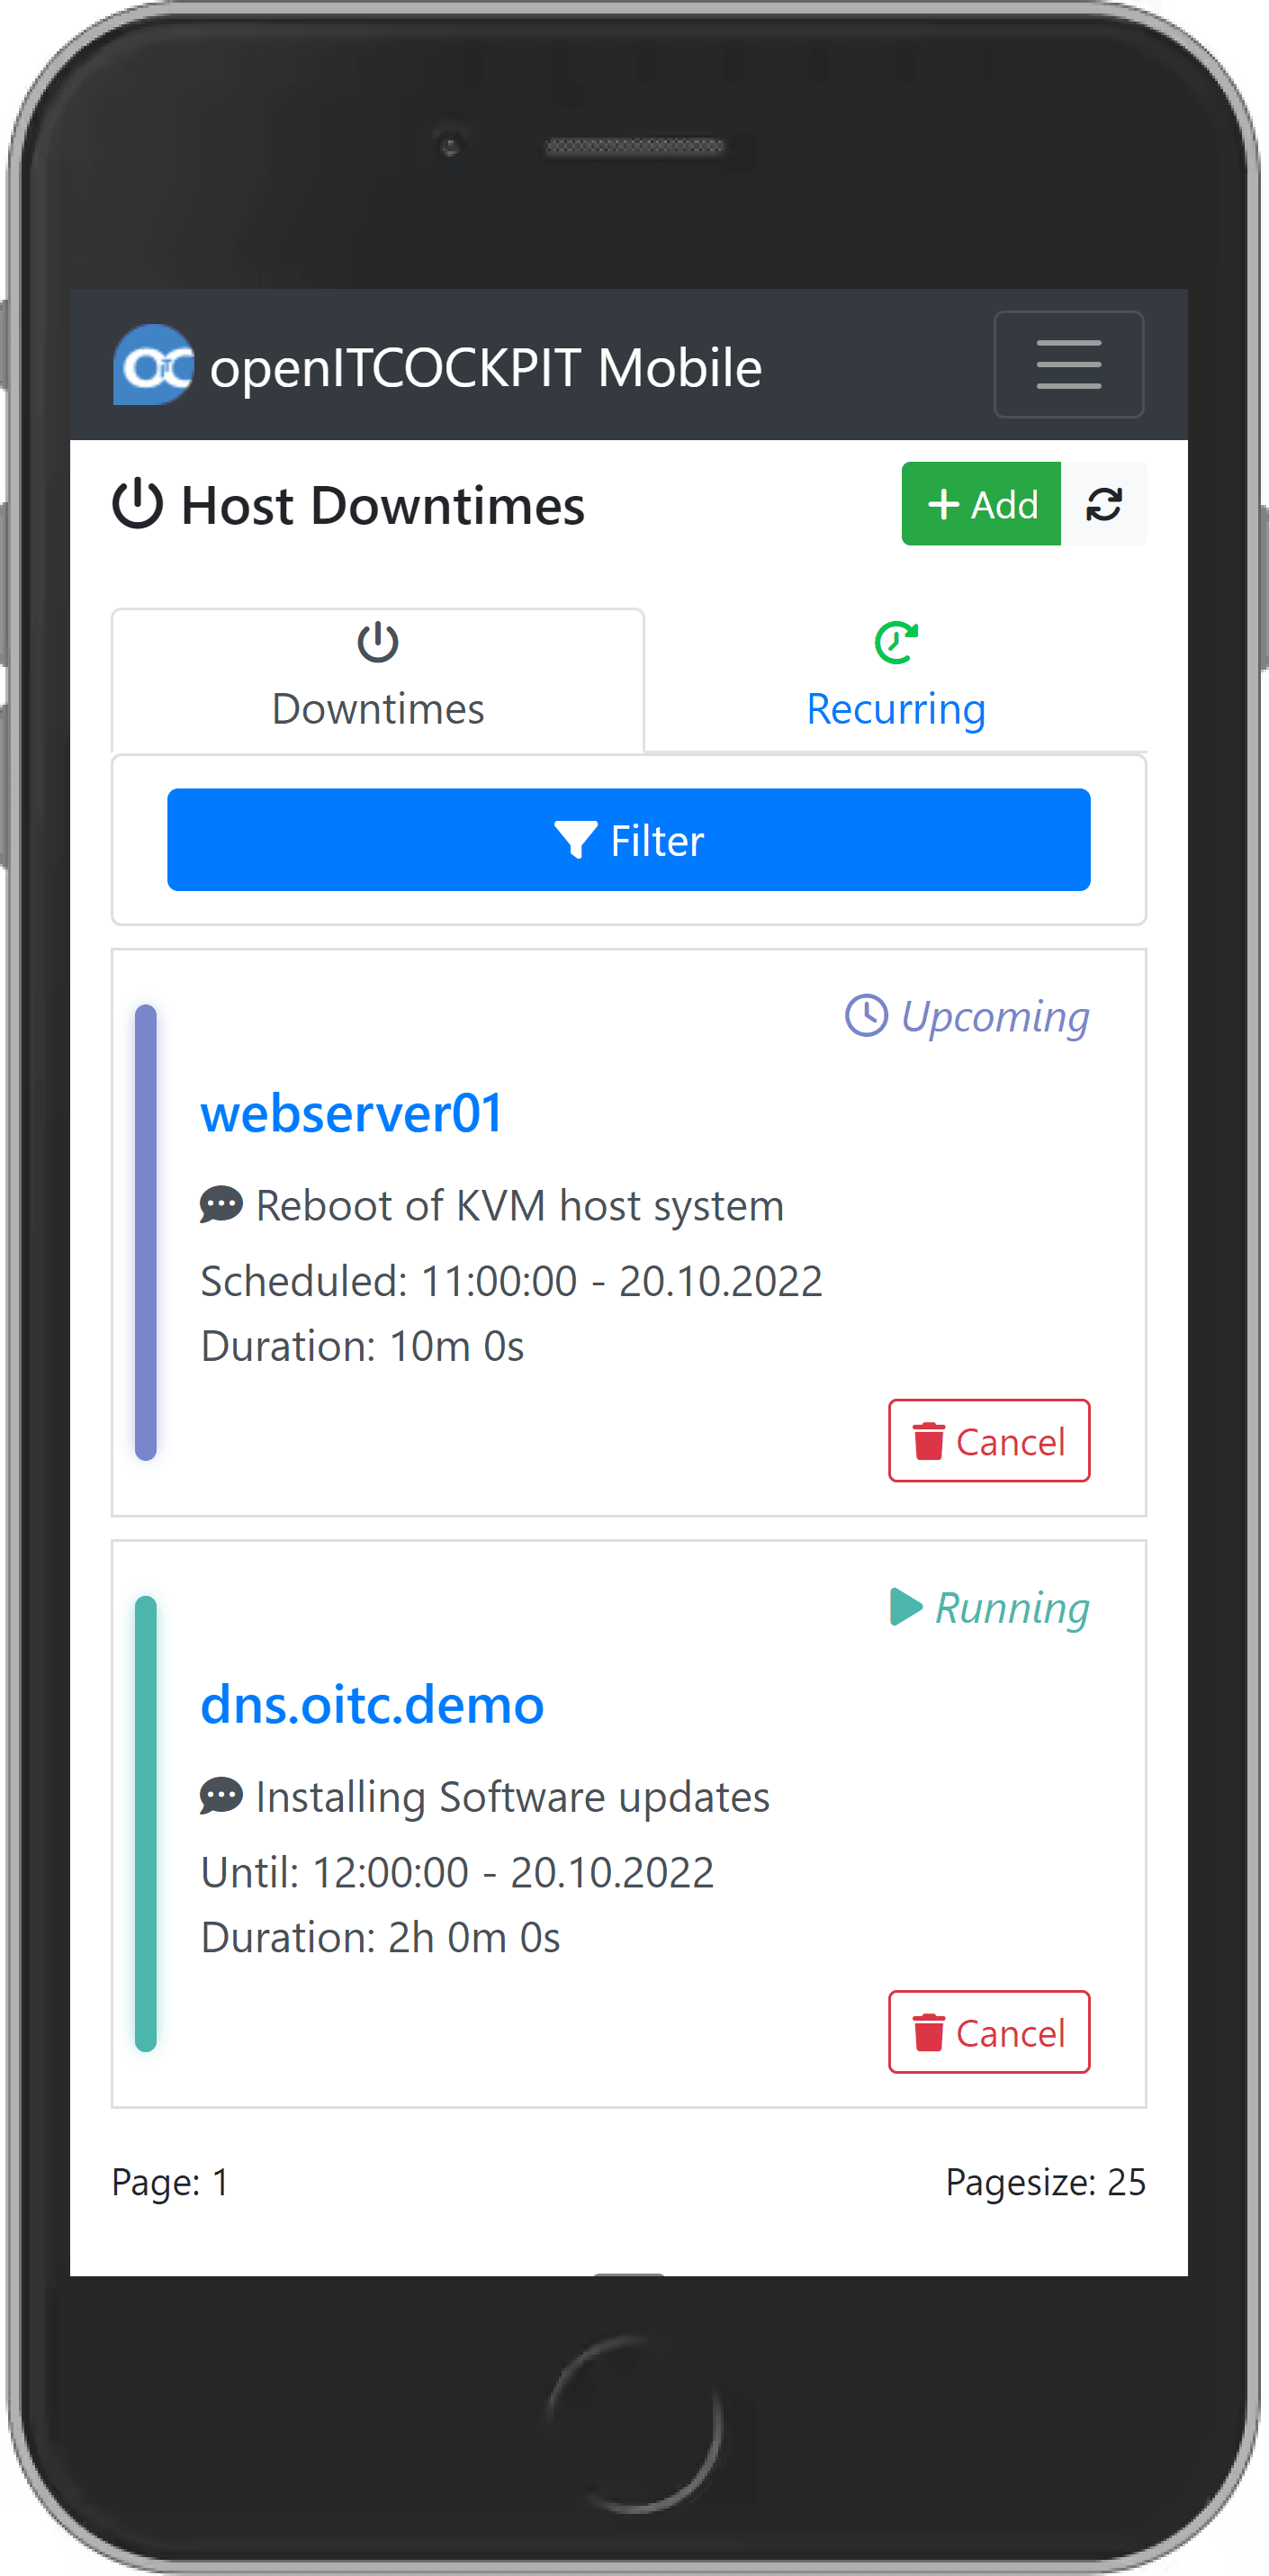
Host and Service downtimes
Downtimes and recurring downtimes are also displayed in the mobile website. For a downtime
overview please navigate in the menu to Host downtimes or Service downtimes.
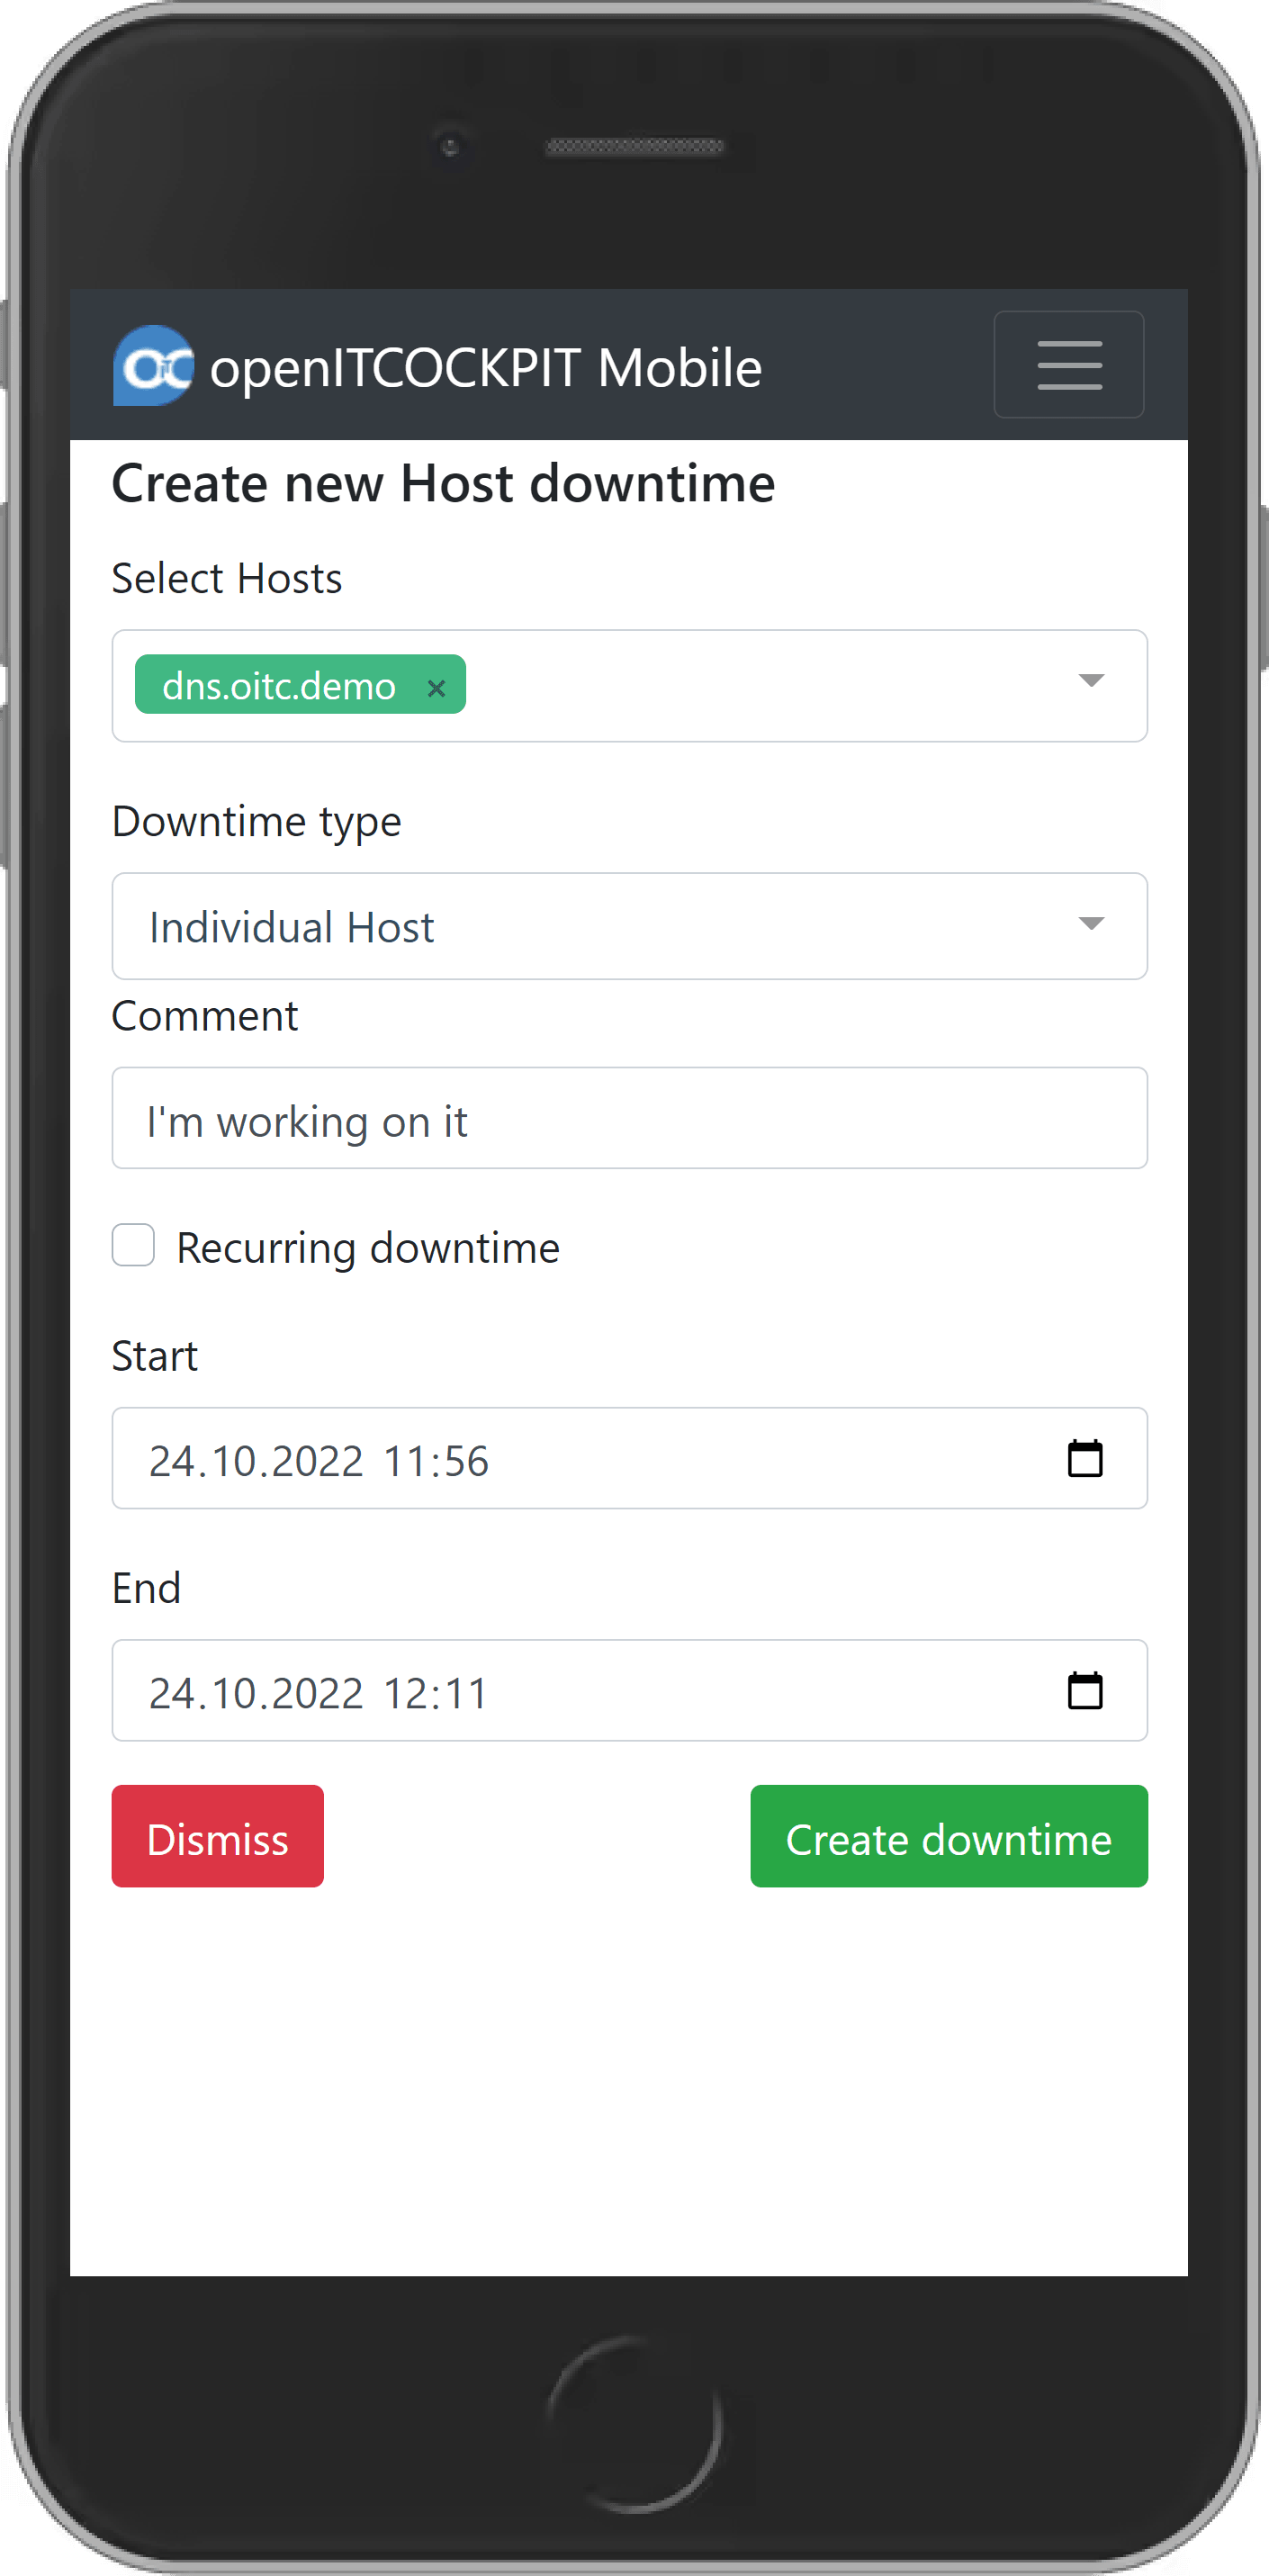
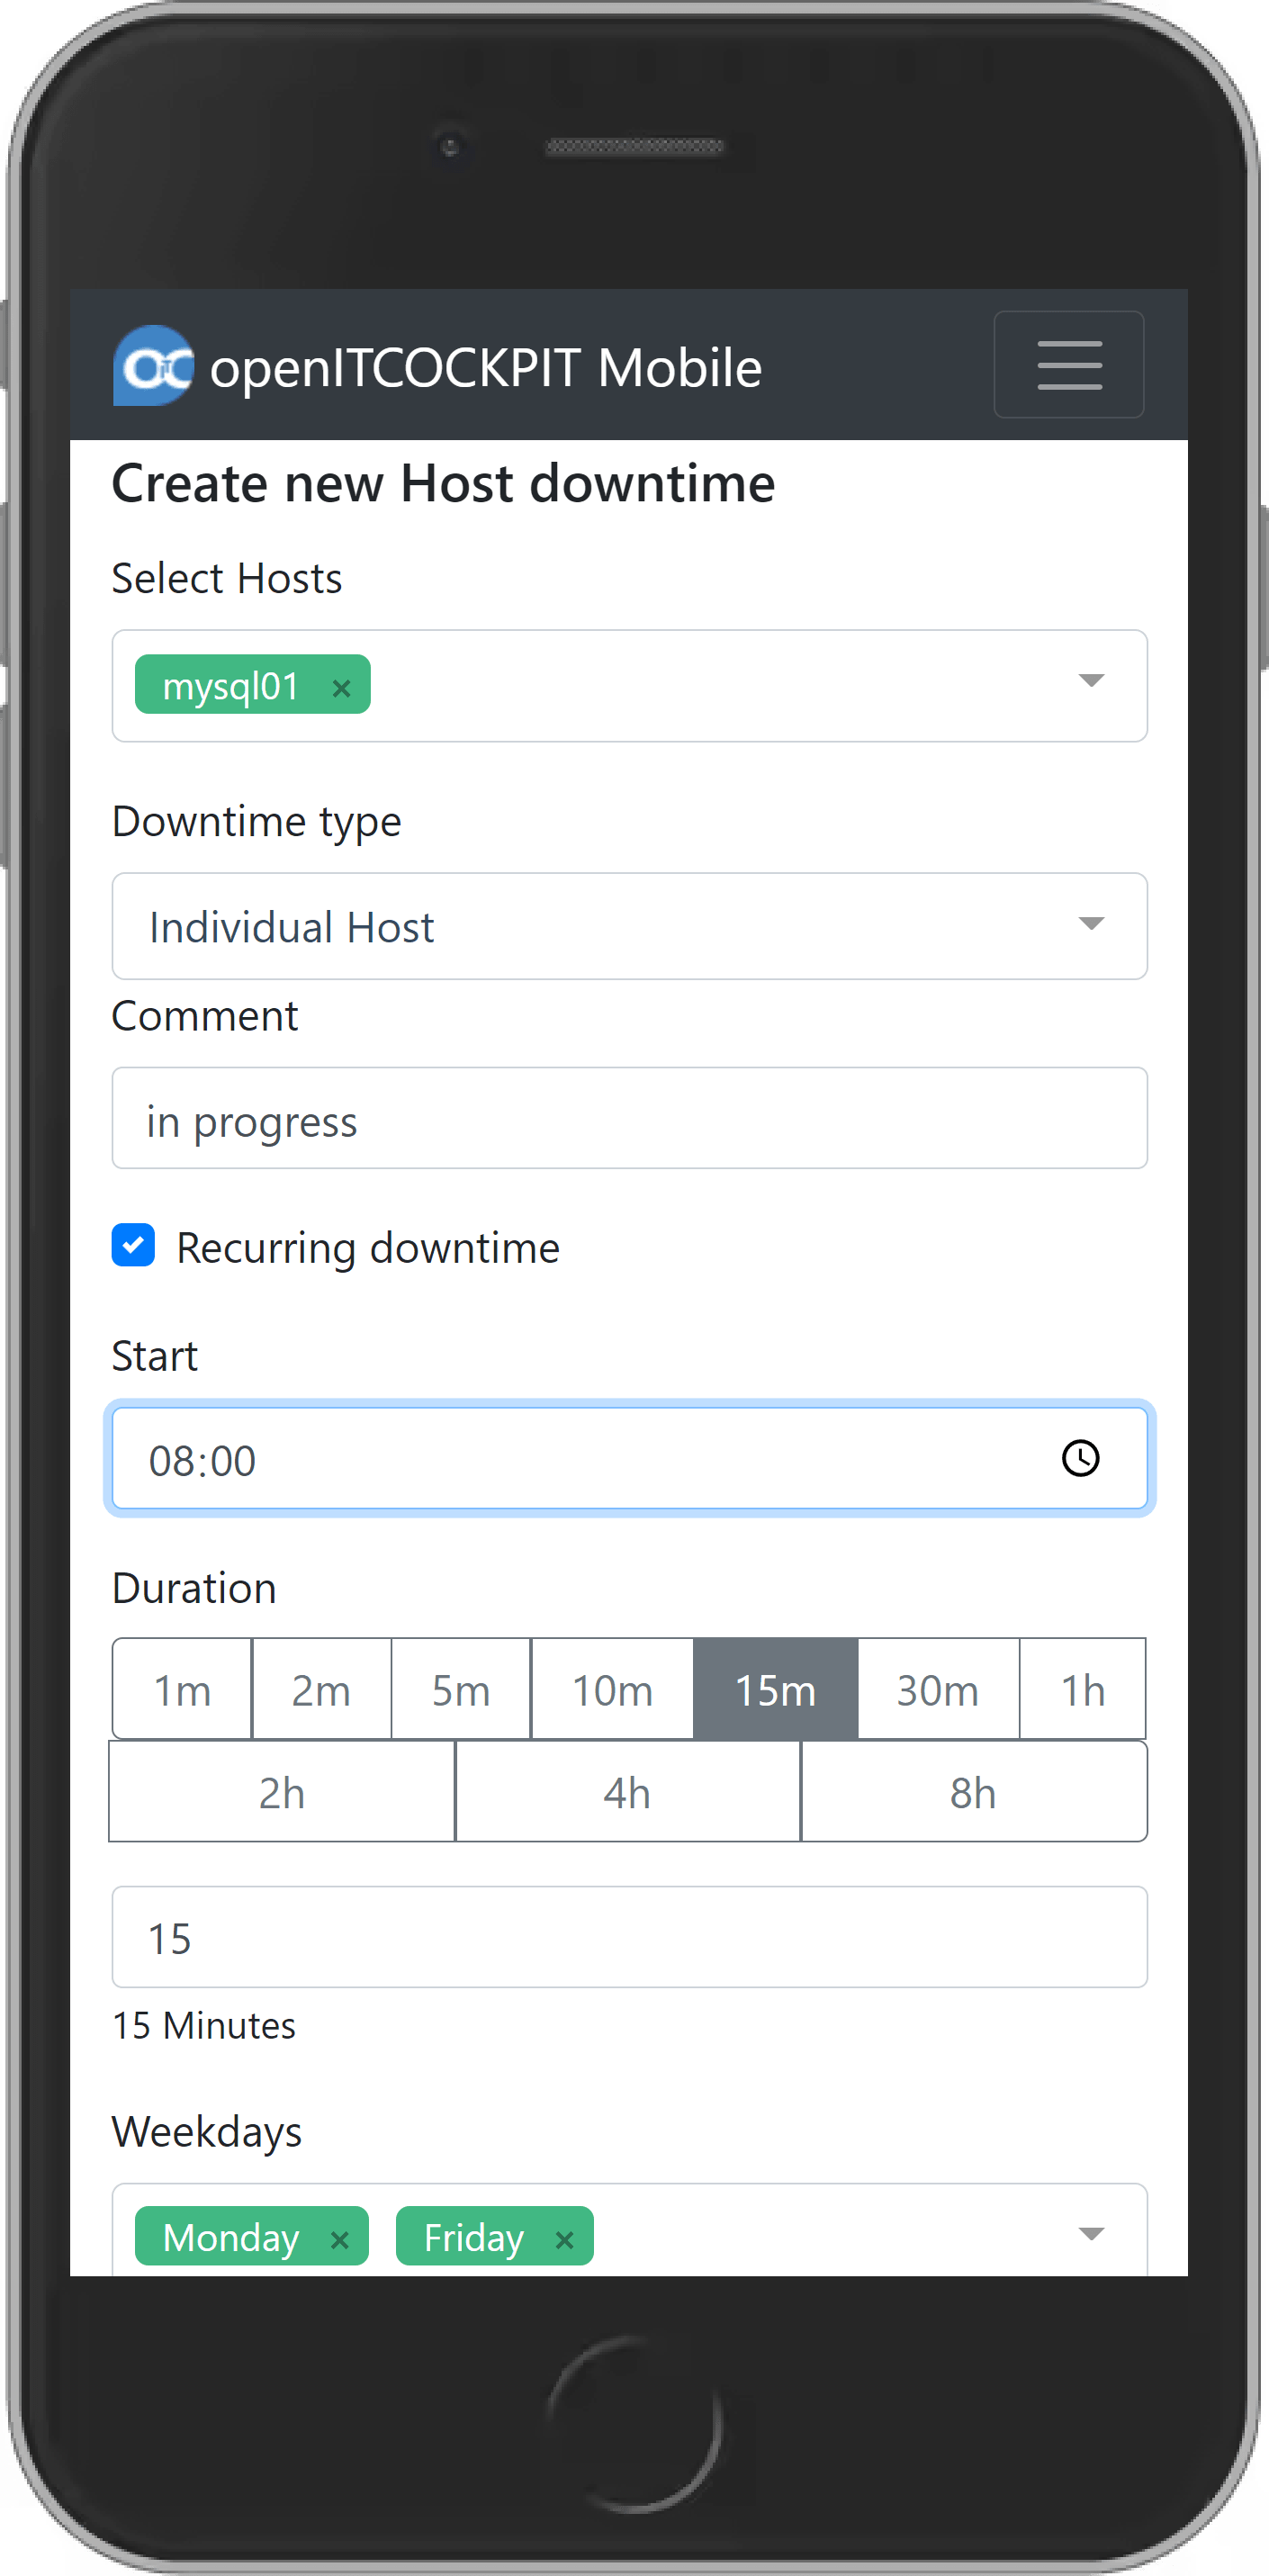
Create downtime
Creating downtimes for a host or a service nearly the same. Host downtimes have the additional possibility to set downtimes for its services too.
Create downtime
To create a downtime, navigate in the menu to Host downtimes or Service downtimes. After that click on the button
New.
Now select the desired hosts or services from the selectbox. The field Downtime type is only available for host
downtimes. This option allows you to crate a downtime not only for the host but its services with the same
parameters too. The Comment field can describe the downtime.
The option Recurring downtime allows you to create recurring downtimes
Start and End defines the start and end time of the downtime
Create recurring downtime
To create a recurring downtime navigate in the menu Host downtimes or Service downtimes. After that click on the
button New.
Now select the desired hosts or services from the selectbox. The field Downtime type is only available for host
downtimes. This option allows you to crate a downtime not only for the host but its services with the same
parameters too. The Comment field can describe the downtime.
Select the option Recurring downtime. The following form fields are changing now.
First you have to set a Start time and Duration. The Duration can be chosen from the predefined buttons or you
can enter a custom value in the field below. This value needs to be entered in minutes.
After that you can select Weekdays, Days of month or both.
Weekdays define the days of a week, where the downtime will be executed at the given Start time and Duration
Days of month pursuant to the given days of a month
Is Weekdays and Days of month selected, the downtime will be extexuted on the weekdays and the day of month. In example: Monday, Wednesday and the 3rd of month
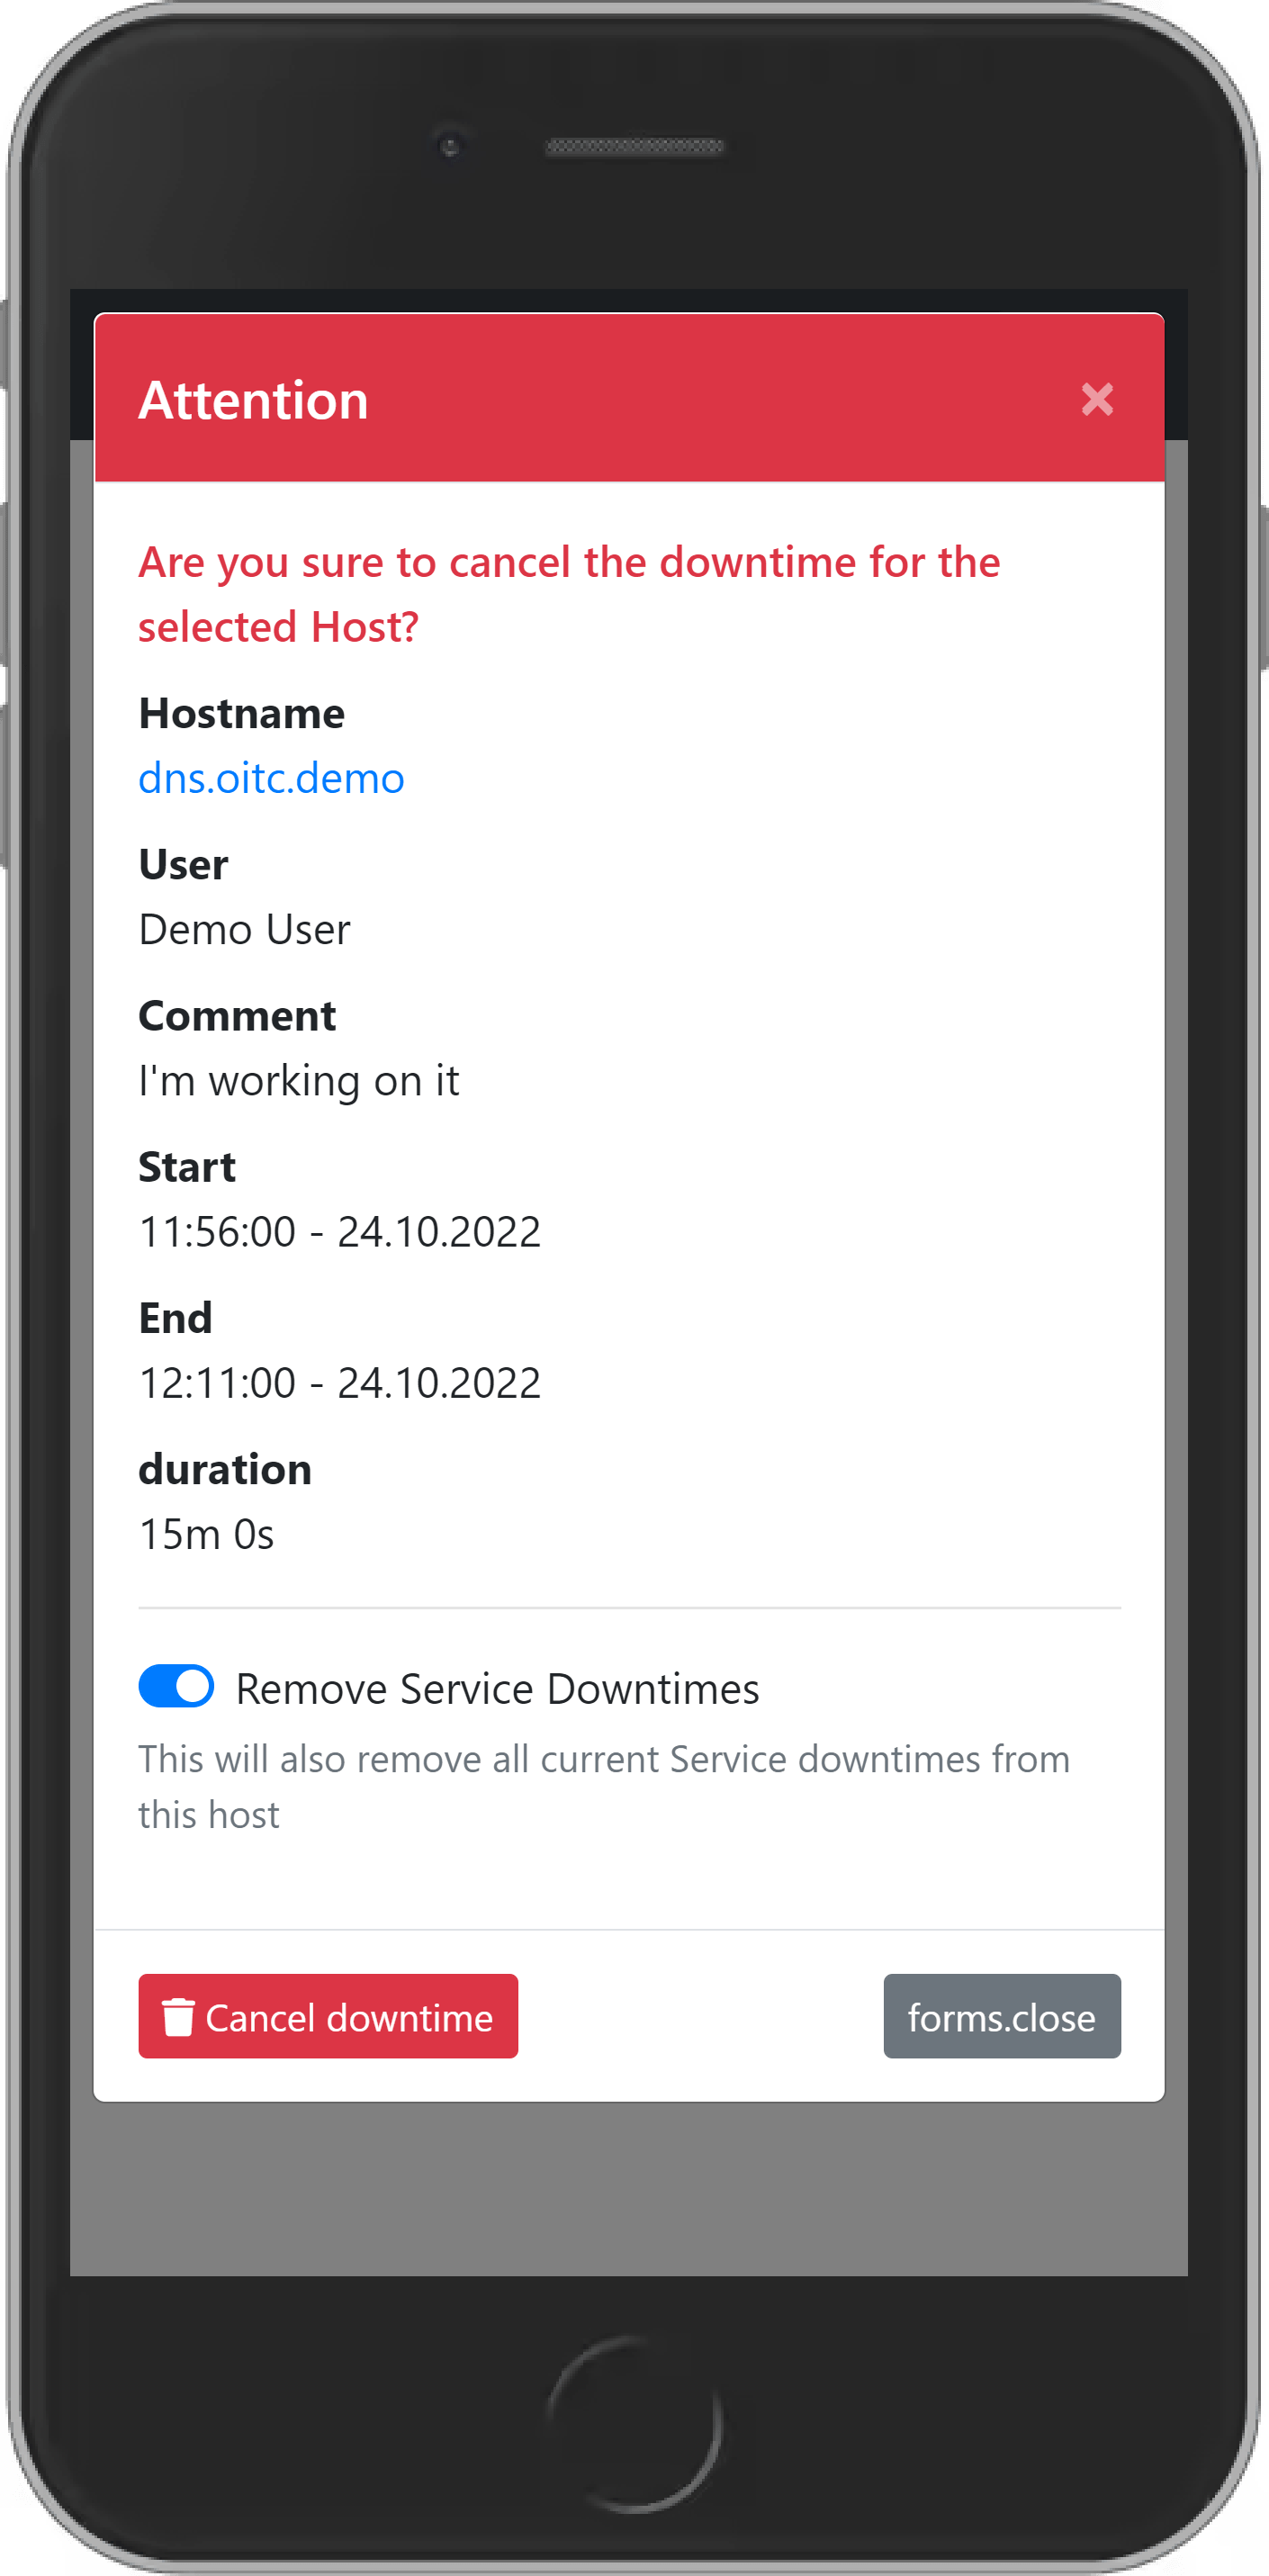
Cancel downtime
Downtimes can also be cancelled with the mobile website. Therefor you need to select the desired downtime from the list and click on the trashcan.
A popup which prompt you to confirm the cancellation will be displayed.
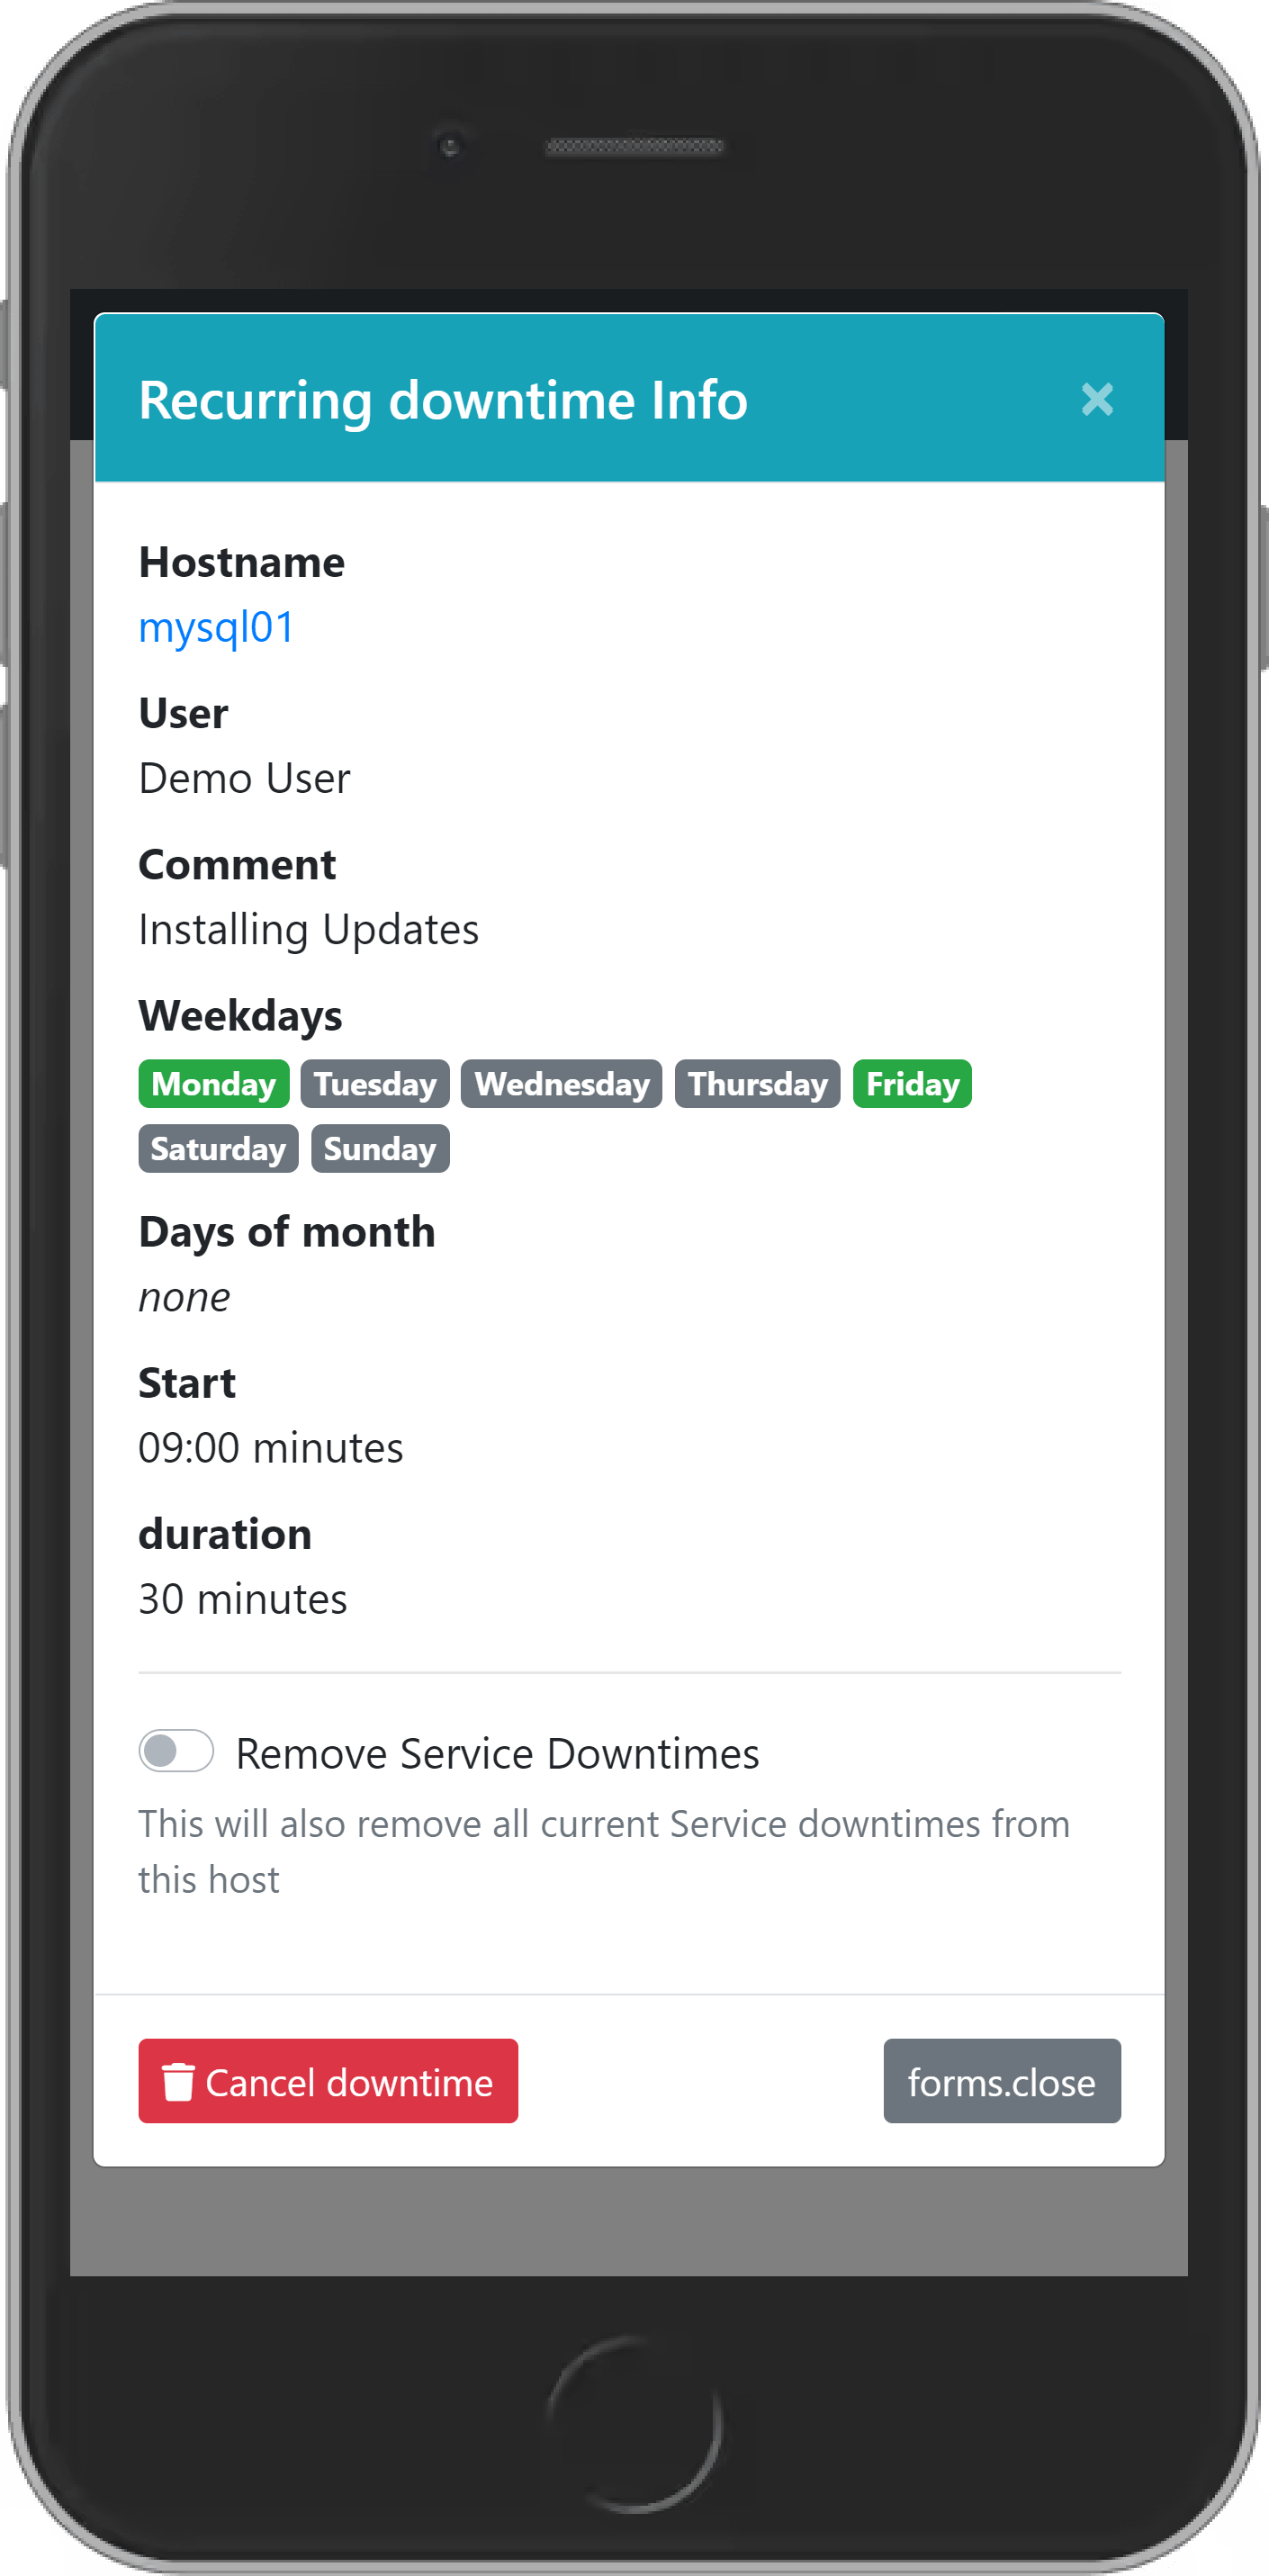
Recurring downtimes can be cancelled if you select the desired recurring downtime from the recurring tab and click
on Cancel downtime in the information popup.
Dark theme
openITCOCKPIT Mobile provides a dark theme by default. You can switch between the light and dark theme via the main menu.
Customization
The mobile website is able to adapt to the identity of the respective company. This affects the login logo, header logo (top menu bar), favicon, systemname (top menu bar) and the website title.
To do this, a directory must be created on the host system in which the corresponding files are stored on the same level.
CustomConfigDir/HeaderLogo.pngLoginLogo.pnginterface.ymlfavicon.png
The file interface.yml is the corresponding configuration file, which contains all configurable parameters. You will
an example of the file in the repository interface.example.yml.
In order to take effect you will need to add the following parameter with your custom directory to the docker commandline:
-v /my/path/to/CustomConfigDir:/var/www/localhost/htdocs/interface
It should be noted, that the internal path:
:/var/www/localhost/htdocs/interface stays the same in every case!
Changes can be done during the runtime in the CustomConfigDir/interface.yml file. No restart of the docker container
required.
Example configuration
This is an example configuration to illustrate how a configuration of the interface.yml file affects the mobile
website.
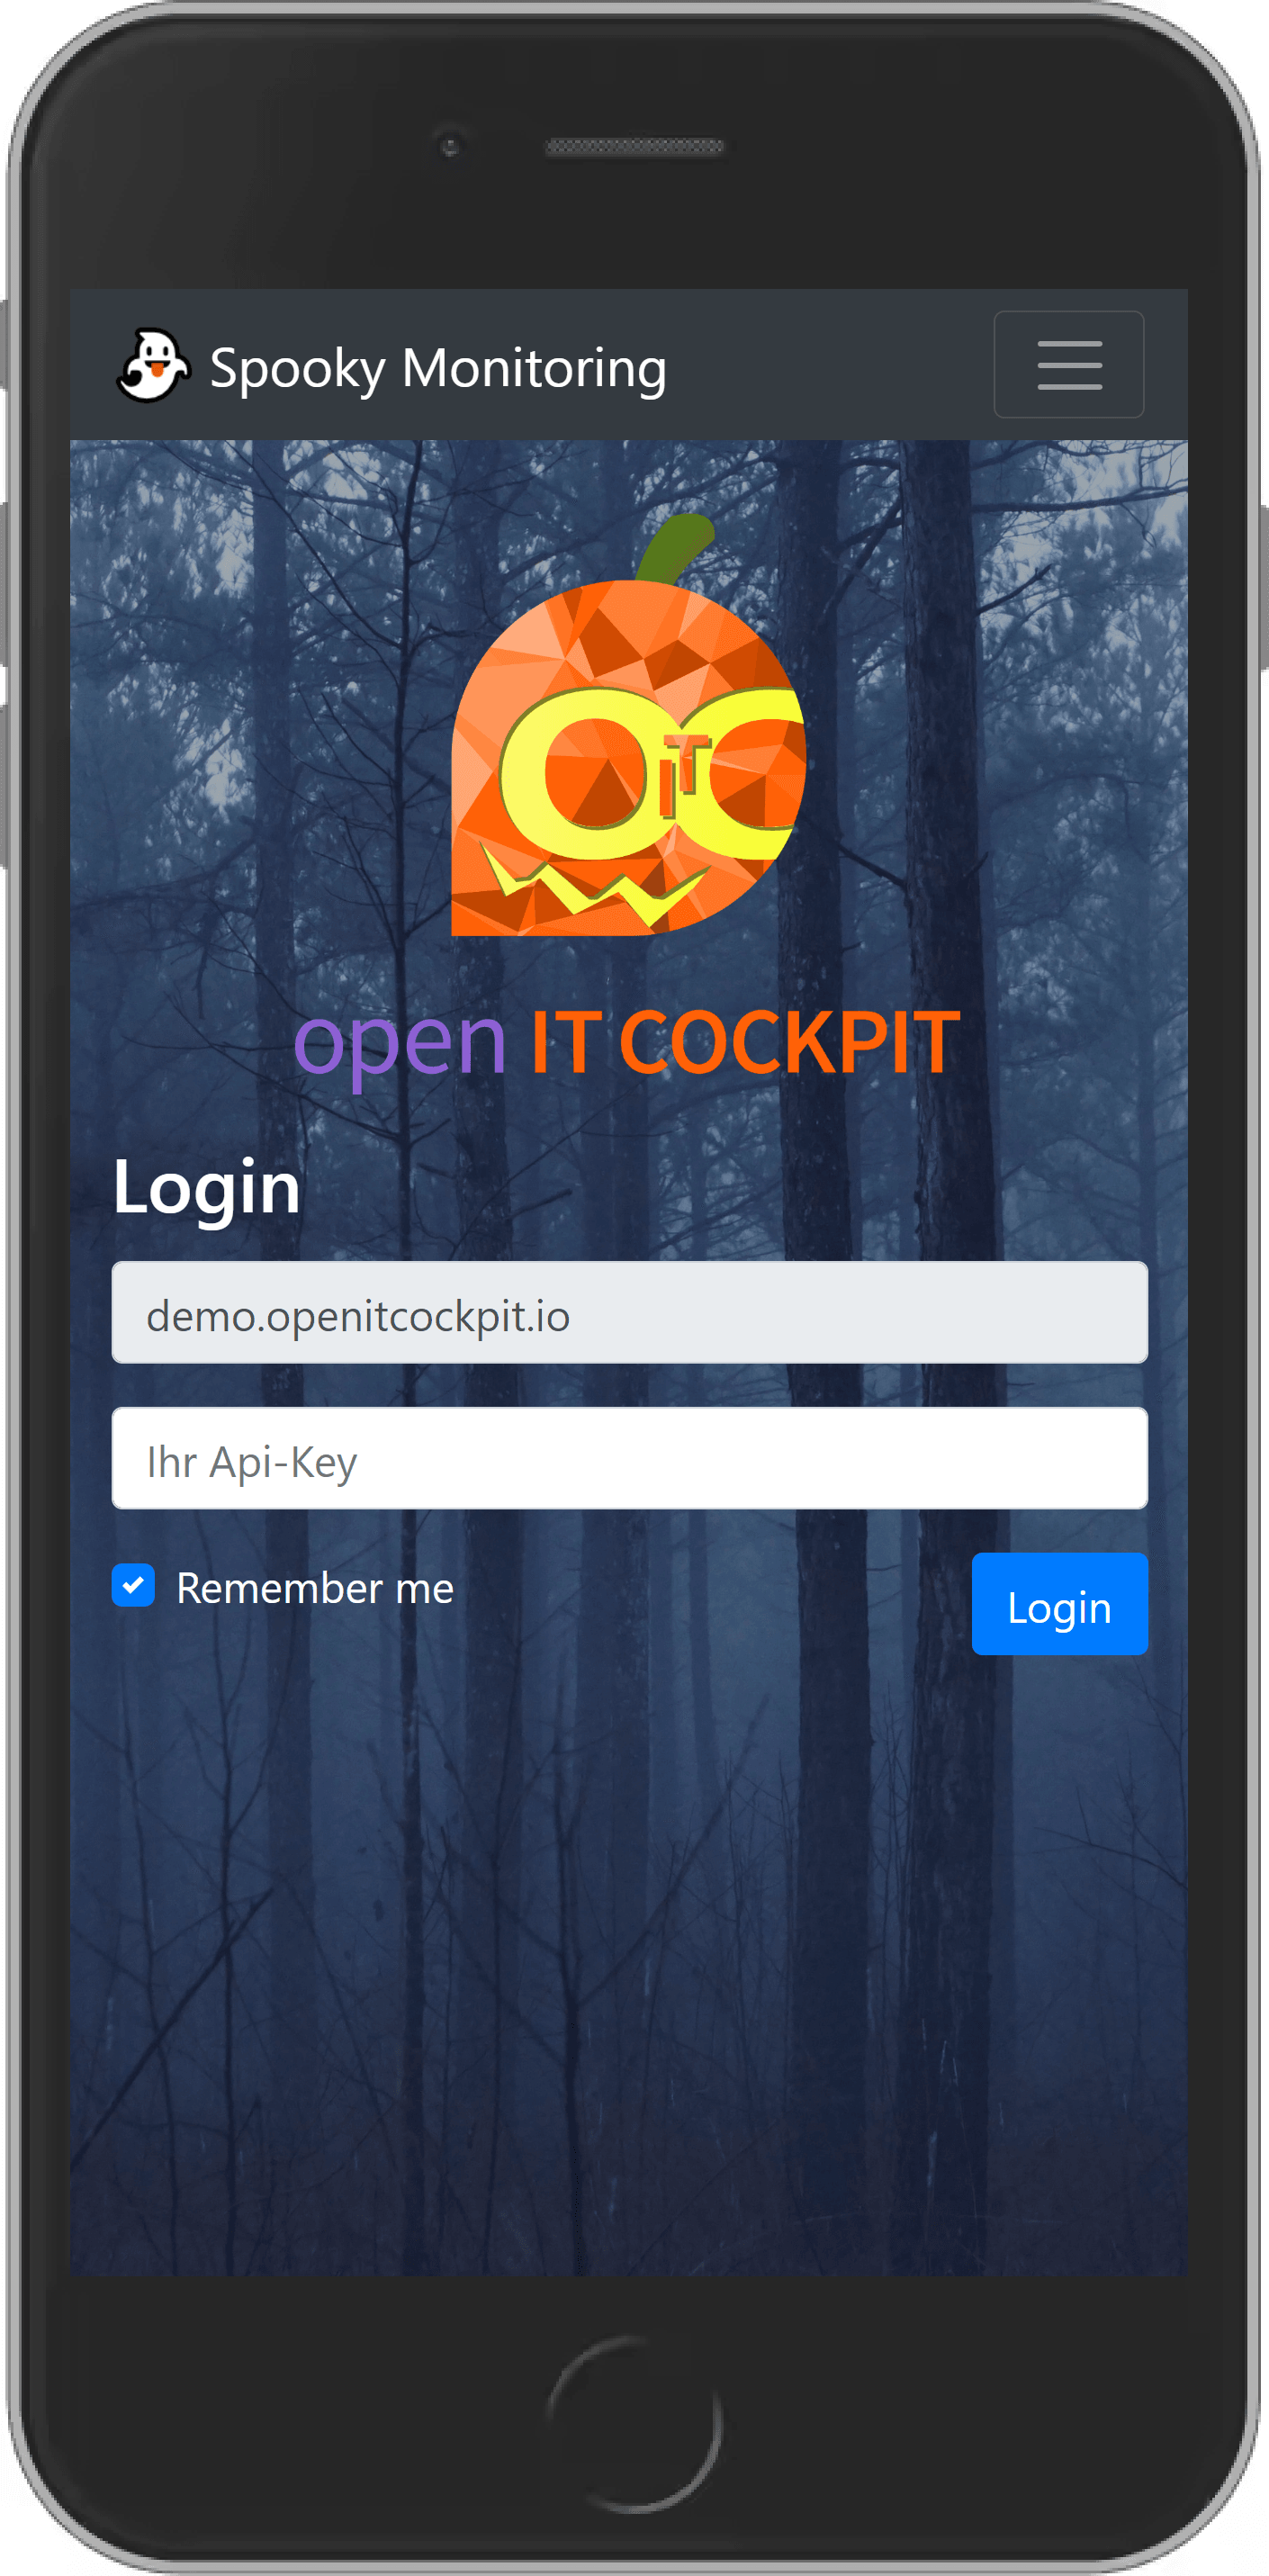
This example was inspired by the Halloween theme for openITCOCKPIT.
Configuration of the interface.yml:
############
# CUSTOM INTERFACE CONFIGURATION EXAMPLE
# All attributes are optional.
# Custom images needs to be placed in the same directory as this configuration file
############

# System name displayed in the website header
systemname: Spooky Monitoring

# Title of the Website
title: custom title

# Logo used on the Login Screen
# filename only! - the complete path will be set automatically
login_logo: openitcockpit_halloween.png

# Filename of a custom background image used by the login screen.
# It is recommended to compress the used image https://tinypng.com/.
# Compression can reduce the filesize up to 70%. The image should have a resolution of 2560x1440px
# filename only! - the complete path will be set automatically
login_bg: ben-mccloskey-wN_UDPOTC1w-unsplash.jpg

# Logo used on the main manu
# filename only! - the complete path will be set automatically
header_logo: ghost_emoji.png

# Determine if openITCOCKPIT Mobile should use one image for all favicons
# (one icon for all Desktop Browsers, Mobile Devices, Operating Systems)
# of if openITCOCKPIT Mobile should use specialized icons for all kind of platforms
# true = one icon for all platforms (not recommended)
# false = Specializes icons per platform (recommended)
simple_favicon: false

# favicon logo
# filename only! - the complete path will be set automatically
# This is only relevant if "simple_favicon" is set to true
# If you want to use favicons per platform use the Website https://realfavicongenerator.net/
# to generate all required files and pass the folder to the container
# More information can be found in the docs: https://docs.openitcockpit.io/en/additional/mobile-website/
favicon: favicon.ico

# Theme color
# Some mobile browsers support to set a so called theme-color, which defines the color of the address bar
# or other parts of the browser itself.
# https://developer.mozilla.org/en-US/docs/Web/HTML/Element/meta/name/theme-color
# If you want to adjust this value, it is recommended to set "simple_favicon" to false and to pass own favicons as well.
# The files "favicons/browserconfig.xml" and "favicons/site.webmanifest" to also contain the colors and have to be
# adjusted manually.
theme_color: '#4085c6'

# FQDN or IP-Address of your openITCOCKPIT Server
# If this value is defined, users have no option anymore to set the ip-address on the login screen.
server_url: demo.openitcockpit.io
Favicons
Favicons are icons that the browser will for bookmarks or in the menu of currently opened tabs. Different browsers and operating systems support different types of favicons. For example there are specialized icons if a bookmark gets created to the home screen of mobile devices.
Multiple favicons (recommended)
As mentioned above different browsers on different operating systems support different Favicons. iOS and Android devices for example have a separate icon for home screen shortcuts. Microsoft Windows requires a tile icon and last but not least Safari and macOS which requires own icons for the tab and touch bar.
The easiest way to get all required favicons is to use a online generator like RealFaviconGenerator.
The base path of all Favicons is /favicons/.
The following example screenshots shows how to use the ghost emoji 👻 as favicon.
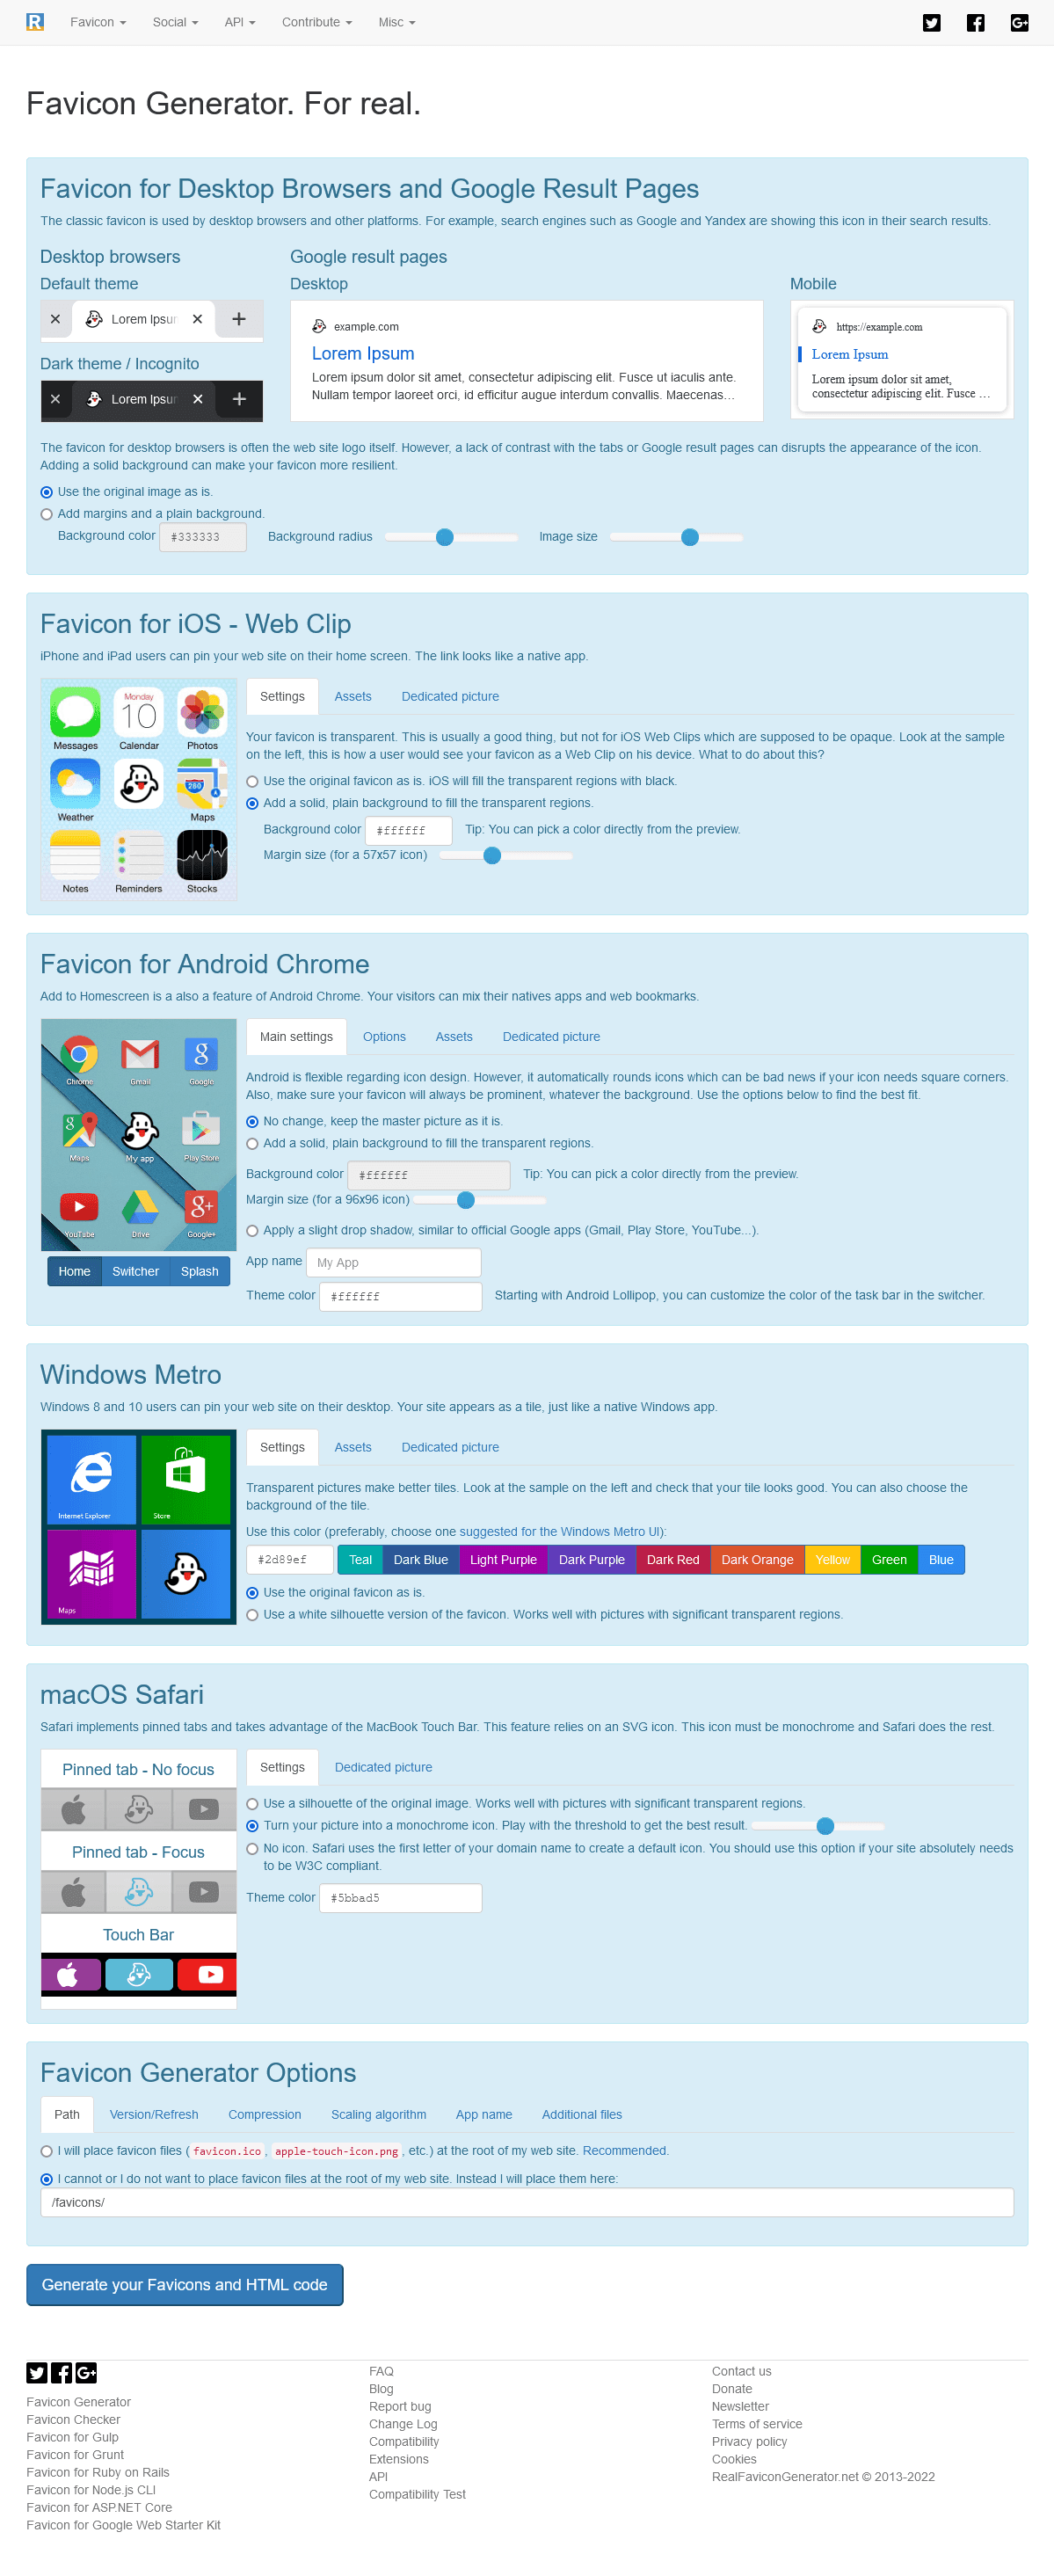
If you have used RealFaviconGenerator you can simply extract all files from the downloaded archive file into a folder called favicons.
Please make sure that your folder contains all the required files:
android-chrome-192x192.pngandroid-chrome-512x512.pngapple-touch-icon.pngbrowserconfig.xmlfavicon.icofavicon-16x16.pngfavicon-32x32.pngmstile-150x150.pngsafari-pinned-tab.svgsite.webmanifest
To apply the changes, make sure that simple_favicon is set to false in your interface.yml. (default)
Also pass the favicons to to contianer like so
-v /host/path/to/favicons:/var/www/localhost/htdocs/webroot/favicons:ro
Simple favicon
It is also possible to use one favicon for all platforms. This is not recommended and especially for mobile devices is a bad practice.
Set simple_favicon is set to true and the file name at favicon in your interface.yml.
Please make sure the file is a Microsoft Windows Icon (.ico)