Docker images
The official Docker images of openITCOCKPIT are available here:
The Docker images of openITCOCKPIT are available for the amd64 and arm64 CPU architectures and can also be used on a SoC like the Raspberry Pi 4.
Requirements
Docker and Docker Compose are required. Please follow the official documentation, if you do not have Docker installed yet.
System requirements
- 2 CPU cores (x86-64 or arm64)
- 4 GB RAM
- 60 GB of free hard disk space
Info
The amount of disk space used depends on the number of monitored hosts and services.
Settings
The configuration of openITCOCKPIT can be customized via the openitcockpit.env file. It is recommended,
to change the login data before the first start of the container:
OITC_ADMIN_EMAIL=user@example.org
OITC_ADMIN_PASSWORD=asdf12
OITC_ADMIN_FIRSTNAME=John
OITC_ADMIN_LASTNAME=Doe
Alternatively, you can also create a new user or change the password.
It is also recommended to replace the password of Grafana admin user. To do this, set the following two variables to the same value:
OITC_GRAFANA_ADMIN_PASSWORD=bGsPMxURCjg4esgJ

GF_SECURITY_ADMIN_PASSWORD=bGsPMxURCjg4esgJ
To generate a secure password, the command pwgen -s -1 16 can be used.
As usual with Docker containers, other settings like ports or volumes can be adjusted in the compose.yml if needed.
Default values
By default, openITCOCKPIT provides these ports:
- 80 (HTTP)
- 443 (HTTPS)
The default login credentials are:
- E-Mail
user@example.org - Password:
asdf12
Preparations
-
The easiest way to check out fully containerized openITCOCKPIT is to use
gitto create a local copy of the repository that contains all the data you need.git clone https://github.com/openITCOCKPIT/openITCOCKPIT-ce-docker.git -
Change to docker directory
cd openITCOCKPIT-ce-docker -
Edit
openitcockpit.envfile and change the values username an password.
Start containers
The containers are started with the help of the command
docker compose up -d
Update containers
To update the containers of openITCOCKPIT, please follow these steps:
-
Update the local copy of your repository:
git pull origin main -
Stop running containers
docker compose down -
Run the Docker compose command to update and launch the containers:
docker compose up --pull always -d
Tags
The Docker registry of openITCOCKPIT includes the following tags for all containers:
latest- latest stable version of openITCOCKPIT (recommended)-
A version such as
4.6.4- These tags contain the specified version of openITCOCKPIT and can be used to obtain a specific stable version. -
nightly- An untested build of openITCOCKPIT which has been automatically created and released. Can be used for testing new versions and features. Not intended for production use!
Setup TLS Certificates
By default, openITCOCKPIT will generate and use a self-signed certificate. It is also possible to use own certificates like Let’s Encrypt for example.
First, you have to change the path to the certificate files through the file openitcockpit.env:
OITC_NGINX_SSL_CERTIFICATE=/tmp/Lets_Encrypt/cert.crt
OITC_NGINX_SSL_CERTIFICATE_KEY=/tmp/Lets_Encrypt/private.key
In the next step you need to mount the certificate files into the container. You can do this by adding a bind-mount for the openitcockpit container into the compose.yml
Short example:
    volumes:
      - /host/ssl/Lets_Encrypt:/tmp/Lets_Encrypt:ro                           # Pass Lets Encrypt Certificate
Full example:
  openitcockpit:
    image: openitcockpit/openitcockpit-ce:latest                              # Community Edition of openITCOCKPIT
    init: true
    env_file:
     - openitcockpit.env
    ports:
      - "80:80"       # HTTP
      - "443:443"     # HTTPS
    networks:
      - oitc-backend
    volumes:
      - naemon-config:/opt/openitc/nagios/etc/config                          # Configuration files related to Naemon
      - naemon-var:/opt/openitc/nagios/var                                    # The status.dat is required for the recurring downtimes cronjob
      - oitc-frontend-src:/opt/openitc/src_sharing/frontend                   # Frontend of openITCOCKPIT to be shared with mod_gearman container so that the container can execute the EVC plugin
      - oitc-webroot:/opt/openitc/frontend/webroot                            # Webroot of openITCOCKPIT to keep images and share files with puppeteer
      - oitc-maps:/opt/openitc/frontend/plugins/MapModule/webroot/img         # Images of the MapModule
      - oitc-agent-cert:/opt/openitc/agent                                    # TLS certificats of the openITCOCKPIT Monitoring Agent
      - oitc-agent-etc:/opt/openitc/receiver/etc                              # Configuration for the openITCOCKPIT Monitoring Agent Check Reciver
      - oitc-var:/opt/openitc/var                                             # A safe harbor to store .lock files
      - oitc-backups:/opt/openitc/nagios/backup                               # Automaticaly generated MySQL dumps
      #- oitc-import:/opt/openitc/frontend/plugins/ImportModule/webroot/files # Uplaoded files of the ImportModule
      - oitc-styles:/opt/openitc/frontend/plugins/DesignModule/webroot/css    # Custom styles of the DesignModule
      - checkmk-agents:/opt/openitc/check_mk/agents:ro
      - checkmk-etc:/opt/openitc/check_mk/etc/check_mk
      - checkmk-var:/opt/openitc/check_mk/var/check_mk
      - /host/ssl/Lets_Encrypt:/tmp/Lets_Encrypt:ro                           # Pass Lets Encrypt Certificate
Troubleshooting
Execute commands in a container
- Run the
docker pscommand to read the ID of the desired container. - In the next step, you need to 'jump' into the container using the
docker execcommand.docker exec -it d92a1431e619 bash
Starting MySQL console
- 'Jump' into the
openitcockpit-cecontainer with thedocker execcommand. - Run the command
mysql --defaults-file=/opt/openitc/etc/mysql/mysql.cnfto get a MySQL shell.
Query Gearman status
- 'Jump' into the
openitcockpit-cecontainer with thedocker execcommand. - Run the command
gearadmin --status -h gearmandto get a gearman status output.
If you have customized the hostname of the gearman job server, you can read the value directly from the environment variable: gearadmin --status -h $OITC_GEARMAN_ADDRESS.
Restarting services
Normally, you do not have to restart services manually. However, via the openitcockpit-ce container it is possible to restart certain services in other containers.
The oitc supervisor --help command can be used for this.
Examples:
oitc supervisor status naemon
oitc supervisor restart nginx
oitc supervisor stop nginx
oitc supervisor start nginx
Install your own monitoring plugins
openITCOCKPIT supports two different methods to extend the monitoring capabilities with custom check plugins. The containerized method is recommended for users that have experience with building and maintaining container images.
If you prefer a bare-metal server or virtual machine for this have a look at the traditional method.
Containerized method
The container openitcockpit/mod_gearman_worker is responsible for running monitoring plugins. This container is always based on
the current LTS version of Ubuntu and can be used as a base image for new containers.
Therefore, you must first create your own Dockerfile, which will install all the plugins you want. In this example, the container will be extended with the plugin
check_ssl_cert.
FROM openitcockpit/mod_gearman_worker:latest

USER root

# Install plugin dependencies
ENV DEBIAN_FRONTEND noninteractive
RUN apt-get update && \
    apt-get install -y perl wget curl bind9-host bc openssl nmap

# Install the plugin
RUN wget https://github.com/matteocorti/check_ssl_cert/releases/download/v2.69.0/check_ssl_cert-2.69.0.tar.gz &&\
    tar xfv check_ssl_cert-2.69.0.tar.gz &&\
    cp check_ssl_cert-2.69.0/check_ssl_cert /opt/openitc/nagios/libexec/check_ssl_cert &&\
    chmod +x /opt/openitc/nagios/libexec/check_ssl_cert
Create the new Docker image:
docker build --rm -t openitcockpit/custom_mod_gearman_worker:latest .
The last step is, to add your own Docker image to the compose.yml file. Find the container openitcockpit/mod_gearman_worker and replace the image with your ownimage.
For example: openitcockpit/custom_mod_gearman_worker:latest.
After restarting the containers, your custom container will be used.
[Ubuntu][11:49]root@srvcontainerswarm04/tmp/custom_mod_gearman# docker exec -it dffc5ffe8681 bash
root@dffc5ffe8681:/# /opt/openitc/nagios/libexec/check_ssl_cert -H openitcockpit.io
SSL_CERT OK - openitcockpit.io:443, https, x509 certificate 'openitcockpit.io' from 'Let's Encrypt' valid until Aug  6 21:32:16 2023 GMT (expires in 76 days)|days_chain_elem1=76;20;15;; days_chain_elem2=847;20;15;; days_chain_elem3=497;20;15;;
root@dffc5ffe8681:/#
Traditional method
openITCOCKPIT make use of Mod-Gearman to distribute the execution of check plugins across multiple servers (or containers).
If you don't feel comfortable by building and maintaining your own container image, openITCOCKPIT provides a package, so you can use any Debian, Ubuntu or Red Hat Enterprise Linux based system as a worker system. Depending on your workload, it could make sense to spin-up multiple worker instances.
Warning
For security reasons we highly recommend to enable encryption.
Prepare containers
First you need to prepare your current container setup a bit.
-
Expose Gearmand
To be able to connect an external Mod-Gearman Worker to openITCOCKPIT, you have to expose the
Gearman-Job-Serverto your network. First, edit the filecompose.ymland search for thegearmandservice. Replace the line- "4730" # Gearman-Job-Serverwith
- "4730:4730" # Gearman-Job-Server -
Disable processing of host and service checks of openITCOCKPIT
To make sure that all host and services checks get executed by your own custom worker, it is important to disable the default check execution of openITCOCKPIT. To do so, edit the file
openitcockpit.envand set the following values:##### ## Naemon Environment Variables ##### MOD_GEARMAN_ENCRYPTION=yes MOD_GEARMAN_KEY=should_be_changed ##### ## Mod_Gearman_Worker Environment Variables ##### MOD_GEARMAN_WORKER_EVENTHANDLER=no MOD_GEARMAN_WORKER_NOTIFICATIONS=yes MOD_GEARMAN_WORKER_SERVICES=no MOD_GEARMAN_WORKER_HOSTS=no MOD_GEARMAN_WORKER_ENCRYPTION=yes MOD_GEARMAN_WORKER_KEY=should_be_changedTo apply the changes, restart the containers. The
openitcockpit/mod_gearman_workercontainer will still be used to send notifications. This behavior can also be changed, but to do so is only recommended for power users.
Prepare VM
Now it is time to setup a VM (or server) which you want to use for check execution. We recommend to start with a blank VM of the latest Ubuntu LTS release.
-
Load the repository.
Please make sure to enable the openITCOCKPIT repository on your system.
-
Install dependencies
apt-get install openitcockpit-mod-gearman-worker-goAll check plugins are located at
/opt/openitc/nagios/libexec. You can add any custom plugin you need to this (or any other) location. -
Connect worker to openITCOCKPIT Server
Open the file
/etc/openitcockpit-mod-gearman/worker.cfgand set the hostname or IP-Address of your openITCOCKPIT Server.server=srvpod03.example.org:4730 # Also make sure to set same encryption parameters encryption=yes key=should_be_changedTo apply the settings, restart the service:
systemctl restart mod-gearman-worker.service
Enabling encryption
By default, openITCOCKPIT has no encryption enabled for Mod-Gearman. This is due to the fact, that by default all communication is only available through the containers that are part of the same container network.
In case you have exposed the Gearman Port (4730) or are using any external Mod-Gearman Workers, we recommend to enable encryption. Mod-Gearman has a shared secret, so you need to make the changes on all affected systems!
For containers edit the file openitcockpit.env and adjust the following variables:
#####
## Naemon Environment Variables
#####

MOD_GEARMAN_ENCRYPTION=yes
MOD_GEARMAN_KEY=should_be_changed

#####
## Mod_Gearman_Worker Environment Variables
#####

MOD_GEARMAN_WORKER_ENCRYPTION=yes
MOD_GEARMAN_WORKER_KEY=should_be_changed
For traditional setups, edit the configuration file /etc/openitcockpit-mod-gearman/worker.cfg:
encryption=yes
key=should_be_changed
The key option contains the shared secret and should be replaced with a secure string.
To apply the changes restart all containers or the mod-gearman-worker.service.
Portainer
Portainer Community Edition is a web interface that makes it convenient and easy to manage Docker containers.
Through Stacks, the Portainer interface allows you to manage Docker Compose files. To do this, click Add stack under Stacks.
-
As name you can set
openitcockpit-ce. -
You can either add the Docker Compose File via the web editor, or alternatively get it directly from the GitHub repository
https://github.com/openITCOCKPIT/openITCOCKPIT-ce-docker.Please note that all references to the
openitcockpit.envfile must be replaced bystack.env.To do this, look for these entries
env_file:
 - openitcockpit.env
Replace with
env_file:
 - stack.env
You can do this with the help of the web editor. (
CTRL + ForCMD + F)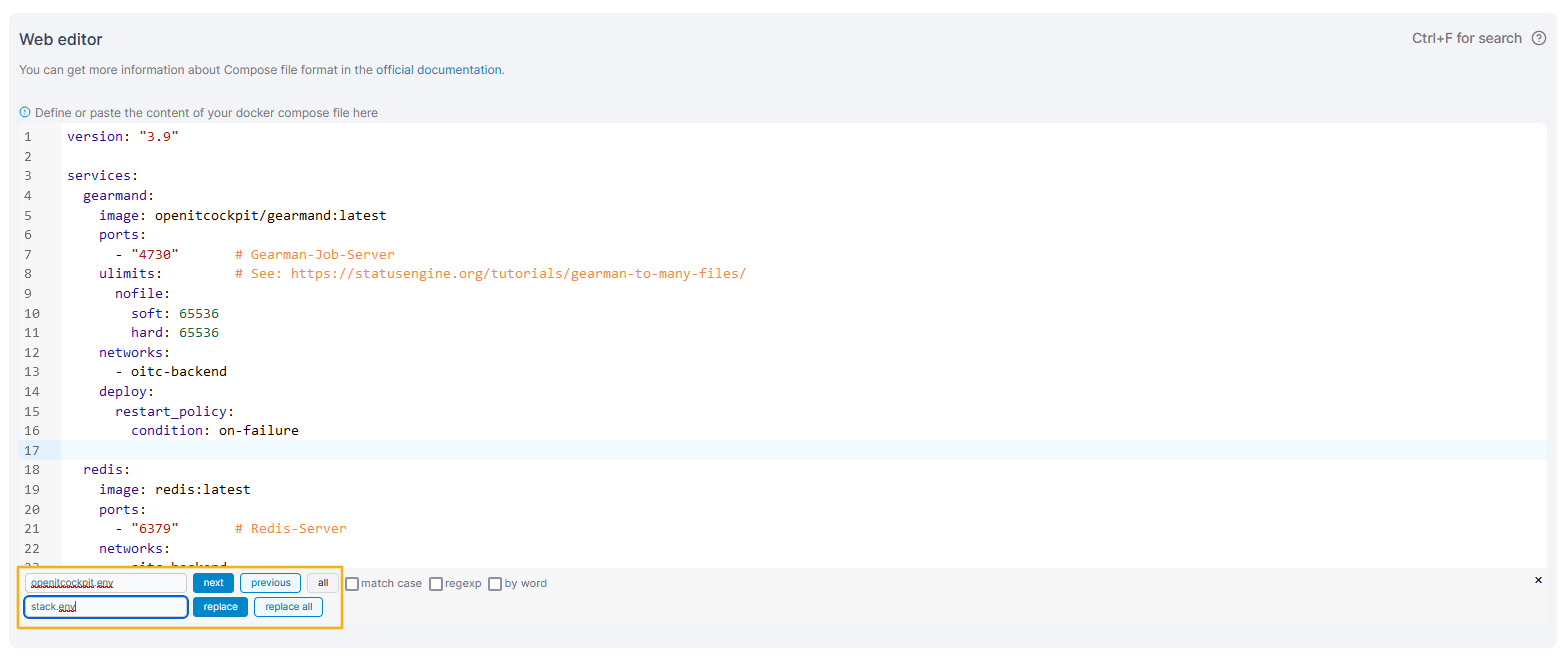
-
Under
Environment variablesselectAdvanced modeand copy the contents of the file openitcockpit.env. Alternatively, you can selectLoad variables from .env filethen upload the fileopenitcockpit.env.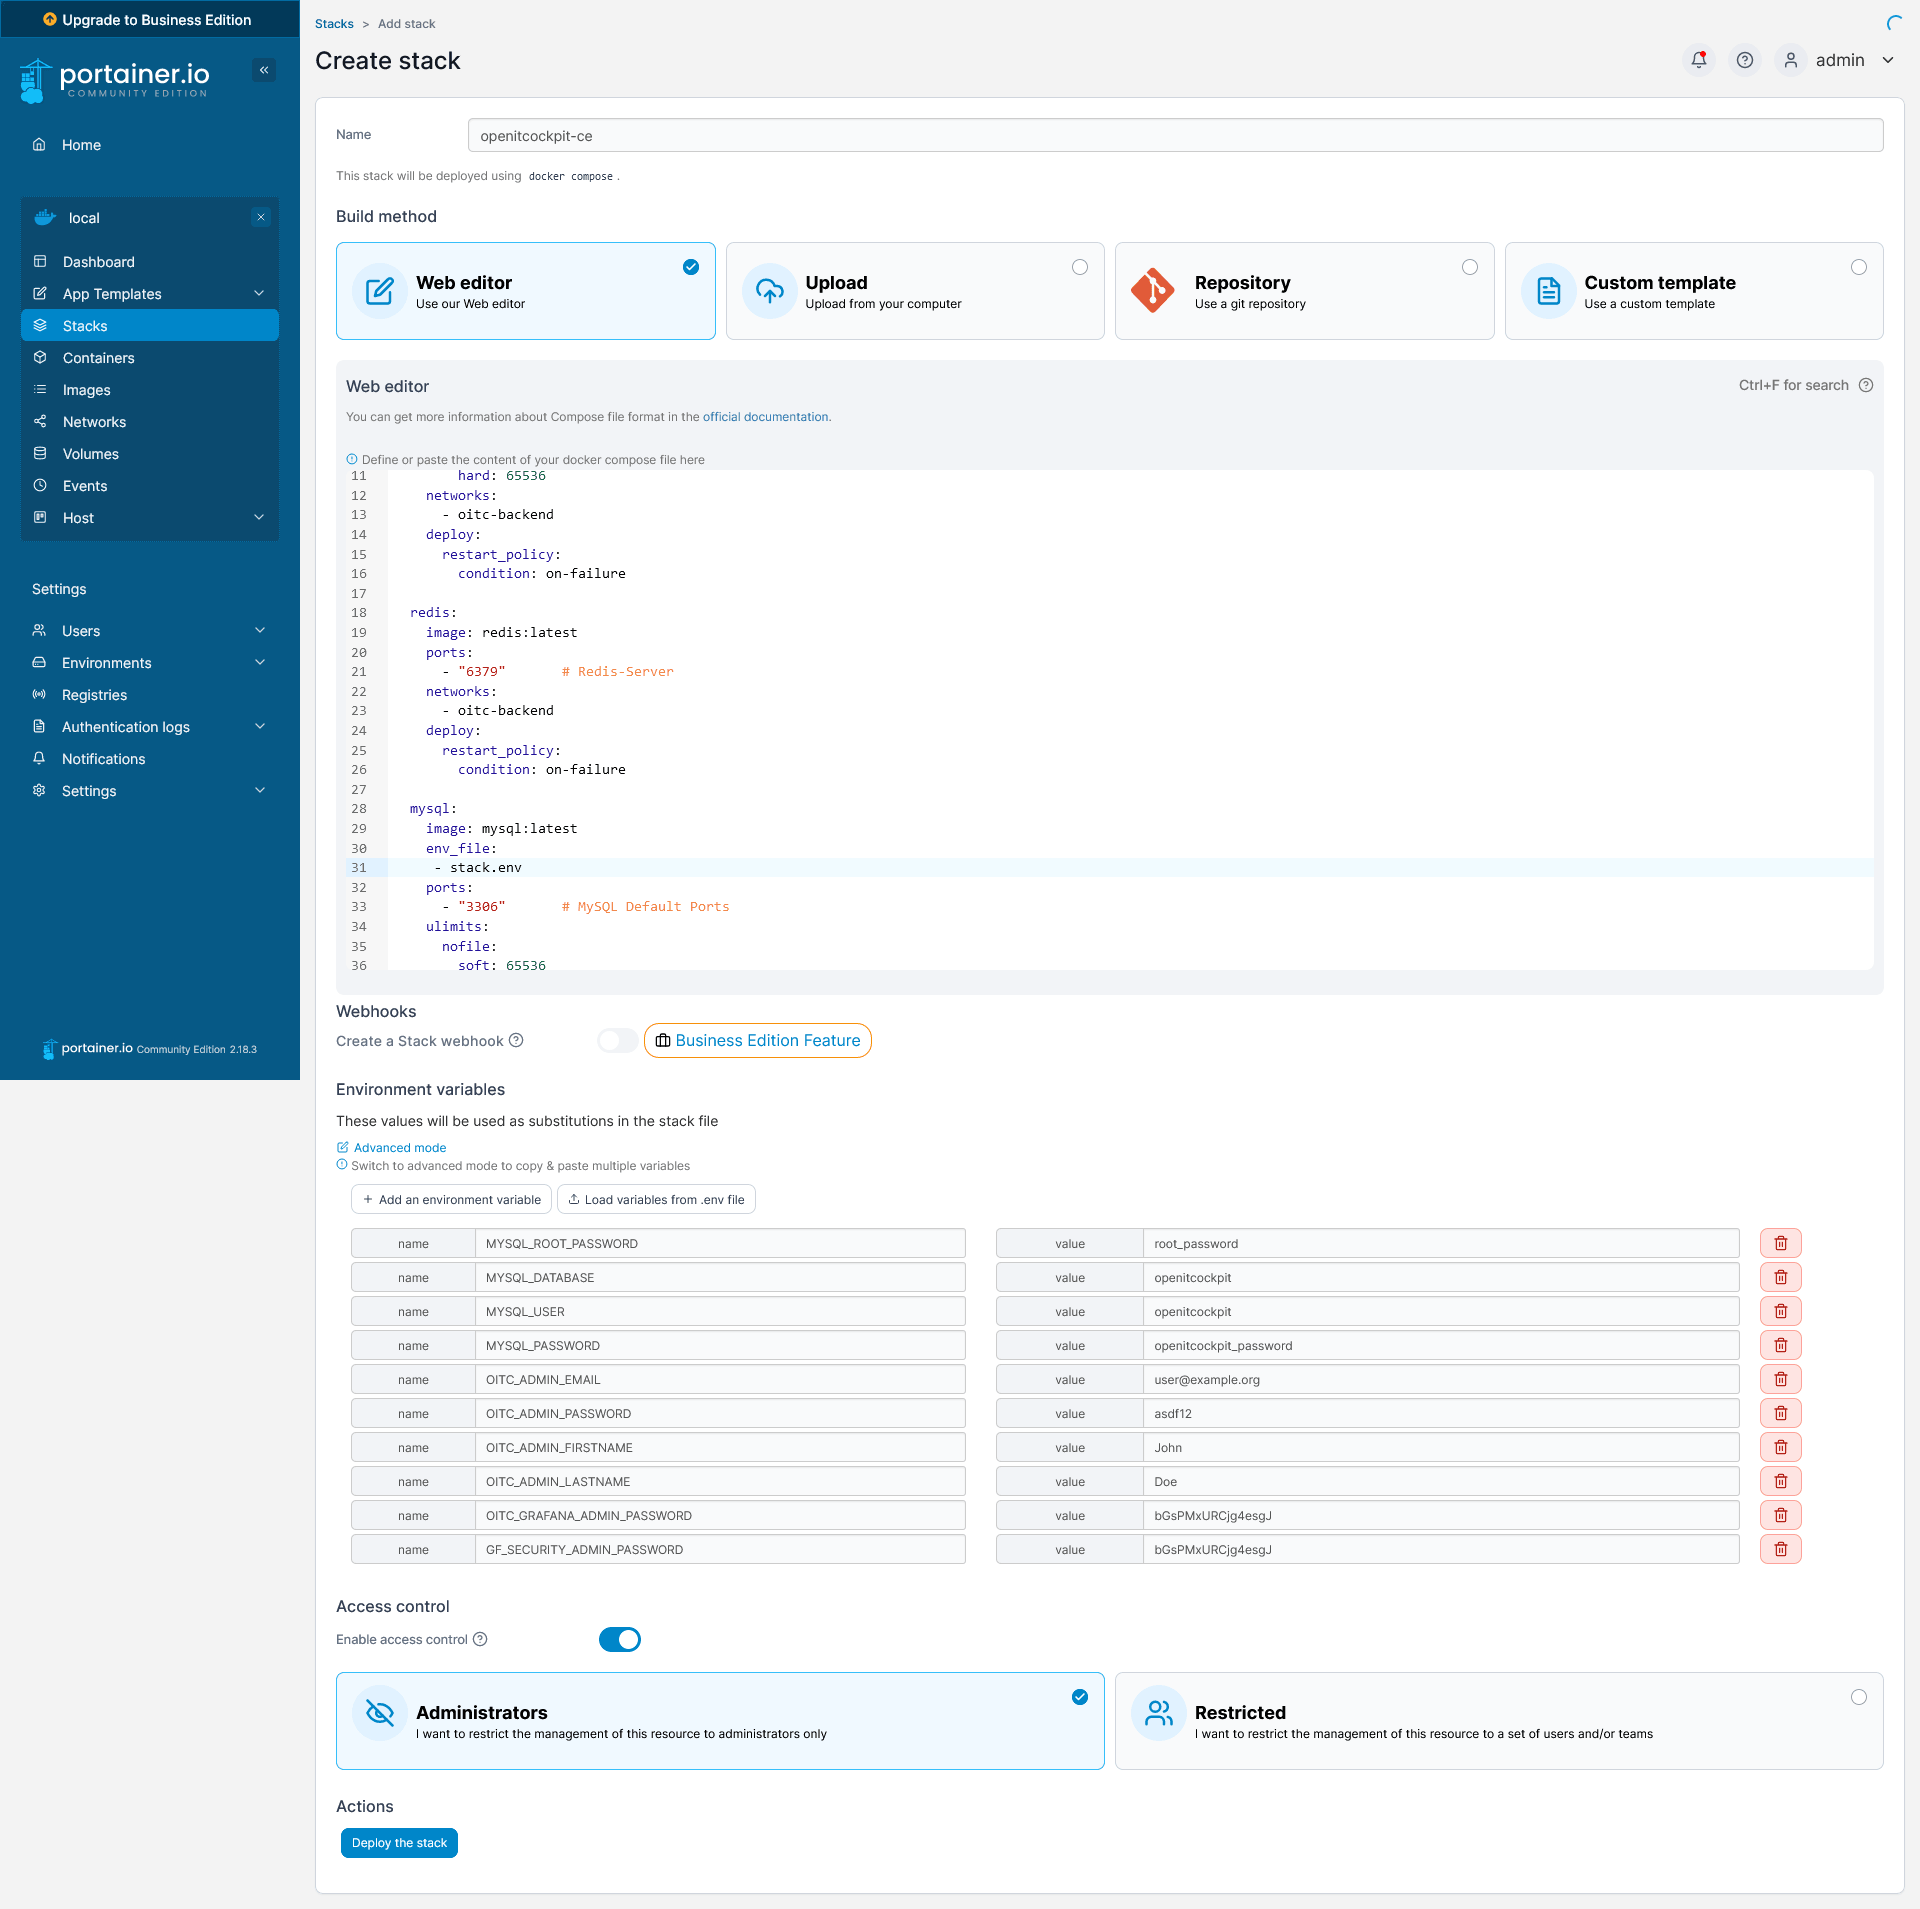
-
Click on
Deploy the stackPortainer will now create the complete stack and start all containers.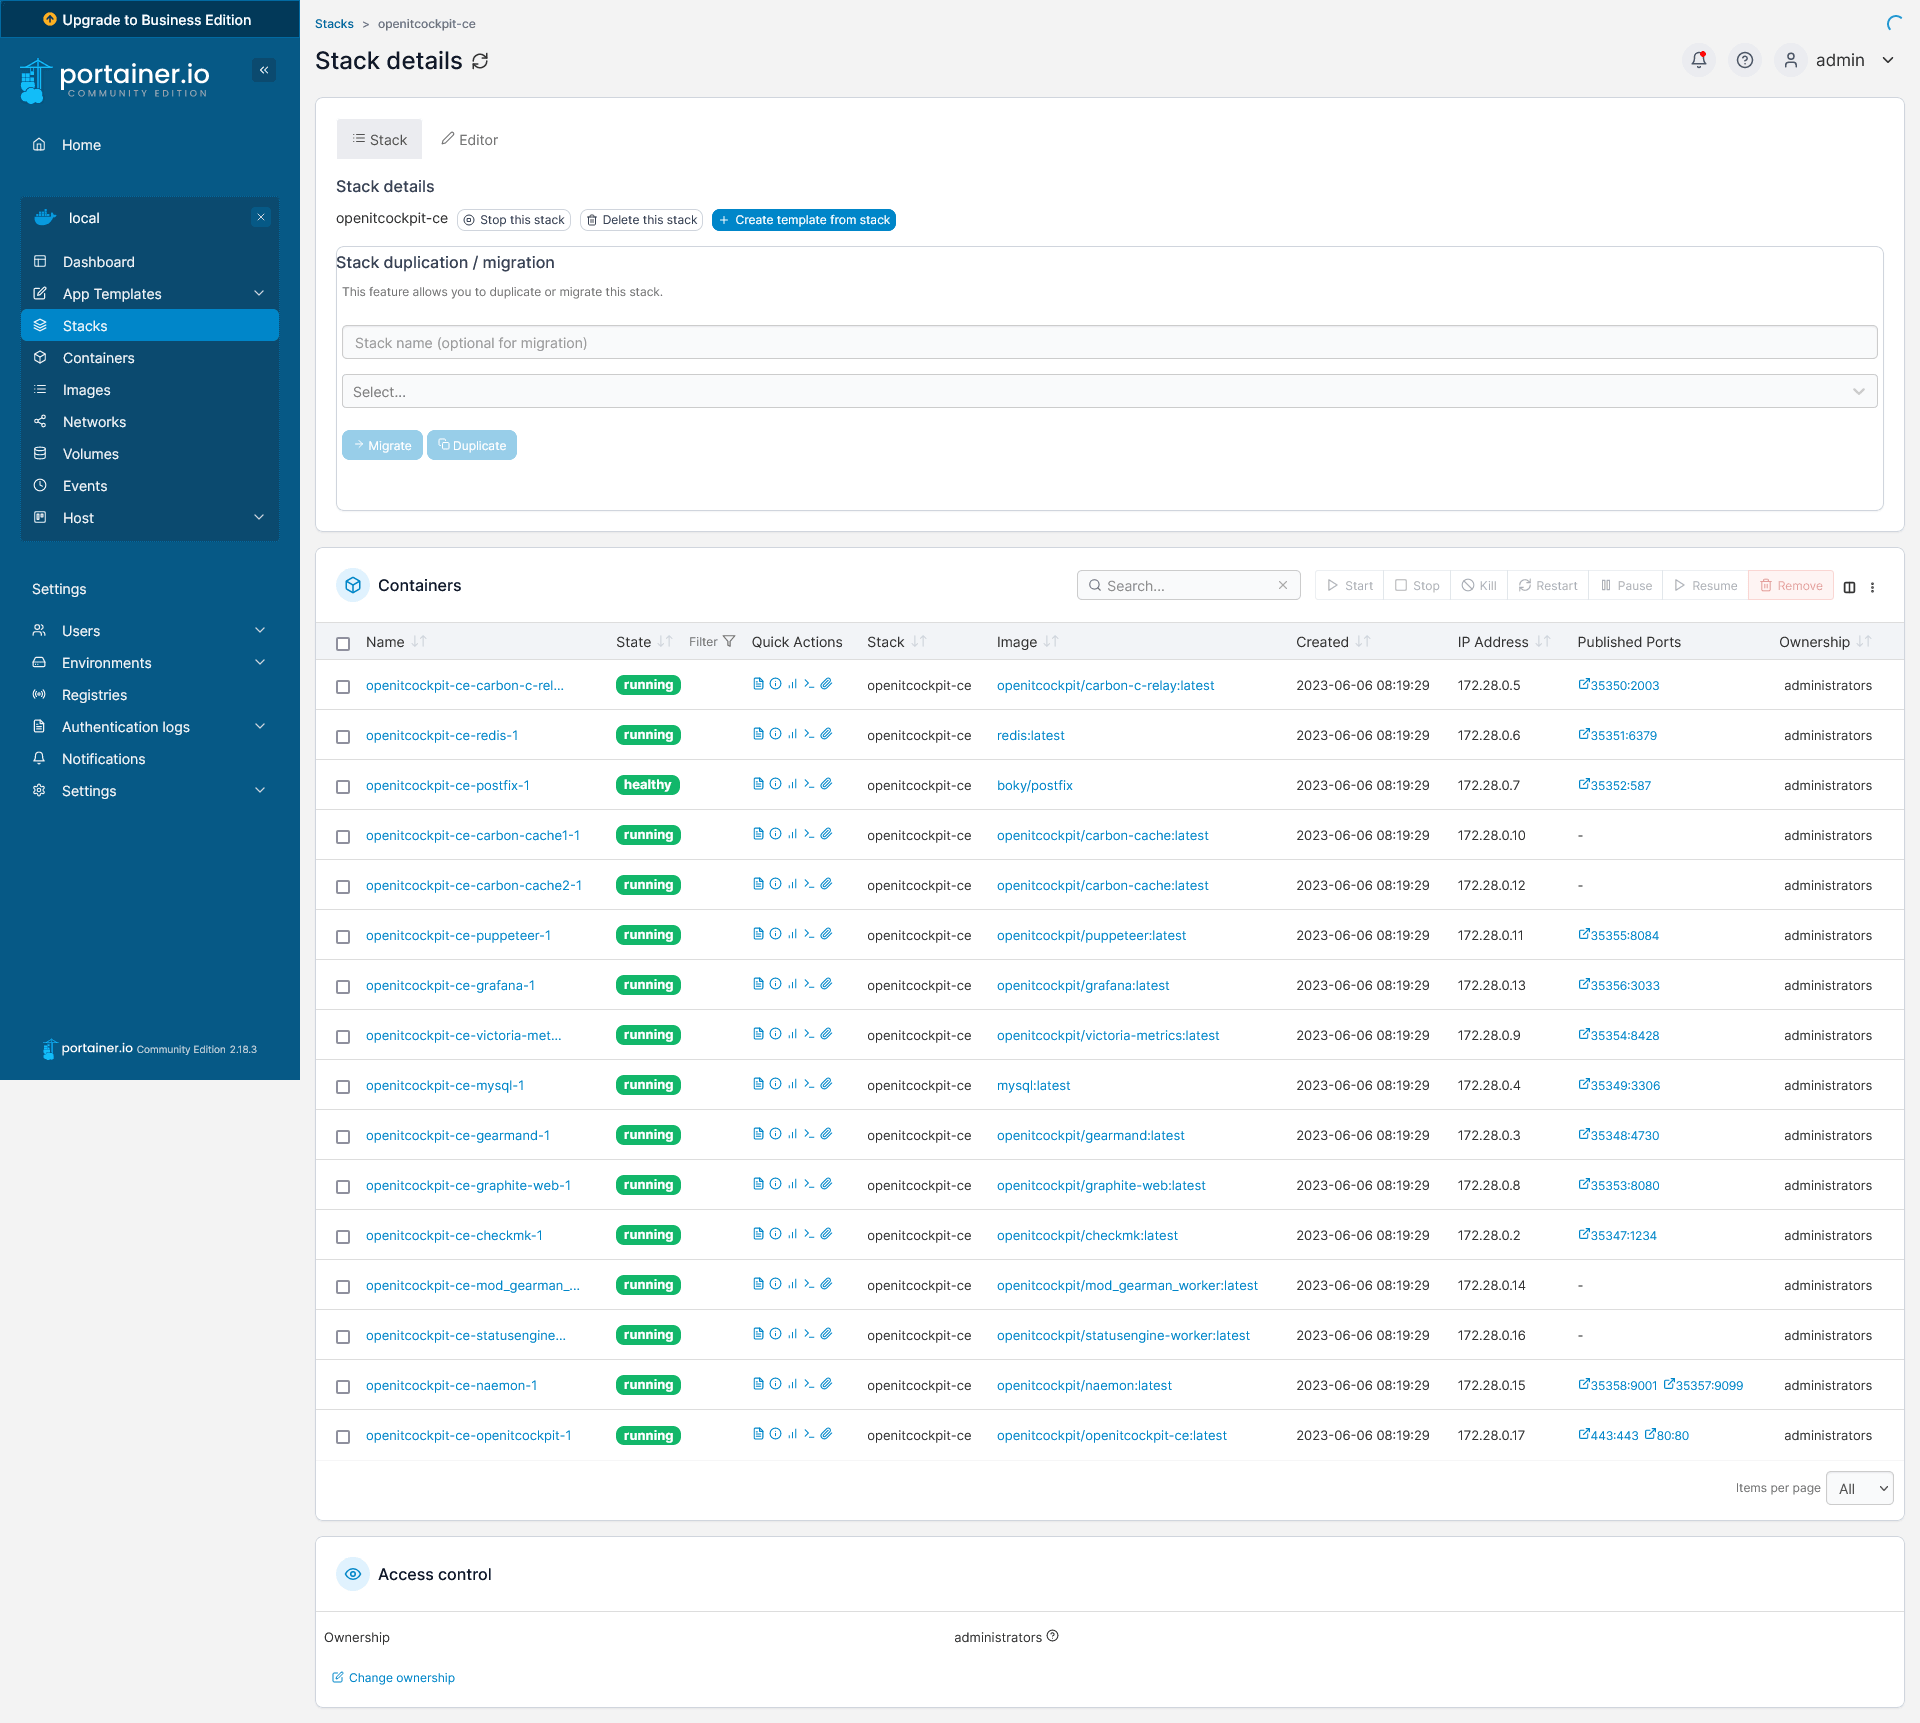
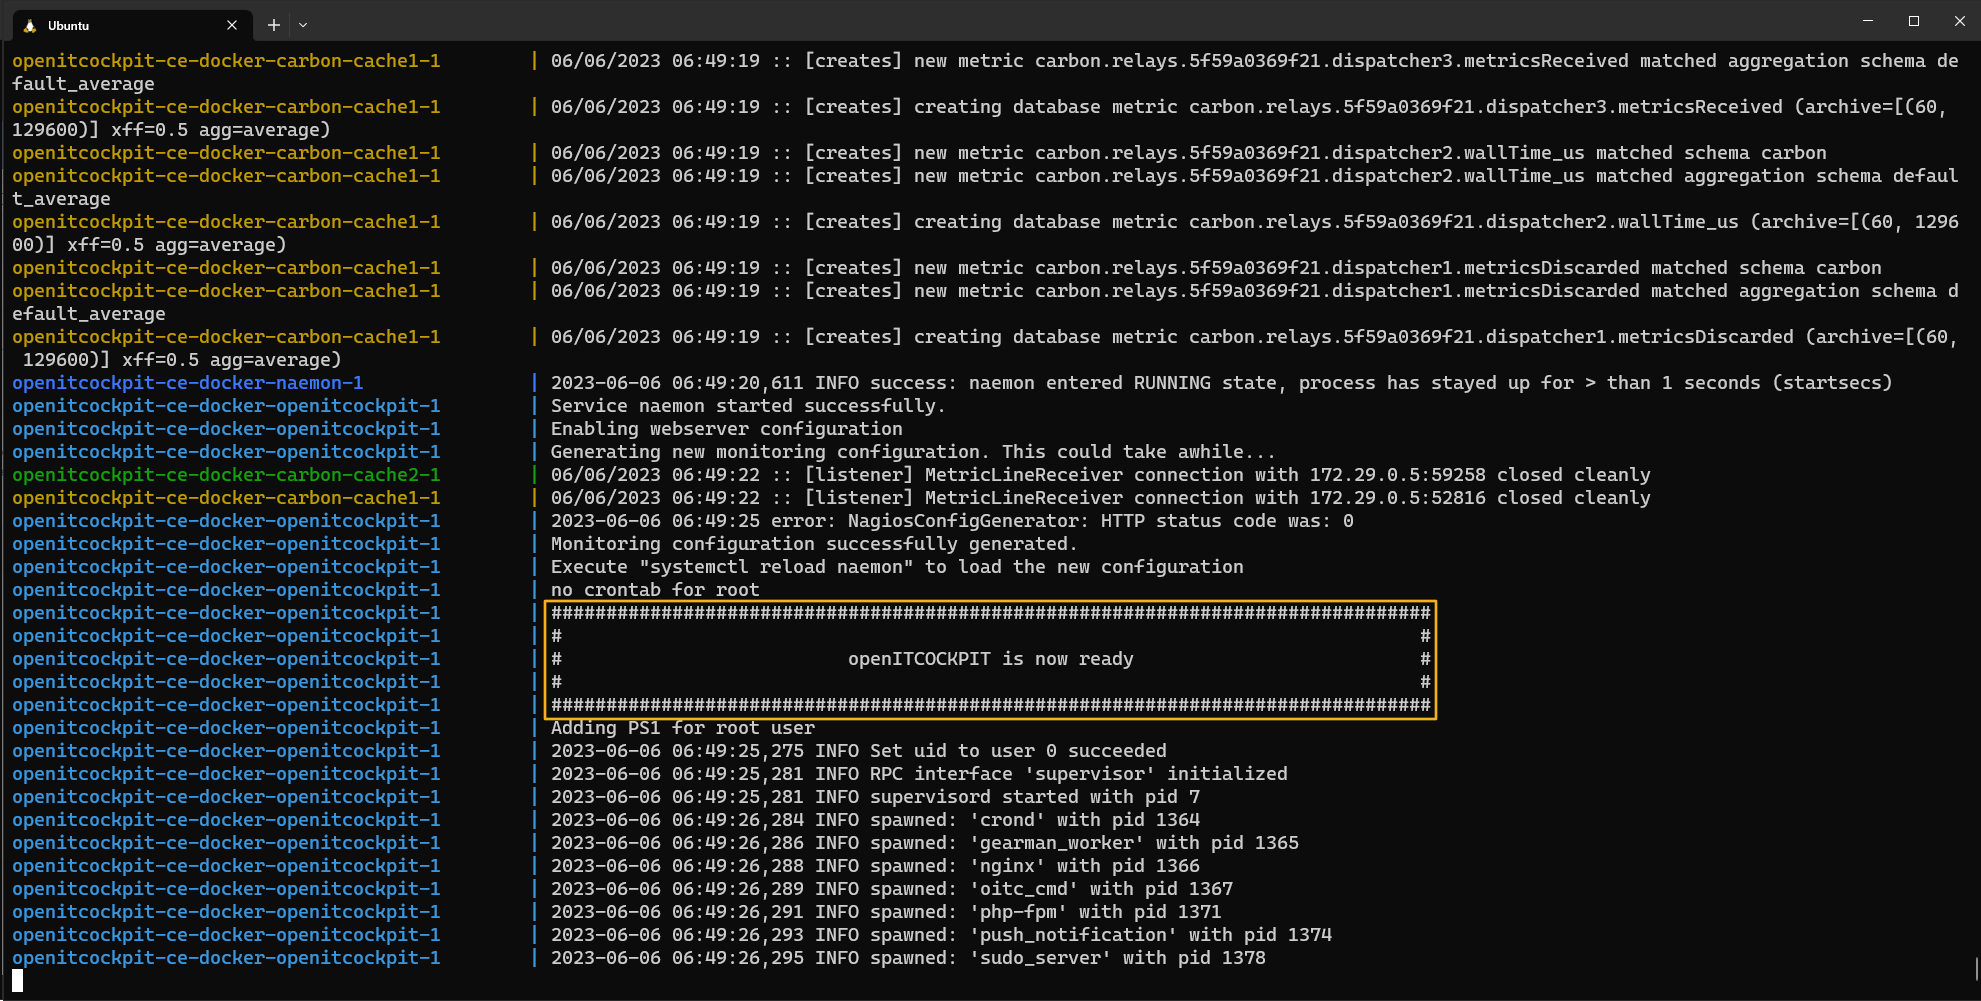
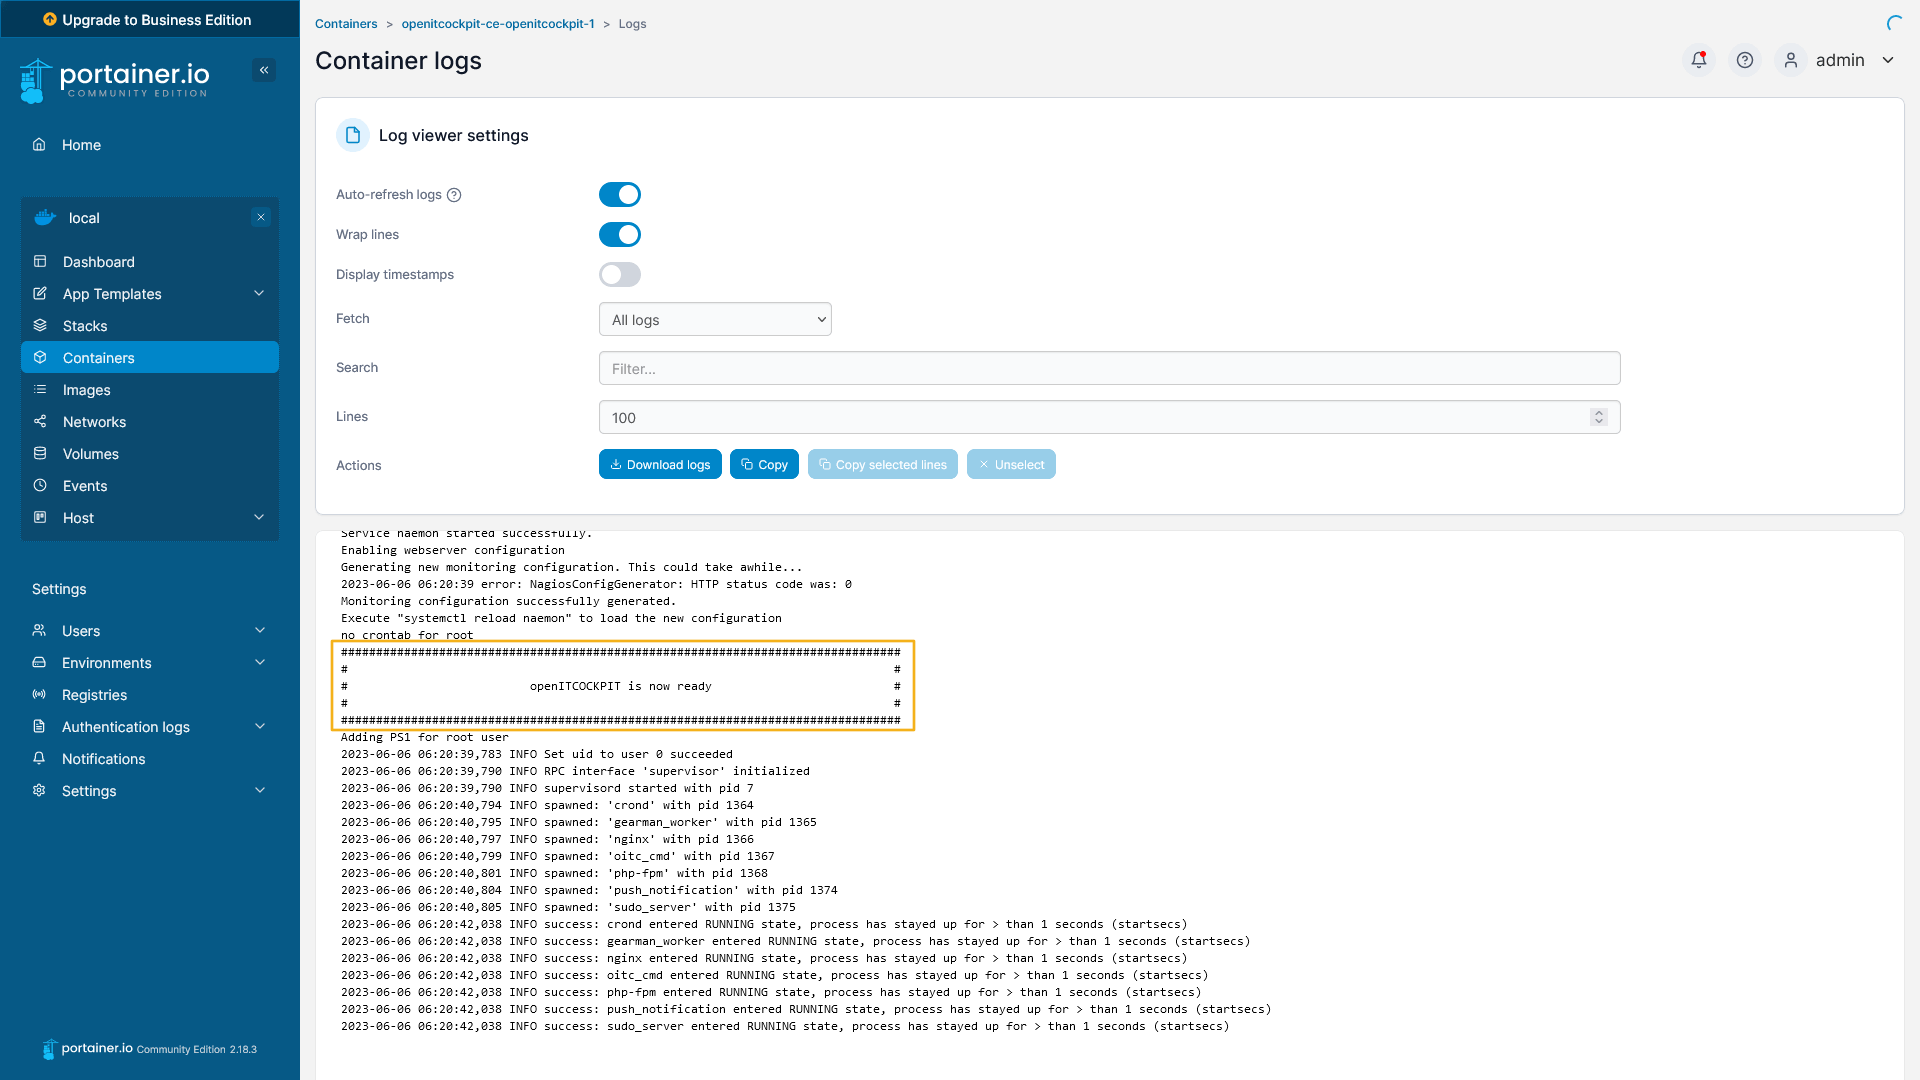
Startup process
The startup process of the openITCOCKPIT container can take some time. The container checks the state of the database at each startup and performs any updates.
As soon as the openITCOCKPIT frontend is accessible, the container outputs the message openITCOCKPIT is now ready.
Docker
Portainer
MySQL Binary Log
By default, the binary log of the MySQL server is disabled in the compose.yml file.
The binary log is required for replication between multiple MySQL servers but can also be useful in case of database recovery.
Further information can be found in the MySQL documentation.
If you want to enable the binary log, you need to remove the --skip-log-bin parameter from the compose.yml file. The retention period of the binary logs can be controlled by the
--binlog-expire-logs-seconds=2592000 parameter, which is set to 30 days by default.