AI-assisted content notice: This documentation was created with support from artificial intelligence and has been reviewed by humans for accuracy.
Mobile App CE
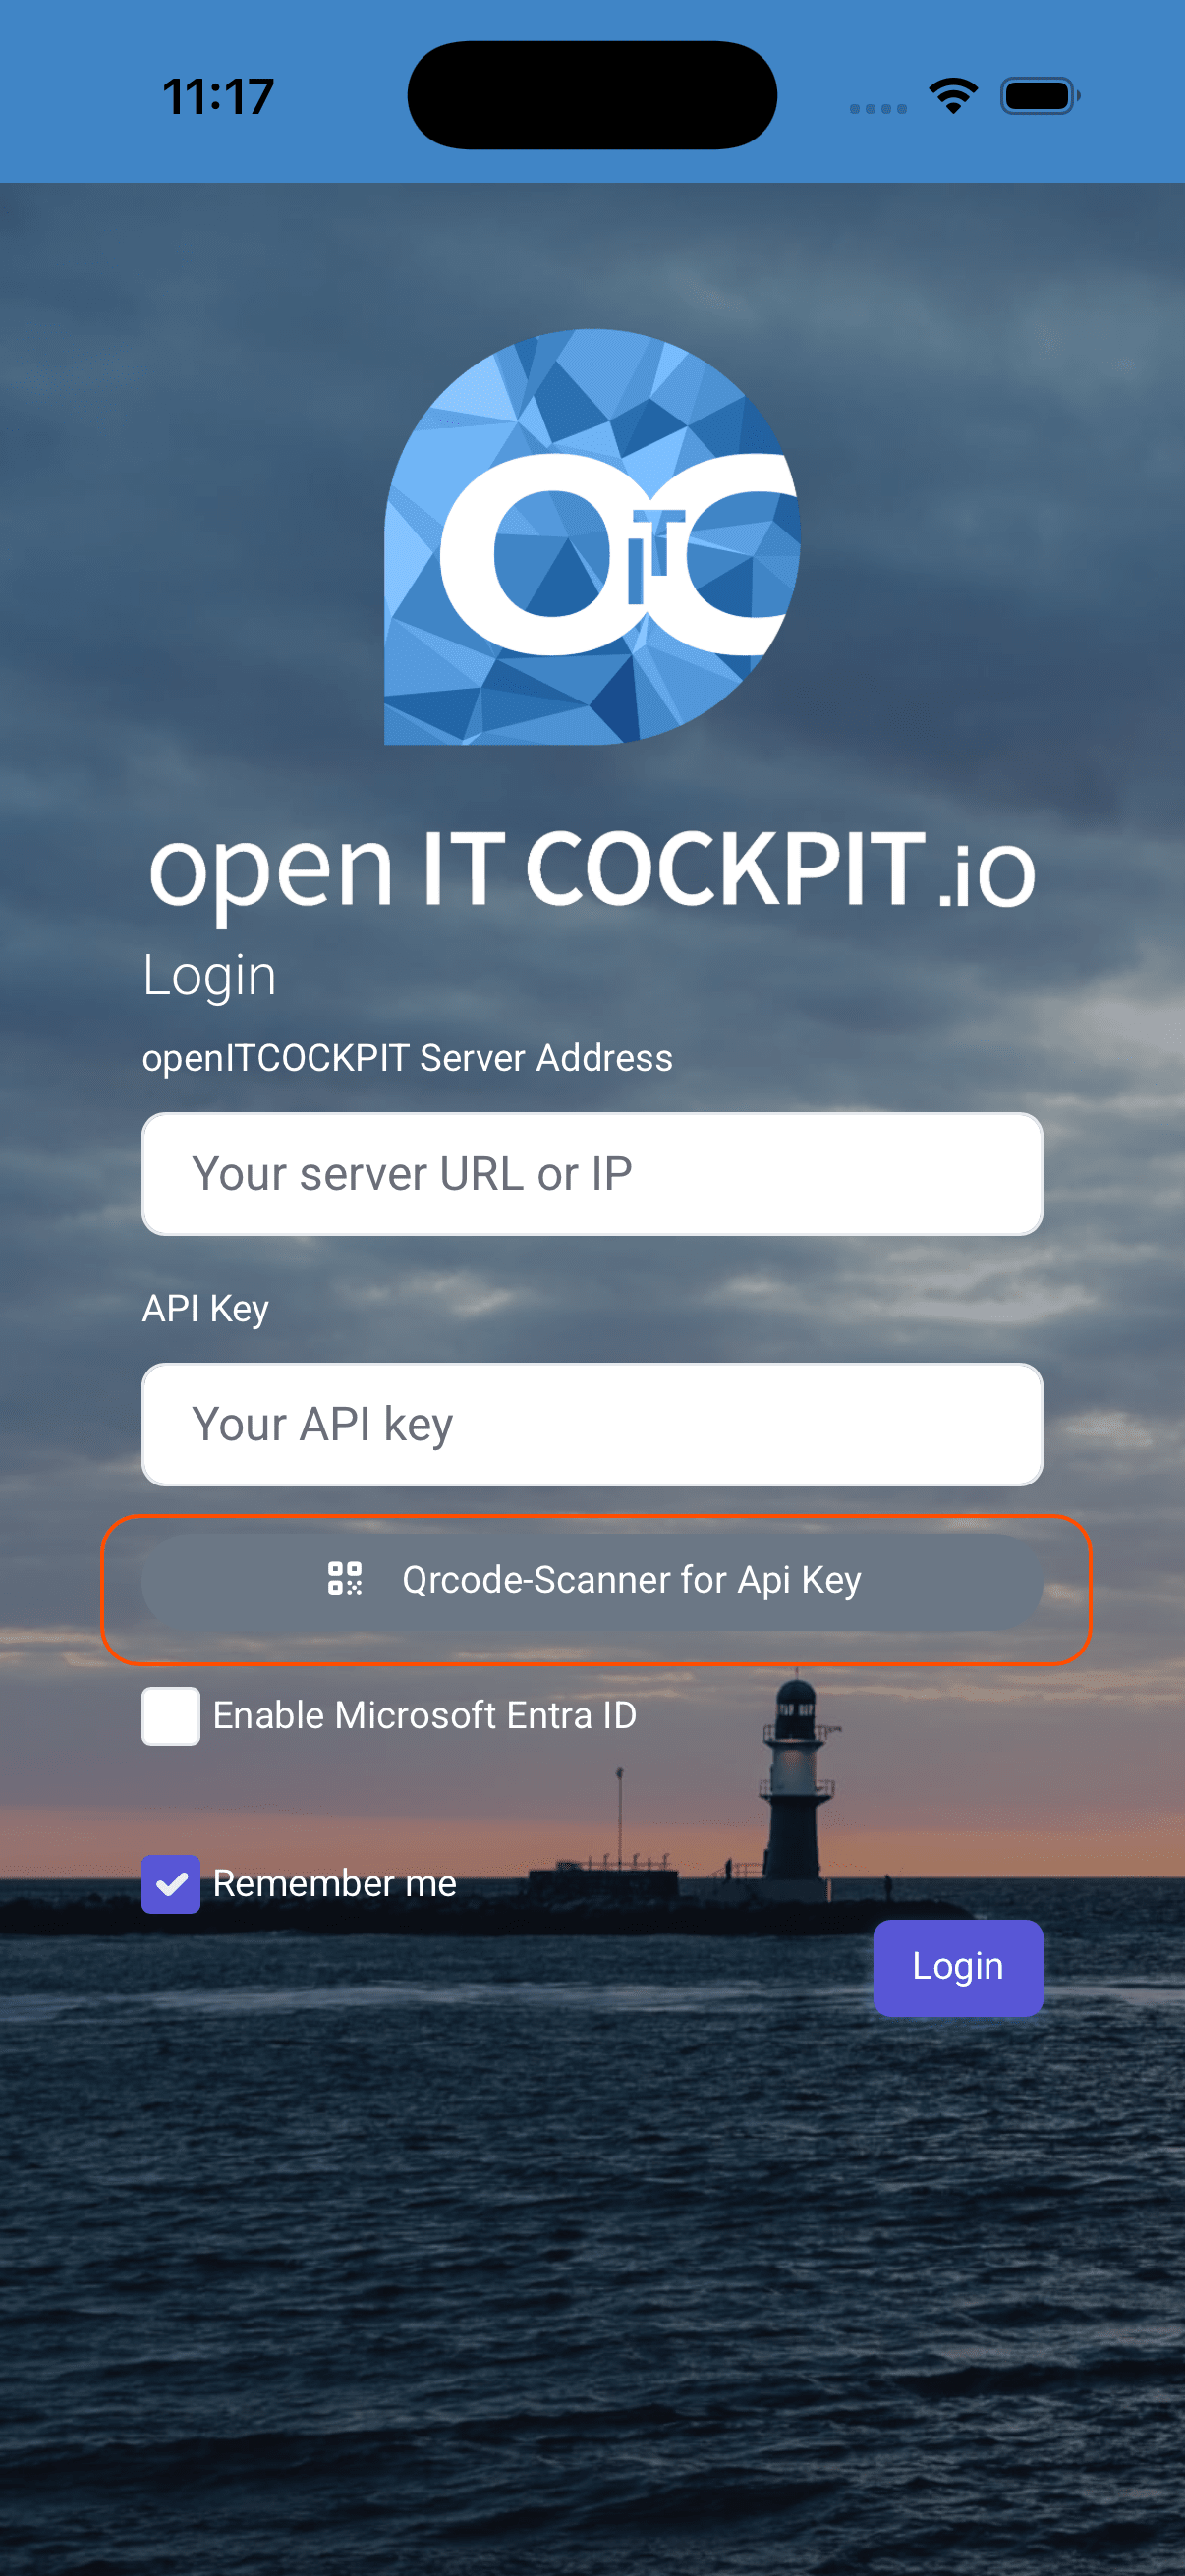
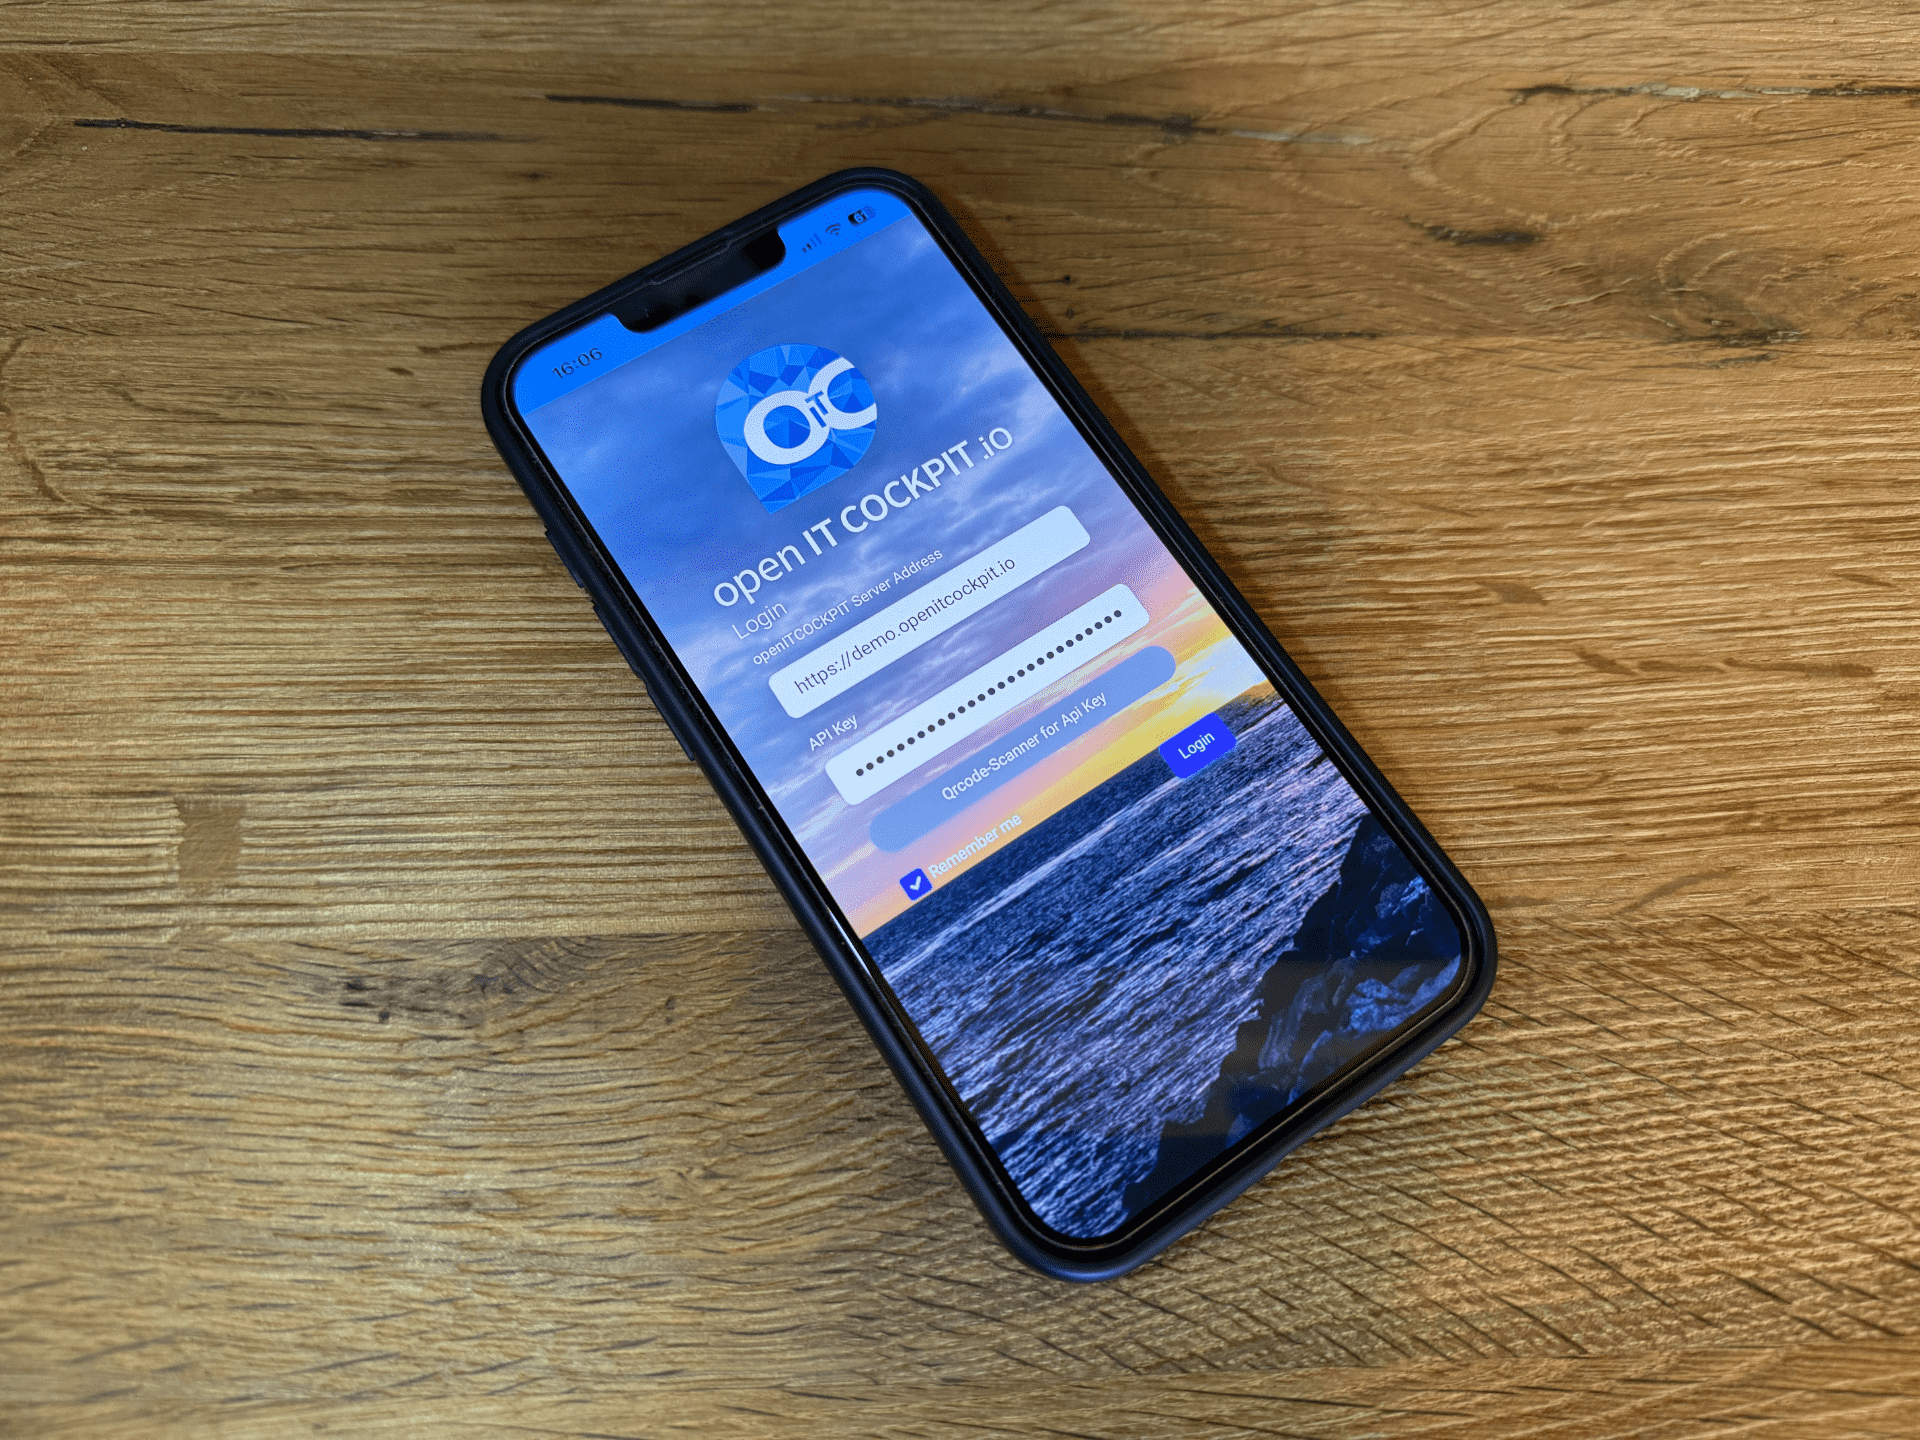 Graphic: openITCOCKPIT iOS App running on an iPhone 16e
Requirements
- openITCOCKPIT 5.6.1 or higher
- iOS 17.5 or higher
- Android 12 or higher
- The openITCOCKPIT server must be reachable from the mobile device (e.g. via VPN or public IP address)
- A valid HTTPS certificate is required. Self-signed certificates will most likely not work.
Download the App
The App can be downloaded from the respective app stores.
The app is free of charge and can be used with any openITCOCKPIT server, regardless of the edition (Community or Enterprise).
iOS

Android

Setup Push Notifications
A huge benefit of the mobile app, compared to its web-based counterpart is, the ability to receive push notifications for alerts. To enable this, you need to configure your openITCOCKPIT server to send notifications though the Push Gateway Service provided by AVENDIS GmbH. This service is free of charge for openITCOCKPIT users.
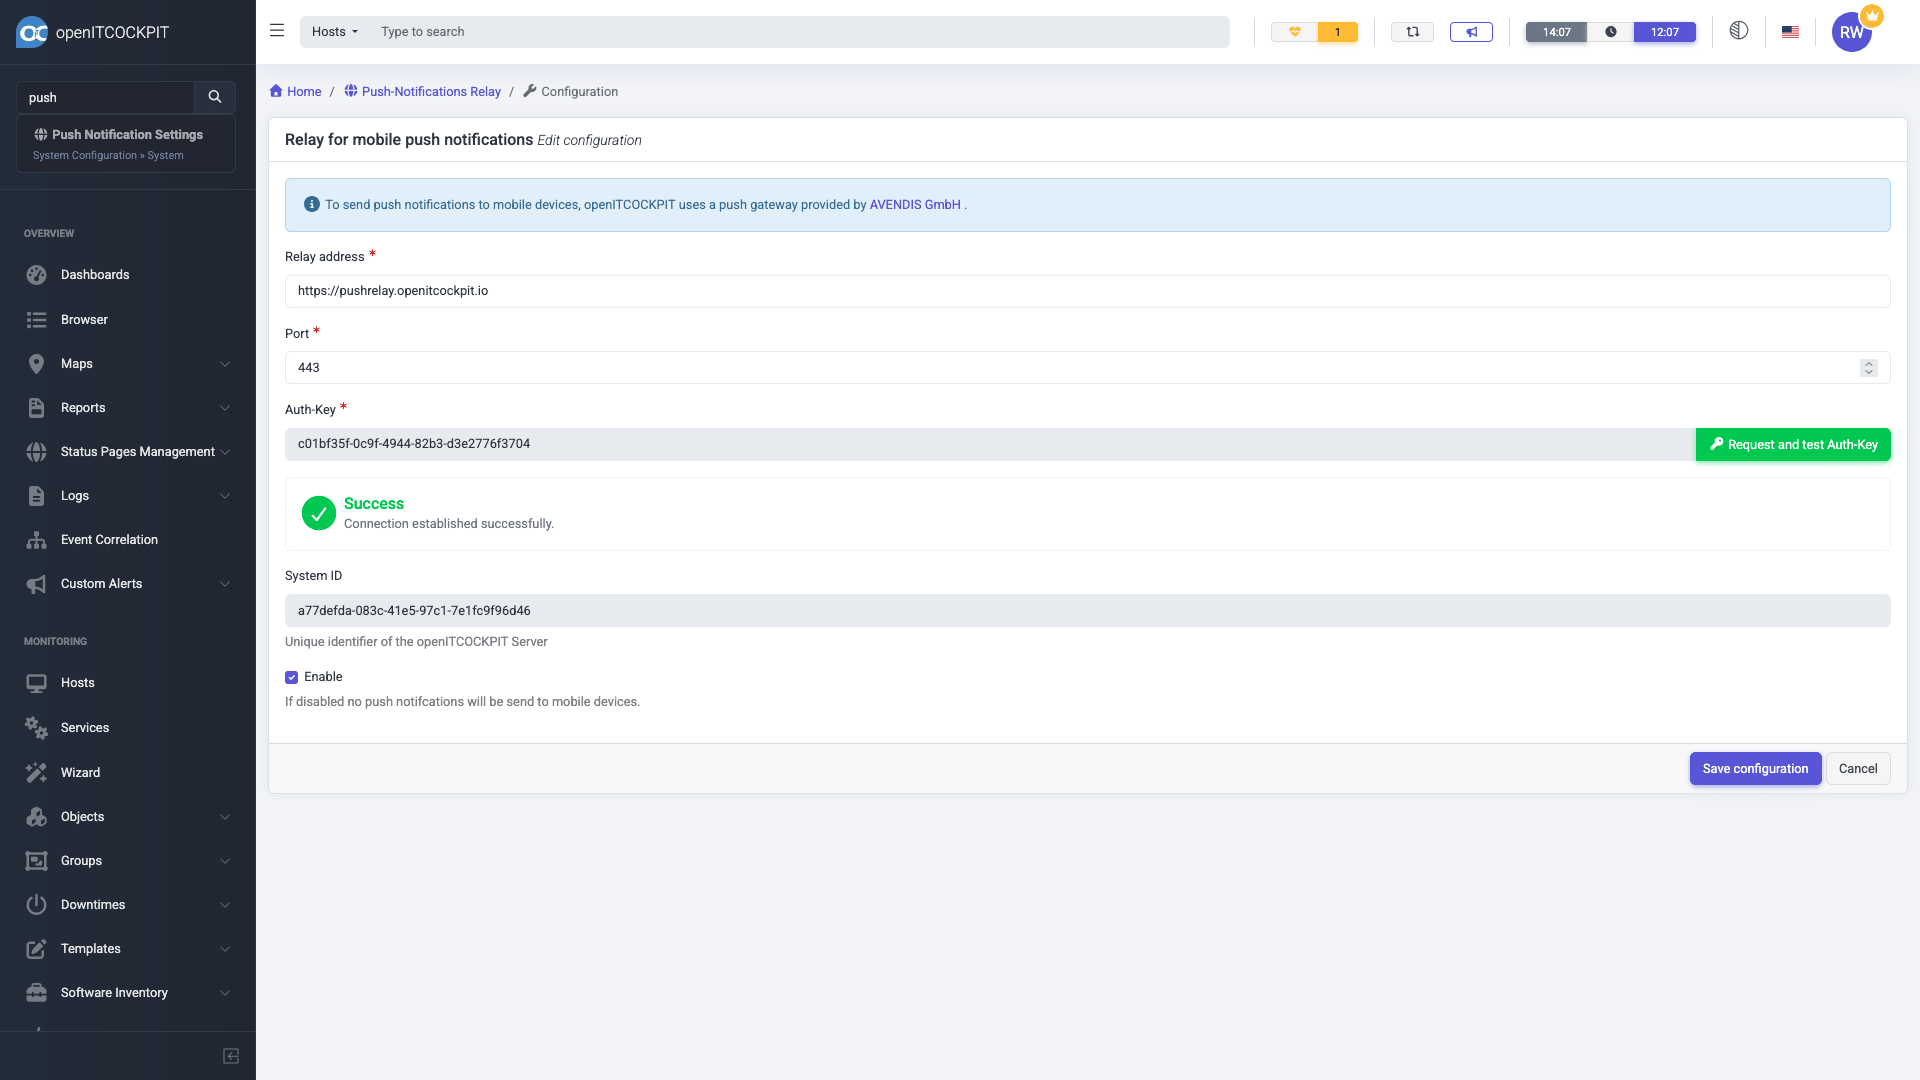
- Navigate to
System configuration -> System -> Push Notification Settings - Set Relay address to
https://pushrelay.openitcockpit.io - Set Port to
443 - Click on
Request and test Auth-Key.
openITCOCKPIT will now request an authentication key from the Push Gateway Service. The Push Gateway Service will use the provided System ID to identify your openITCOCKPIT server and will generate a new authentication key for your server.
To complete the setup, make sure to click on Save configuration after the key has been generated.
Assign Users to Contacts
It is important to assign your openITCOCKPIT user one (or more) contact(s) in order to receive push notifications for alerts.
First, navigate to Monitoring -> Objects -> Contacts and select the contact you want to assign to your user, or create a new contact.
Make sure to select your openITCOCKPIT user in the Users field of the contact configuration.
Also tick the checkbox Push notifications to browser for hosts and services. This option will now send Notifications to both, the web interface and the mobile app.
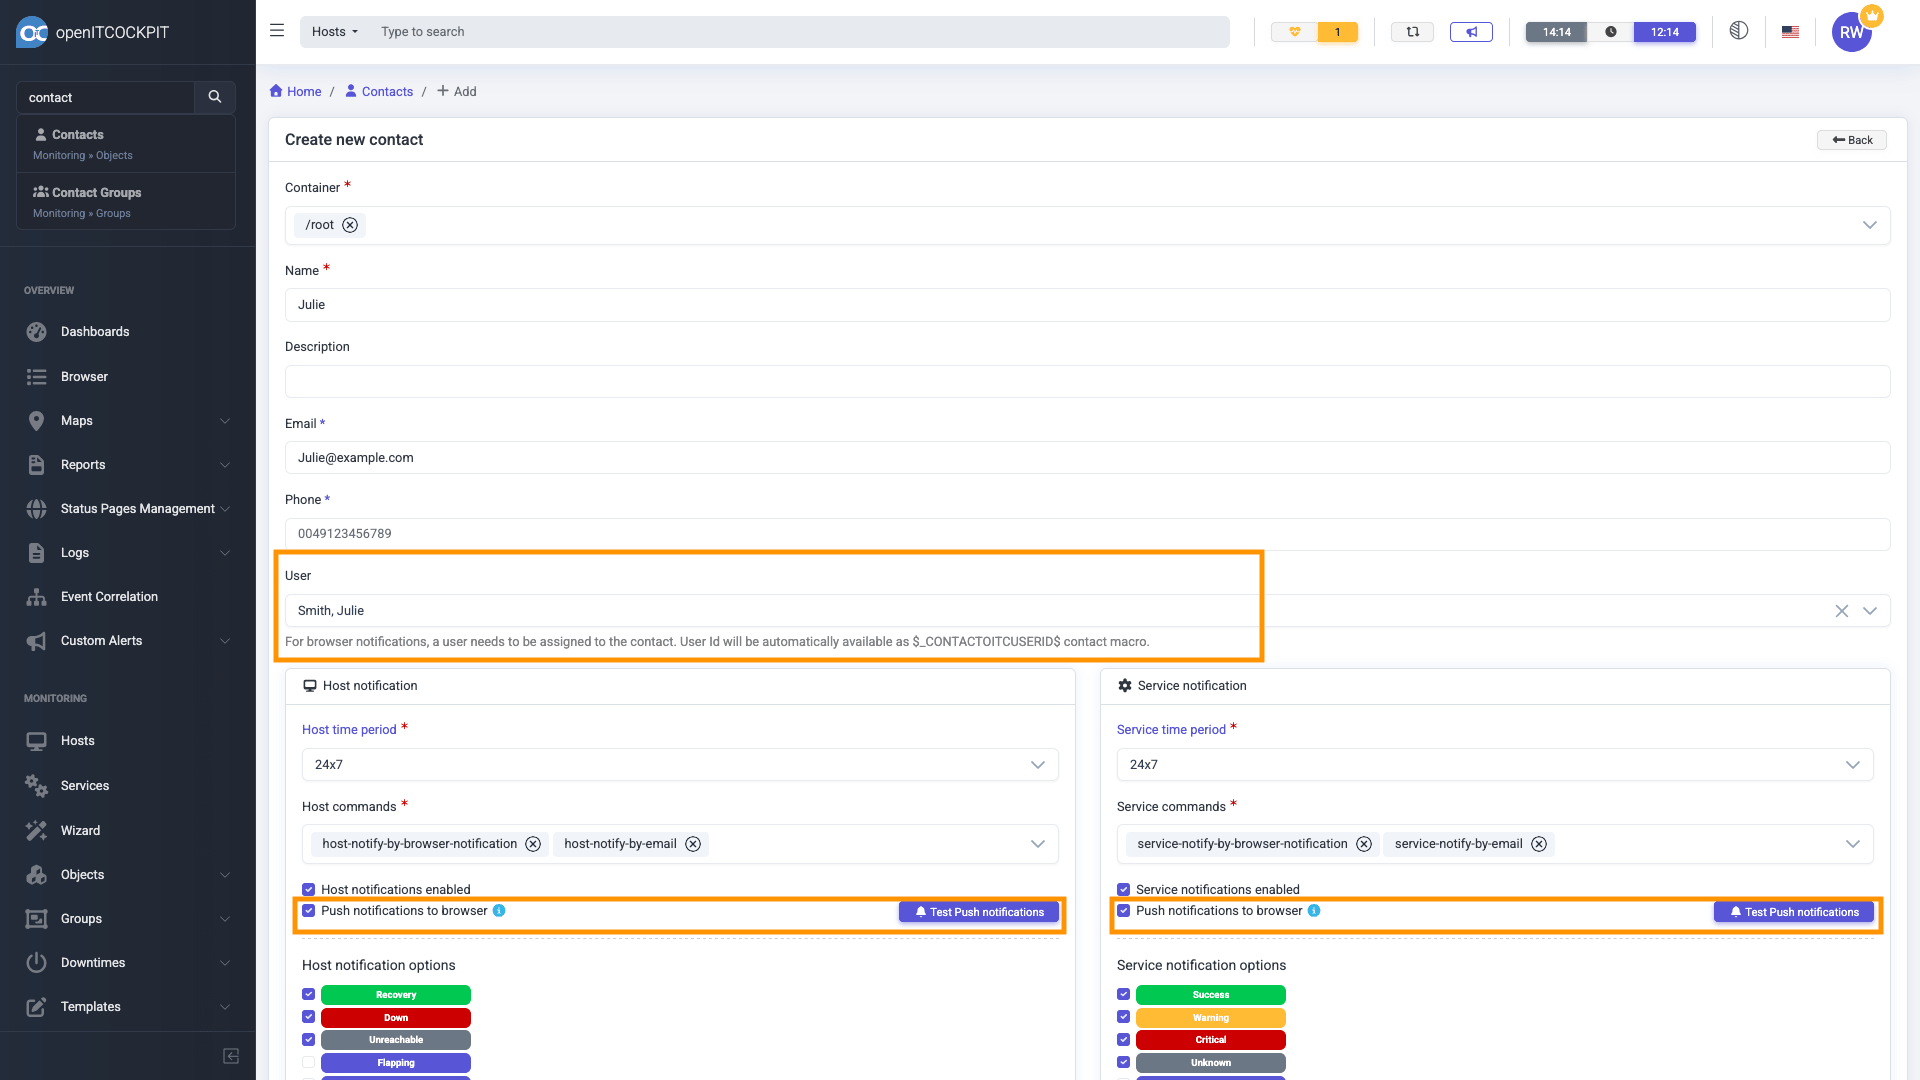
To apply the changes, make sure to save the contact configuration and refresh the monitoring configuration.
Setup the Mobile App
Once the app is installed on your mobile devices, you can start the app and enter the URL of your openITCOCKPIT server. The app uses the openITCOCKPIT API for authentication, so you have to create an API key first.
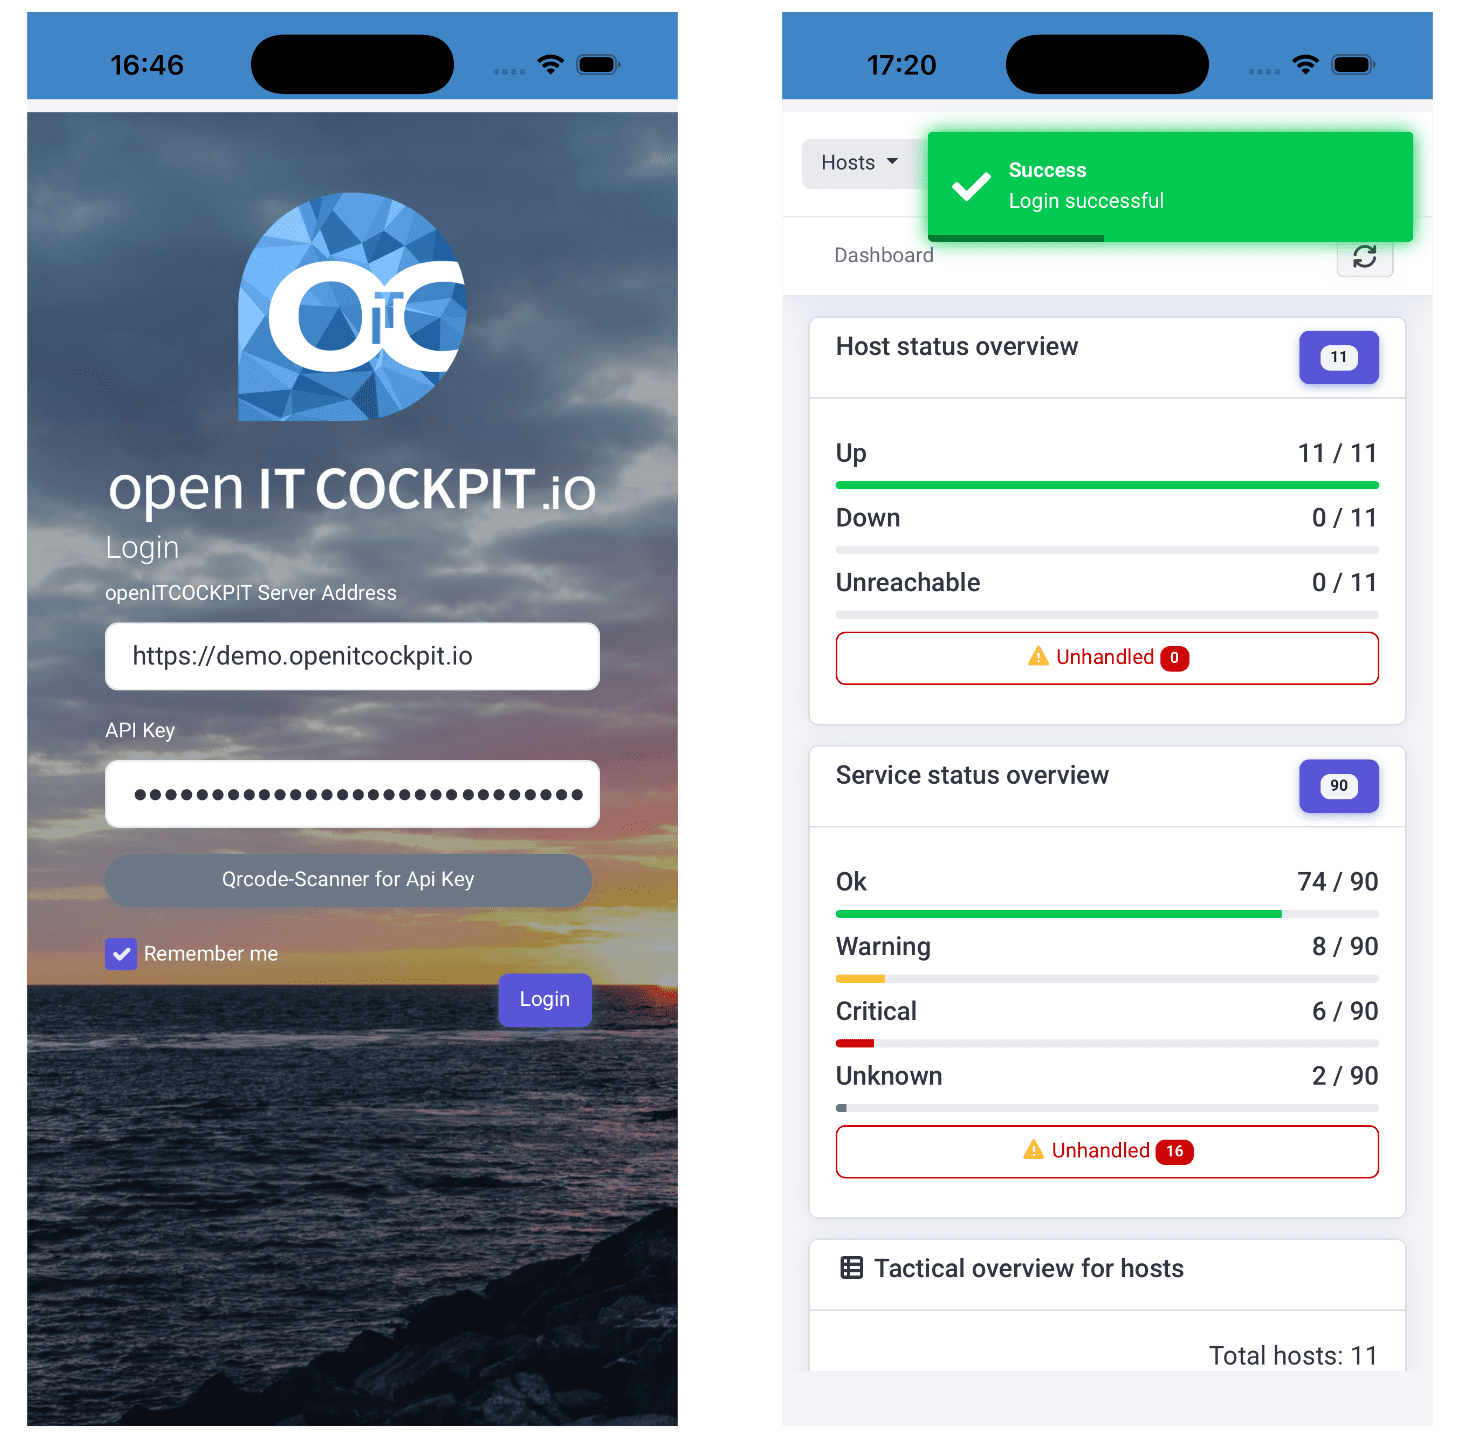
For convenience, you can also scan the QR code from the openITCOCKPIT web interface to automatically fill in the API key.
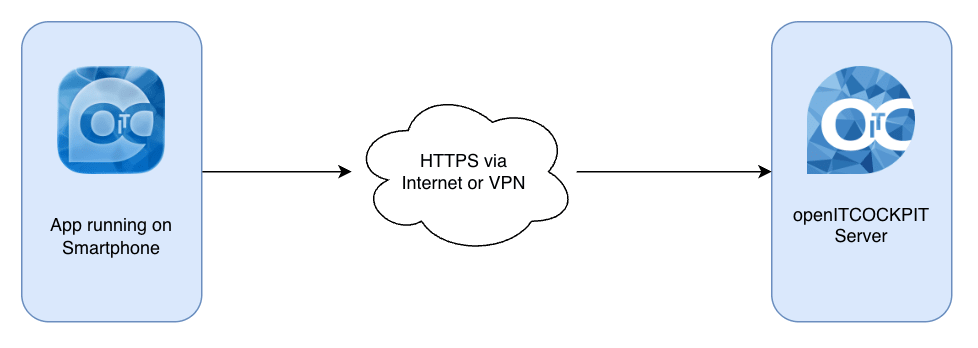
The openITCOCKPIT App require that your device is able to directly connect to the openITCOCKPIT server. This can be done via a public address, a reverse proxy or with a VPN connection. In addition, a valid HTTPS certificate is required. Self-signed certificates will most likely not work, or you have to make sure to install the CA certificate of the self-signed certificate on your mobile device.
Web Application Firewall (WAF) / Reverse Proxy EE
Info
The Web Application Firewall is not required to use the openITCOCKPIT Mobile App. It is an optional feature for users who want to add an extra layer of security to their openITCOCKPIT server.
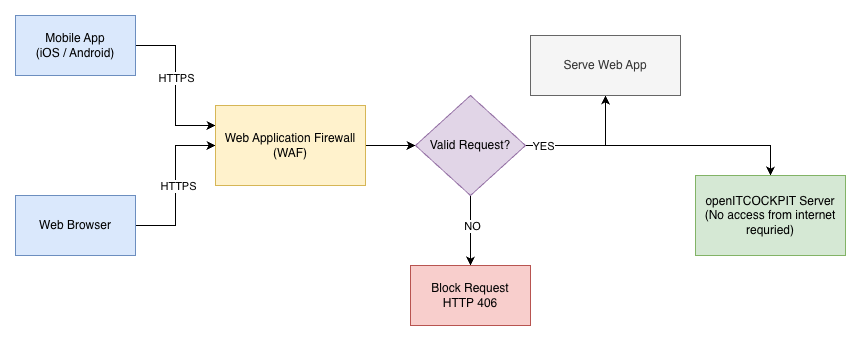
For adding an extra layer of security, we provide an optional Web Application Firewall (WAF) / Reverse Proxy configuration for the openITCOCKPIT Mobile App. This configuration is based on Nginx and can be used to protect your openITCOCKPIT server from malicious requests.
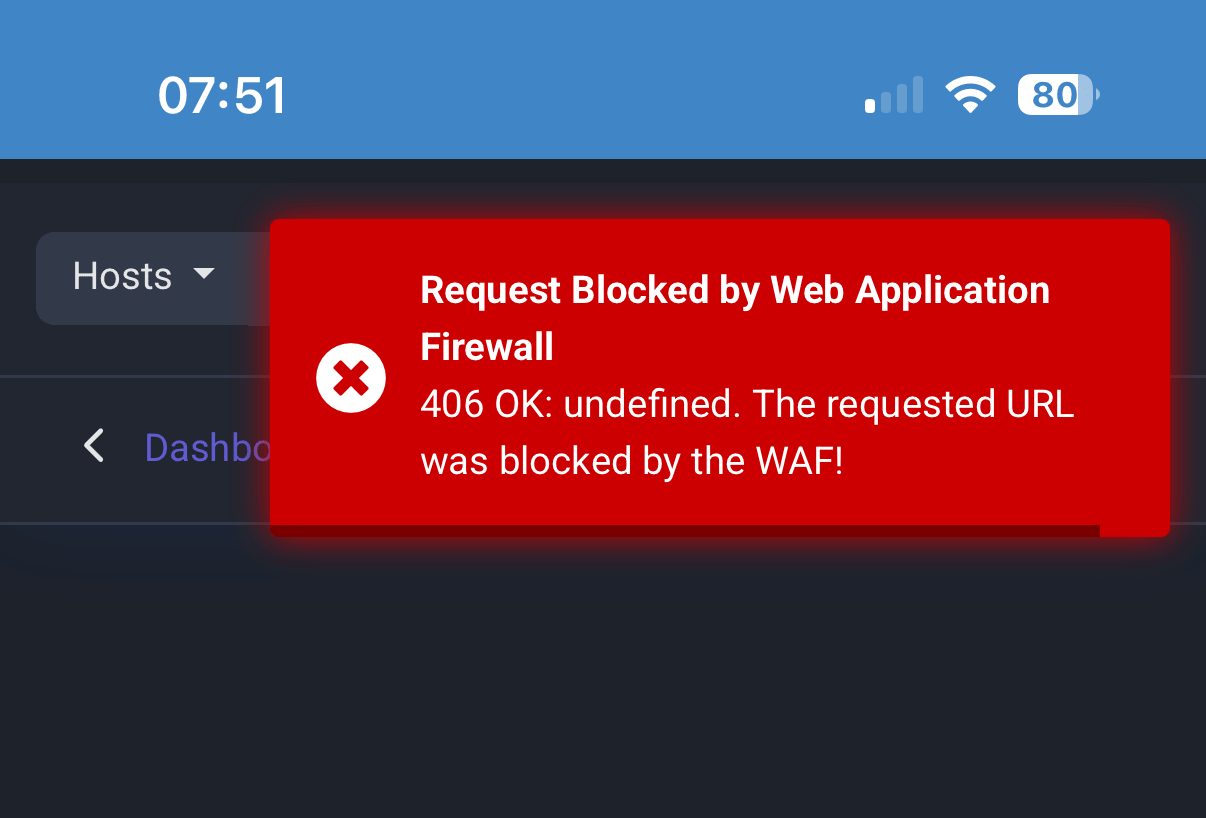
The way it works is, the openITCOCKPIT App will send all requests to the WAF, which will check the request and forward it to the openITCOCKPIT server if it is valid. In case the request got blocked by the WAF, a 406 Not Acceptable response will be returned.
The WAF also hosts the Web App version of the openITCOCKPIT App, which can be accessed via a web browser. This is useful for users who want to access the openITCOCKPIT Mobile Website from a desktop computer or without installing the openITCOCKPIT App to their mobile devices.
Installation
The WAF is designed to run in a Docker container, therefore we provide pre-built Docker images for amd64 and arm64 architectures.
Authentication and downloading the image
Before you can download the Docker image, you must register with our Docker Registry:
docker login https://cr.openitcockpit.io
The command prompts you to enter a username as well as a password. As username please enter the e-mail address which is registered with your openITCOCKPIT Enterprise license key. As password enter your license key.
After successful authentication you can download the Docker image:
docker pull cr.openitcockpit.io/openitcockpit-mobile-waf:latest
Starting the Docker container
- OITC_SERVER must be set to the hostname (e.g.
demo.openitcockpit.io) or IP address (192.168.56.2) of your openITCOCKPIT server. The WAF will forward all requests to this server. - SSL_CERT_PATH and SSL_CERT_KEY_PATH must be set to the path of your SSL certificate and key inside the container. You can mount a directory from the host to the container to provide the certificate and key.
You can start the container with the following command:
docker run --rm -it \
--name openitcockpit-mobile-waf \
-p 80:80 \
-p 443:443 \
-e WEB_APP_ENABLED=1 \
-e OITC_SERVER=demo.openitcockpit.io \
-e SSL_CERT_PATH=/etc/nginx/certs/local.crt \
-e SSL_CERT_KEY_PATH=/etc/nginx/certs/local.key \
-v /path/on/host/certs:/etc/nginx/certs:ro \
cr.openitcockpit.io/openitcockpit-mobile-waf:latest
The WAF only supports HTTPS connections, therefore you must provide a valid SSL certificate and key. You can use a self-signed certificate for testing purposes, but we recommend using a valid certificate from a trusted CA for production environments.
Configuration options
The configuration of the WAF can be done via environment variables. The following options are available:
| Environment Variable | Description | Valid Values | Default Value |
|---|---|---|---|
WEB_APP_ENABLED |
Enable or disable the Web App | 0 or 1 |
1 |
OITC_SERVER |
The URL of the openITCOCKPIT server | IP address or hostname | 192.168.56.2 |
DNS_RESOLVER |
DNS resolver used by Nginx | IP address | 9.9.9.9 8.8.8.8 |
SSL_CERT_PATH |
Path to the SSL certificate | File path | /etc/nginx/certs/fullchain.pem |
SSL_CERT_KEY_PATH |
Path to the SSL certificate key | File path | /etc/nginx/certs/privkey.pem |
SSL_PROTOCOLS |
SSL protocols to use | Nginx compatible list of SSL protocols | TLSv1.2 TLSv1.3 |
SSL_CIPHERS |
Supported SSL ciphers | Nginx compatible list of supported SSL ciphers | ECDHE-ECDSA-AES128-GCM-SHA256:ECDHE-RSA-AES128-GCM-SHA256:ECDHE-ECDSA-AES256-GCM-SHA384:ECDHE-RSA-AES256-GCM-SHA384:ECDHE-ECDSA-CHACHA20-POLY1305:ECDHE-RSA-CHACHA20-POLY1305:DHE-RSA-AES128-GCM-SHA256:DHE-RSA-AES256-GCM-SHA384:DHE-RSA-CHACHA20-POLY1305 |
SSL_PREFER_SERVER_CIPHERS |
Enable or disable the preference of server ciphers over client ciphers | on or off |
on |
LOGIN_BACKGROUND_IMAGE |
Background image for the login page | File name | (empty string) See Custom Image Section |
LOGIN_LOGO_IMAGE |
Logo for the login page | File name | (empty string) |
Web App
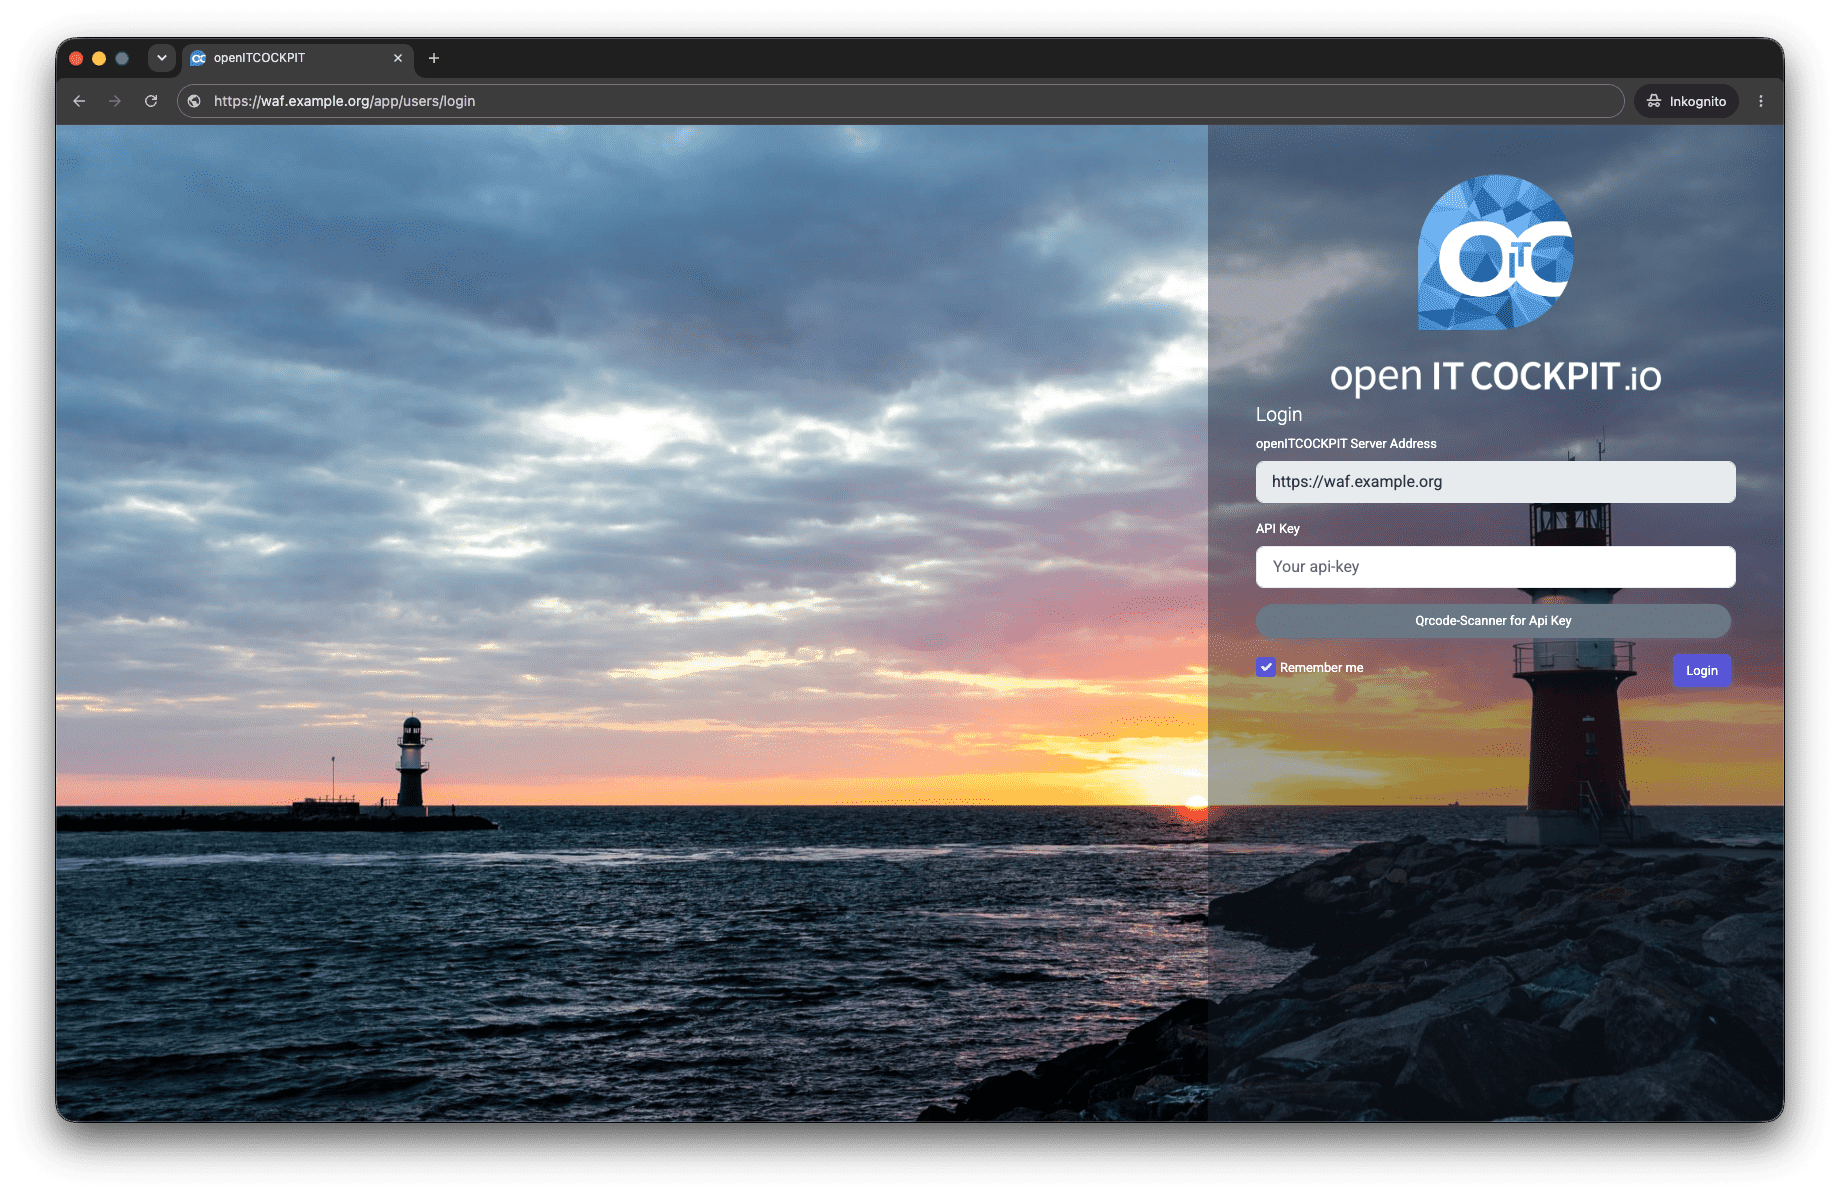
The WAF check the Accept header of of incoming requests to / for text/html or application/xhtml\+xml and will redirect the request to the Web App at /app/.
In case this redirect is not working, your Browser is probably sending a different Accept header. In this case, please navigate to /app/ directly to access the Web App.
HTTP 406 Not Acceptable
If the WAF blocks a request, it responds with the HTTP status code 406 Not Acceptable. This can happen if a route or request method is blocked in the WAF's ruleset. In the openITCOCKPIT app, an error message will be displayed in this case.
WAF behind a reverse proxy
The WAF itself can also be placed behind a reverse proxy. This is useful, if you want to use self-signed certificates inside of the WAF container, but want to use a valid certificate for the outside world. In this case, the reverse proxy will handle the SSL termination and forward the requests to the WAF via HTTPS.
Mobile Device --> Reverse Proxy (valid SSL cert) --> WAF (self-signed SSL cert) --> openITCOCKPIT Server
Apache2 example
This example shows how to configure an Apache2 reverse proxy in front of the WAF. The reverse proxy will handle the SSL termination and forward the requests to the WAF via HTTPS.
In this example, the WAF is running on the same server as the reverse proxy 127.0.0.1:5555 and the reverse proxy is listening on waf.example.org.
<VirtualHost 207.154.223.22:80>
  ServerName waf.example.org
  Redirect / https://waf.example.org/

  ErrorLog ${APACHE_LOG_DIR}/openitcockpit_waf_error.log
  CustomLog ${APACHE_LOG_DIR}/openitcockpit_waf_access.log combined
</VirtualHost>

<VirtualHost 207.154.223.22:443>
    ServerName waf.example.org
    ServerAdmin info@example.org
    DocumentRoot "/var/www/html"

    SSLEngine On
    SSLCertificateChainFile  /etc/letsencrypt/live/example.org/fullchain.pem
    SSLCertificateKeyFile    /etc/letsencrypt/live/example.org/privkey.pem
    SSLCertificateFile       /etc/letsencrypt/live/example.org/cert.pem

    ErrorLog ${APACHE_LOG_DIR}/openitcockpit_waf_error.log
    CustomLog ${APACHE_LOG_DIR}/openitcockpit_waf_access.log combined

    SSLProxyEngine On
    ProxyPreserveHost On
    ProxyPass / https://127.0.0.1:5555/
    ProxyPassReverse / https://127.0.0.1:5555/
    SSLProxyCheckPeerName Off
    #RequestHeader set X-Forwarded-Proto "https"
    #RequestHeader set X-Forwarded-Port "443"
    #RequestReadTimeout header=7200 body=7200

    Include /etc/letsencrypt/options-ssl-apache.conf

</VirtualHost>
For the given Apache2 example above, the WAF was started with the following commands:
# Create a self-signed certificate for the WAF.
apt-get install ssl-cert
mkdir -p /root/openitcockpit-waf/certs
cp /etc/ssl/certs/ssl-cert-snakeoil.pem /root/openitcockpit-waf/certs/
cp /etc/ssl/private/ssl-cert-snakeoil.key /root/openitcockpit-waf/certs/

# Start the WAF container with the self-signed certificate listening on port 5555.
# The Apache2 reverse proxy will handle the SSL termination and forward the requests to the WAF via HTTPS.
docker run --rm -it \
--name openitcockpit-mobile-waf \
-p 5554:80 \
-p 5555:443 \
-e WEB_APP_ENABLED=1 \
-e OITC_SERVER=demo.openitcockpit.io \
-e SSL_CERT_PATH=/etc/nginx/certs/ssl-cert-snakeoil.pem \
-e SSL_CERT_KEY_PATH=/etc/nginx/certs/ssl-cert-snakeoil.key \
-v /root/openitcockpit-waf/certs:/etc/nginx/certs:ro \
cr.openitcockpit.io/openitcockpit-mobile-waf:latest
Microsoft Entra ID
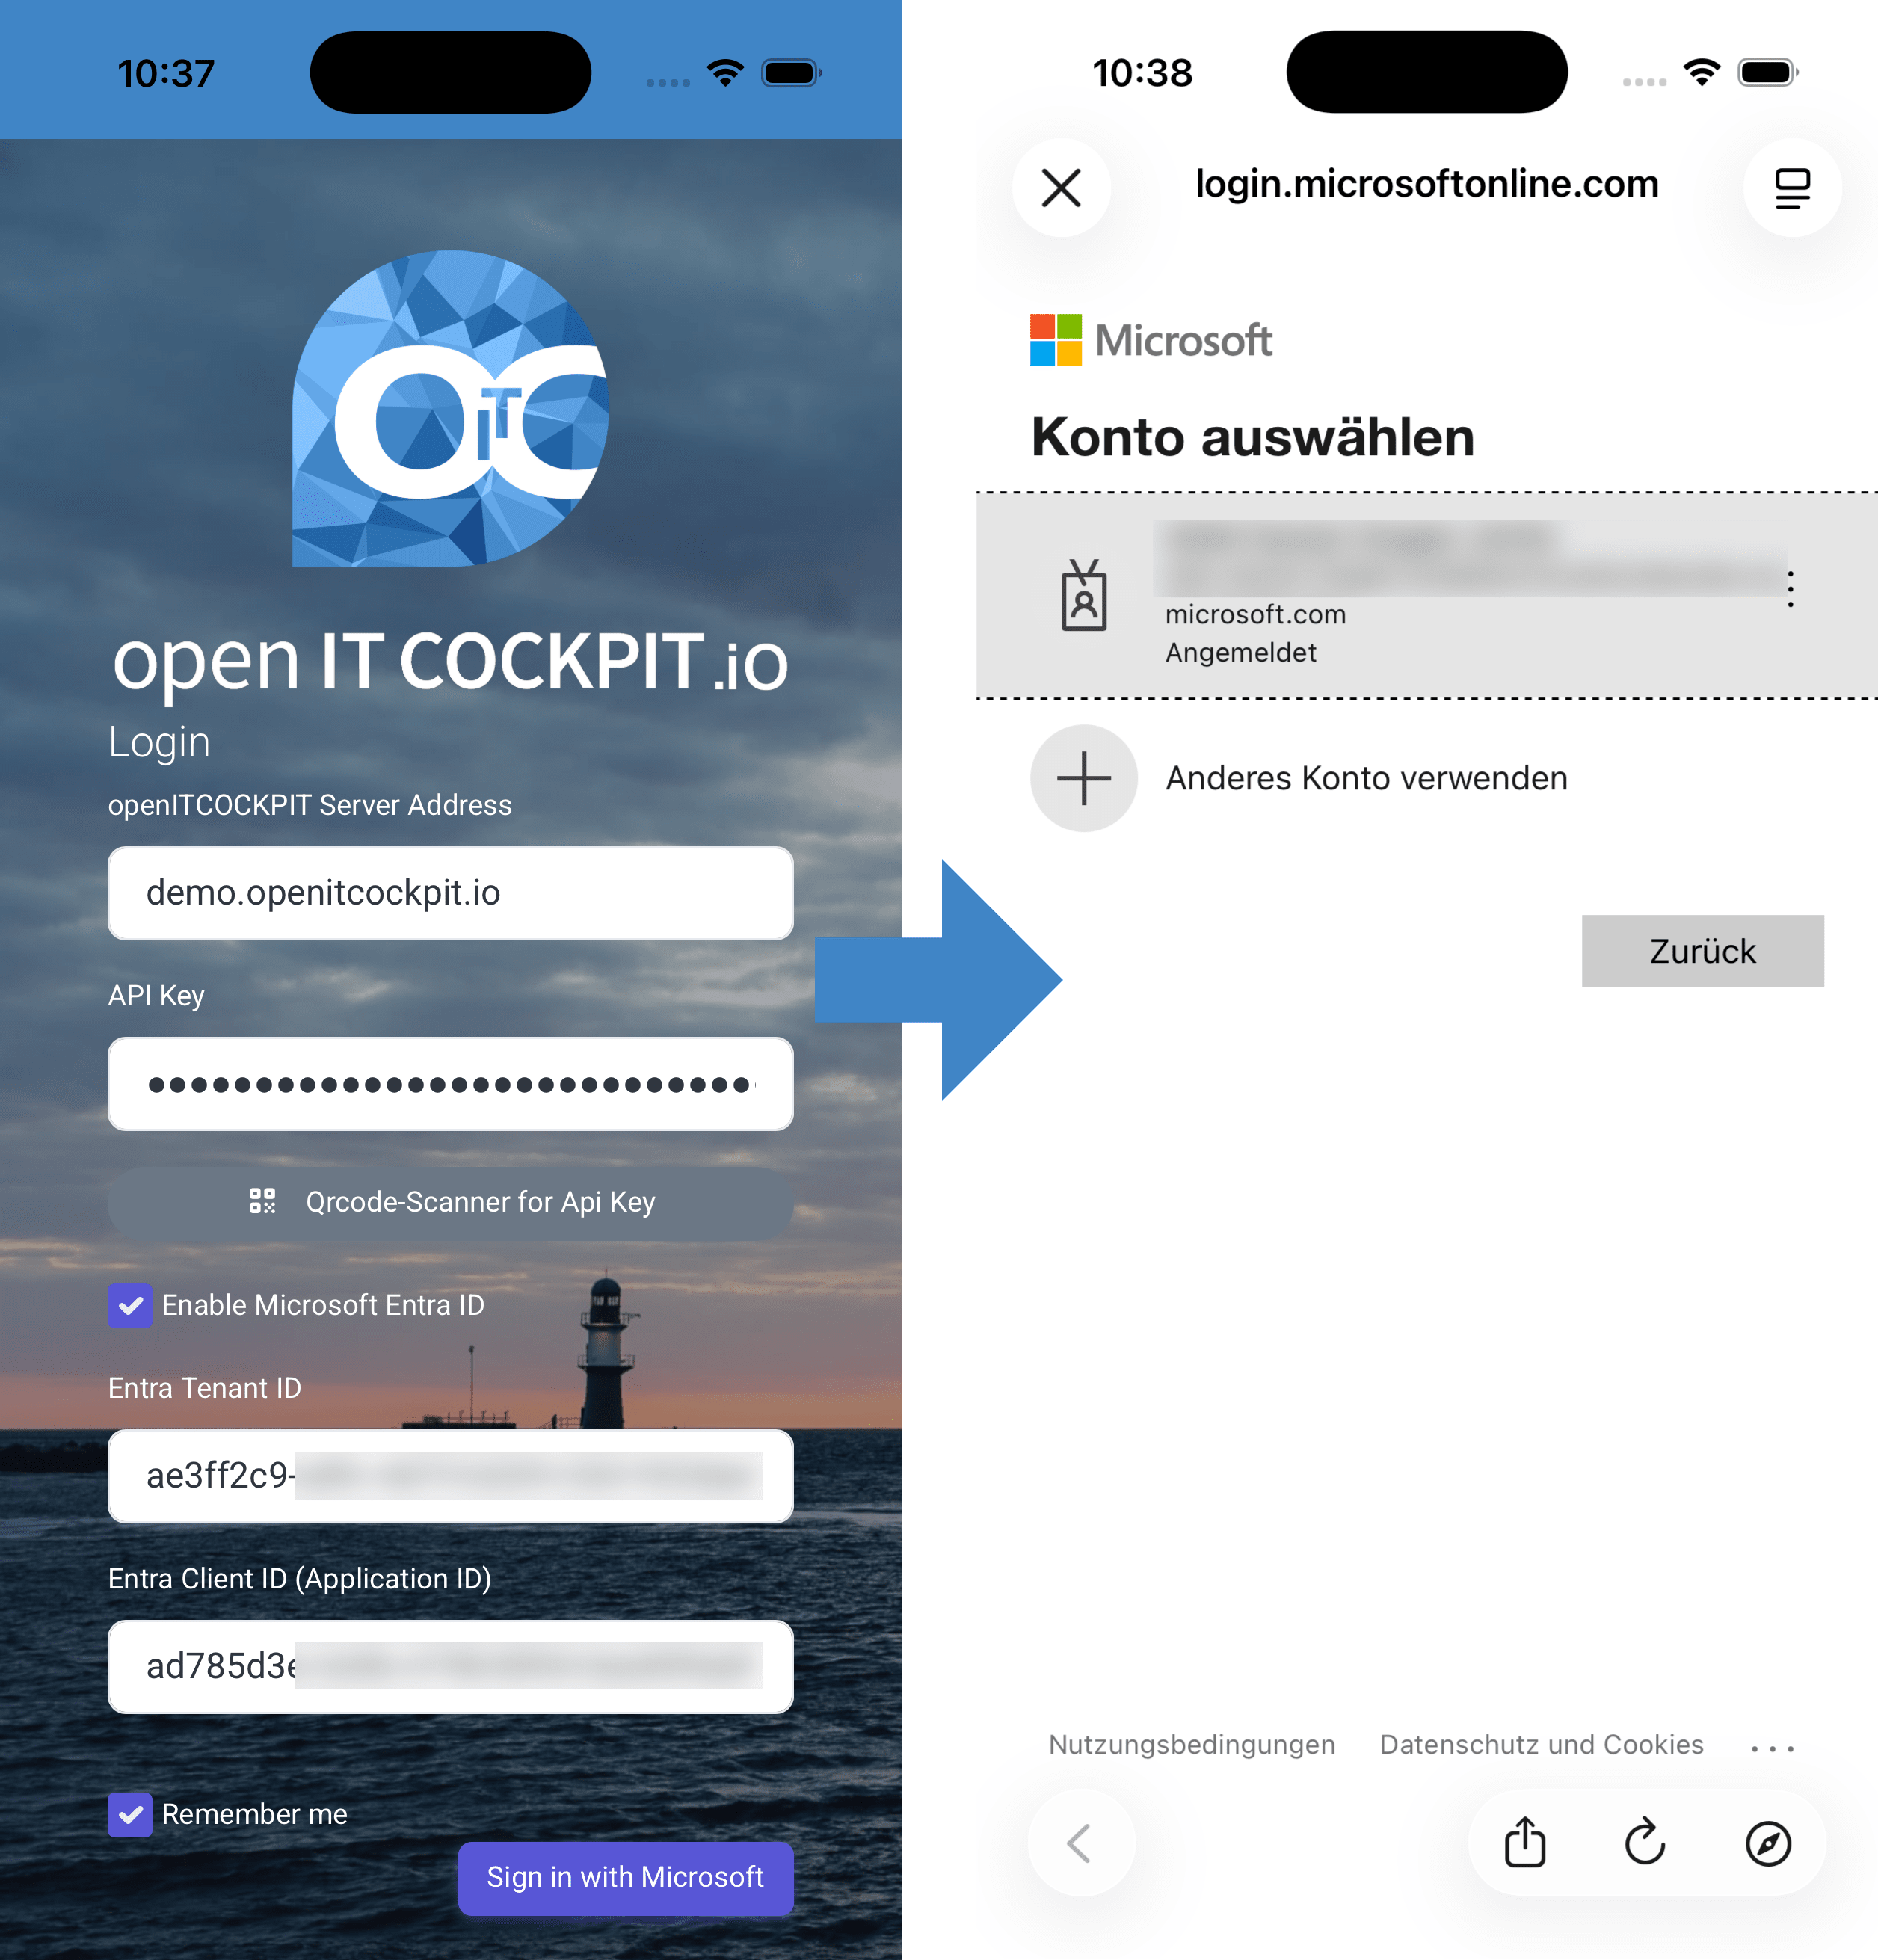
It is possible, to use Microsoft Entra ID to protect your openITCOCKPIT Server or the WAF from unauthorized access. When Microsoft Entra ID is enabled, users will need an openITCOCKPIT API key and a Microsoft Entra account to access the openITCOCKPIT App or the Web App. The Microsoft Entra ID login page will be displayed before the openITCOCKPIT login page.
To Enable Microsoft Entra ID, you need to create an application in the Microsoft Entra portal first. In the openITCOCKPIT App, check the option Enable Microsoft Entra ID and fill in the Tenant ID and Client ID (also known as Application ID) fields with the values from the Microsoft Entra portal.
The Login button will then change to Sign in with Microsoft and the user will be redirected to the Microsoft Entra login page.
Microsoft Entra ID Setup
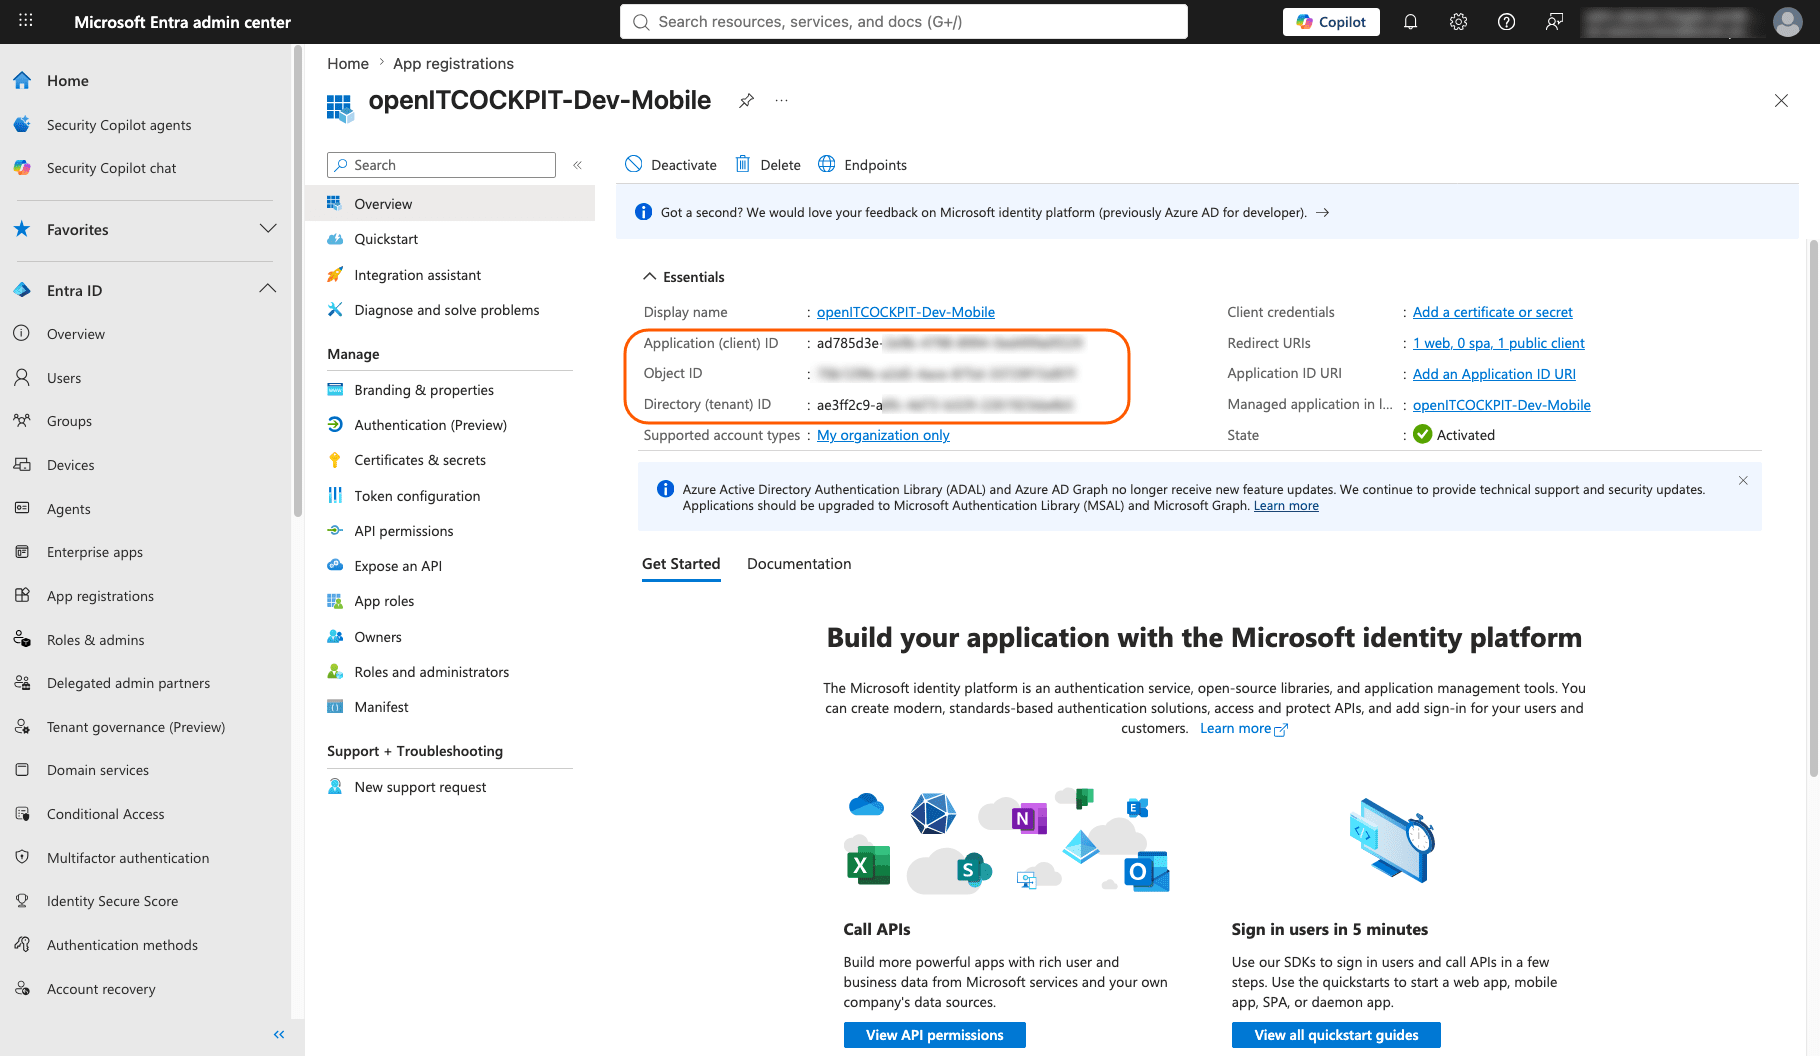
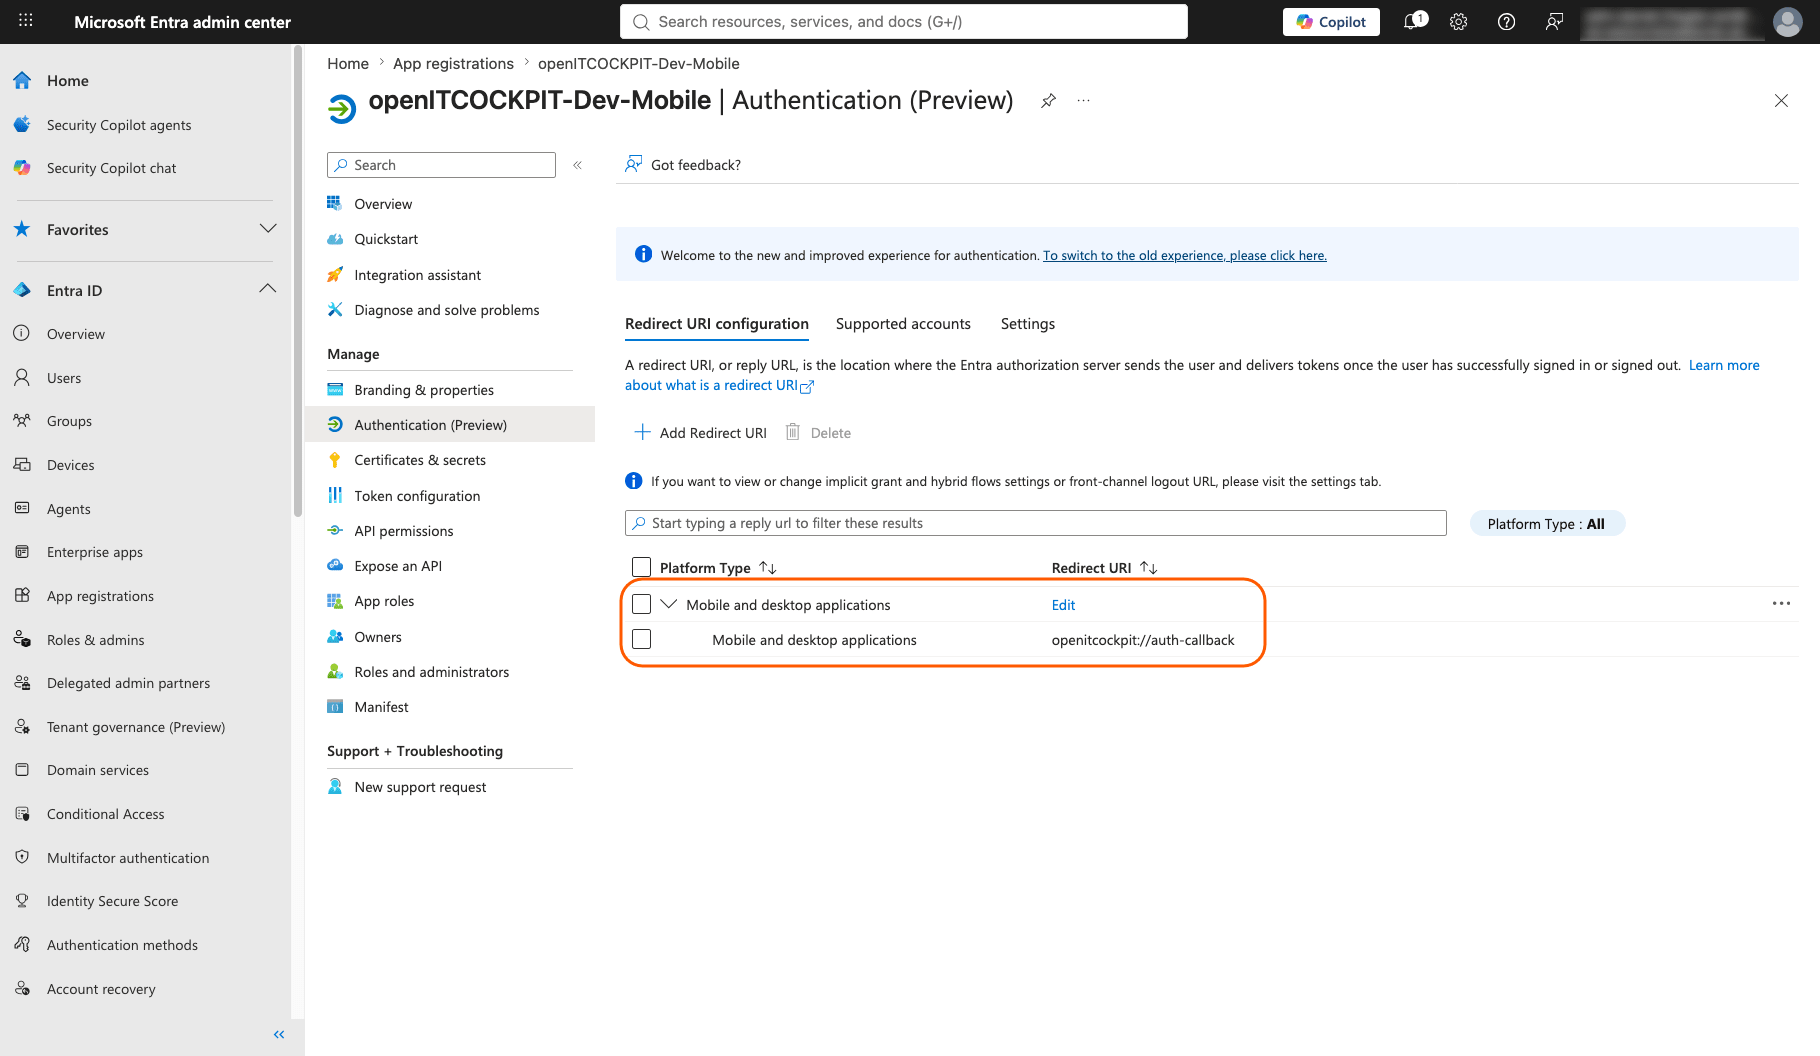
In the Microsoft Entra portal, navigate to App registrations and click on New registration. This is an required step to get the Tenant ID and Client ID for the openITCOCKPIT App.
Please make sure to set the Redirect URI for Mobile and desktop applications to the following value:
openitcockpit://auth-callback
Do not change the Redirect URL, it has to be exactly as shown above, otherwise the Microsoft Entra login will not work in the openITCOCKPIT App.
Info
The Tenant ID and Client ID (also known as Application ID) are no secrets and can be shared with anyone.
- Tenant ID: This simply identifies your specific organization or Microsoft Entra directory instance.
- Application ID: This identifies a specific application within the tenant's directory. It tells Microsoft which app is requesting a login.
Mobile Device Management (MDM)
The openITCOCKPIT App can be configured through Mobile Device Management (MDM) solutions like Microsoft Intune. This allows you to pre-configure the app for your users and enforce certain settings, like the server address or Microsoft Entra ID credentials. The setup process depends on the MDM solution you are using.
This documentation is using Microsoft Intune for reference, but the process should be similar for other MDM solutions.
iOS
The configuration is controlled via a XML based profile configuration. All fields are optional. In case you do not want to configure a field, please leave it empty like <string></string>.
<dict>
    <key>apiKey</key>
    <string>API_KEY_OR_EMPTY_STRING</string>

    <key>serverAddress</key>
    <string>https://your.openitcockpit.server</string>

    <key>enableMicrosoftEntraID</key>
    <true/>

    <key>microsoftTenantId</key>
    <string>ae3ff2c9-56df-4e36-98bd-37f9f52f3185</string>

    <key>microsoftClientId</key>
    <string>ad785d3e-6bd7e-4e30-b16a-e18dc85edb09</string>

    <key>hideMicrosoftEntraConfig</key>
    <false/>
</dict>
Note
Settings that are controlled by the MDM, cannot be changed by the user in the app. For example, if the serverAddress is set via MDM, the user cannot change it in the app.
For Microsoft Intune, you have to create a new iOS/iPadOS App first.
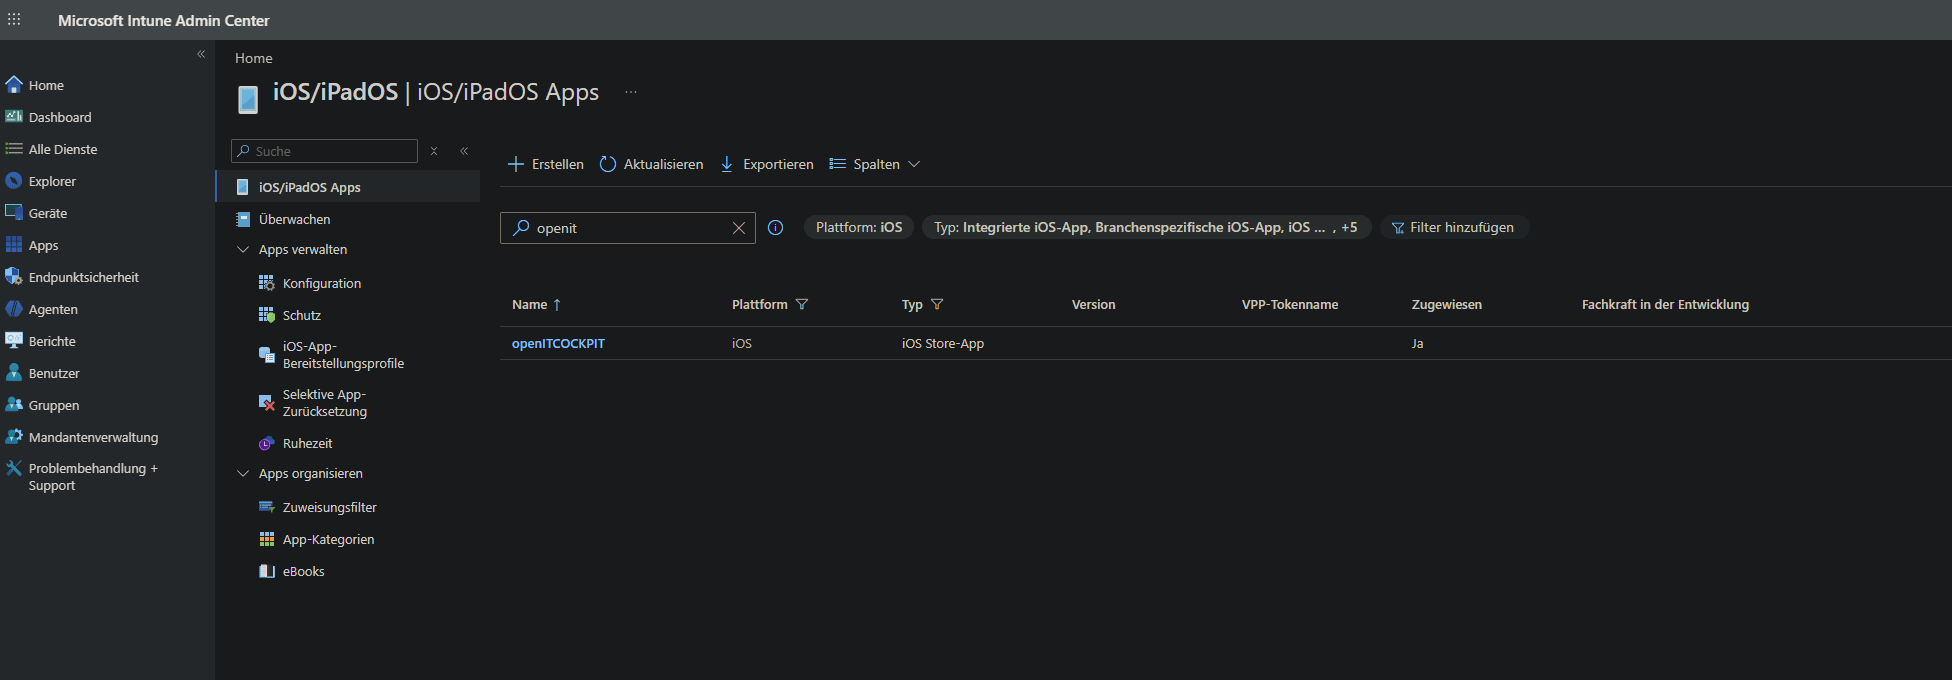 This app will be then available to your users through the Microsoft Intune Company Portal.
In the next step, you can configure the app with the XML configuration above. Please make sure to select the option Managed configuration and paste the XML configuration into the text field.
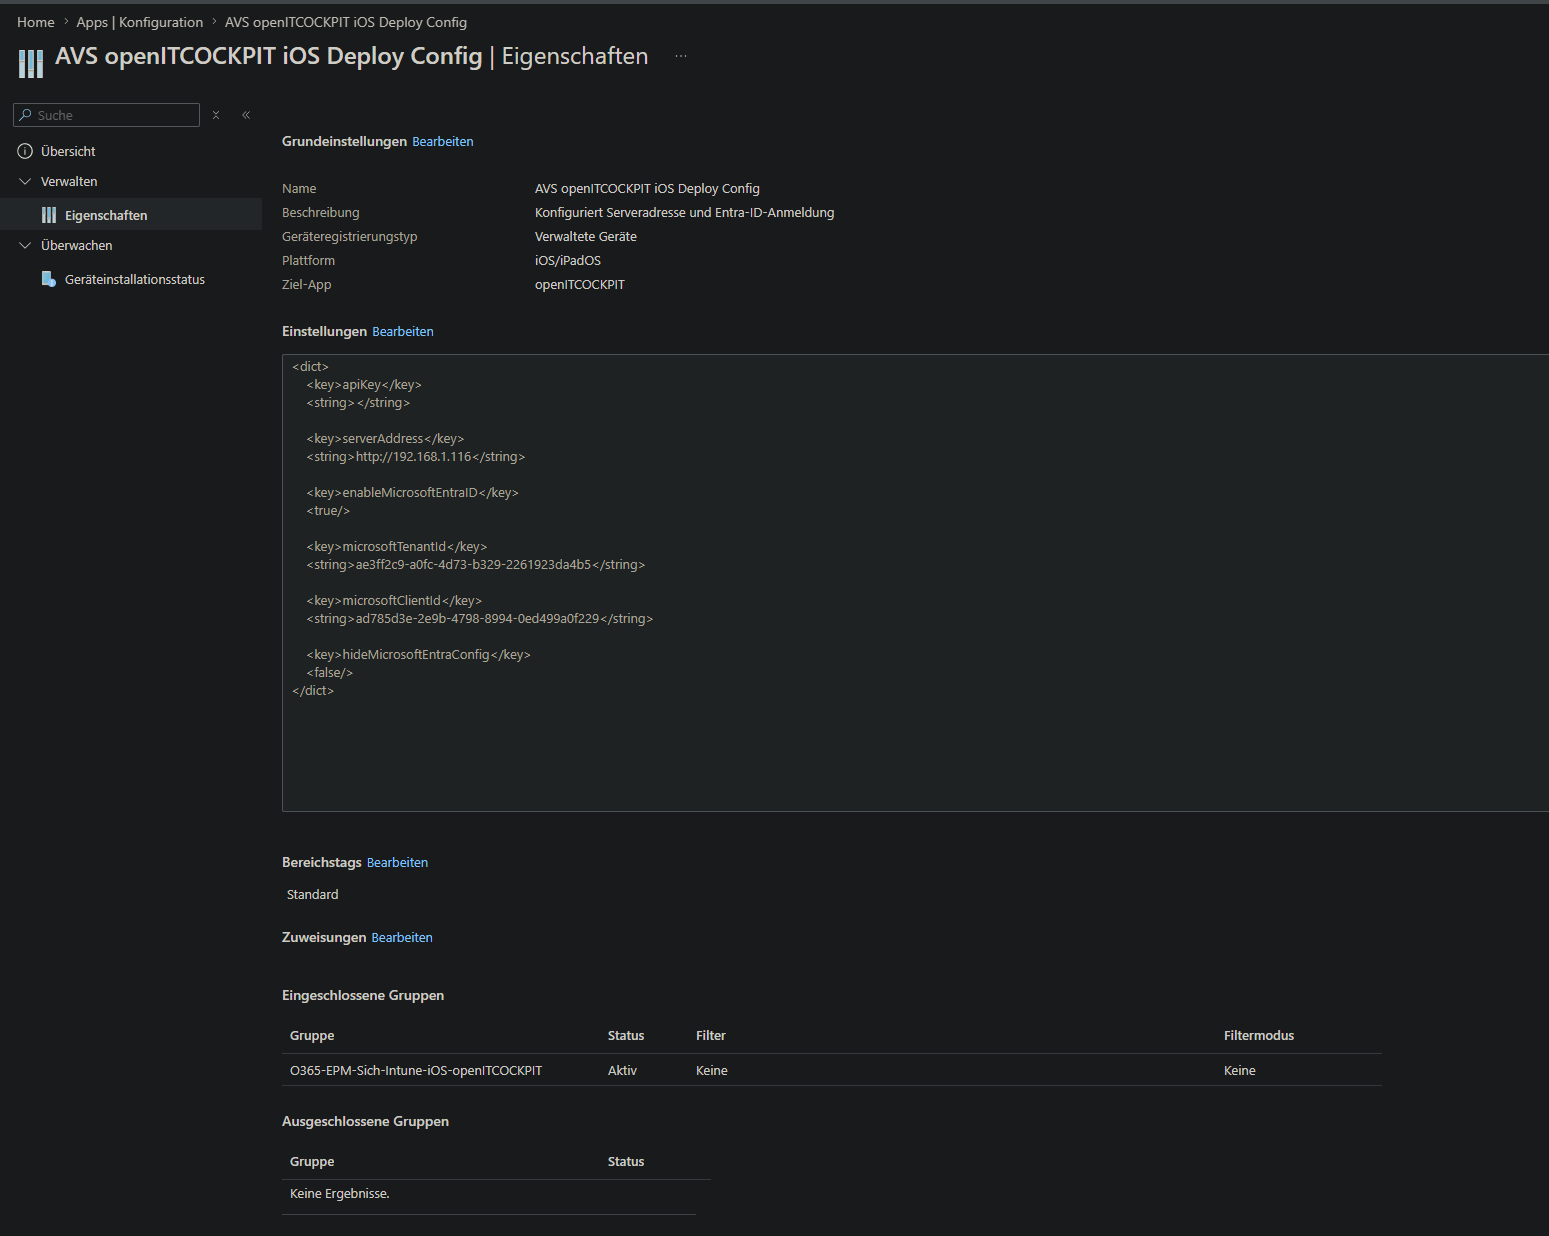
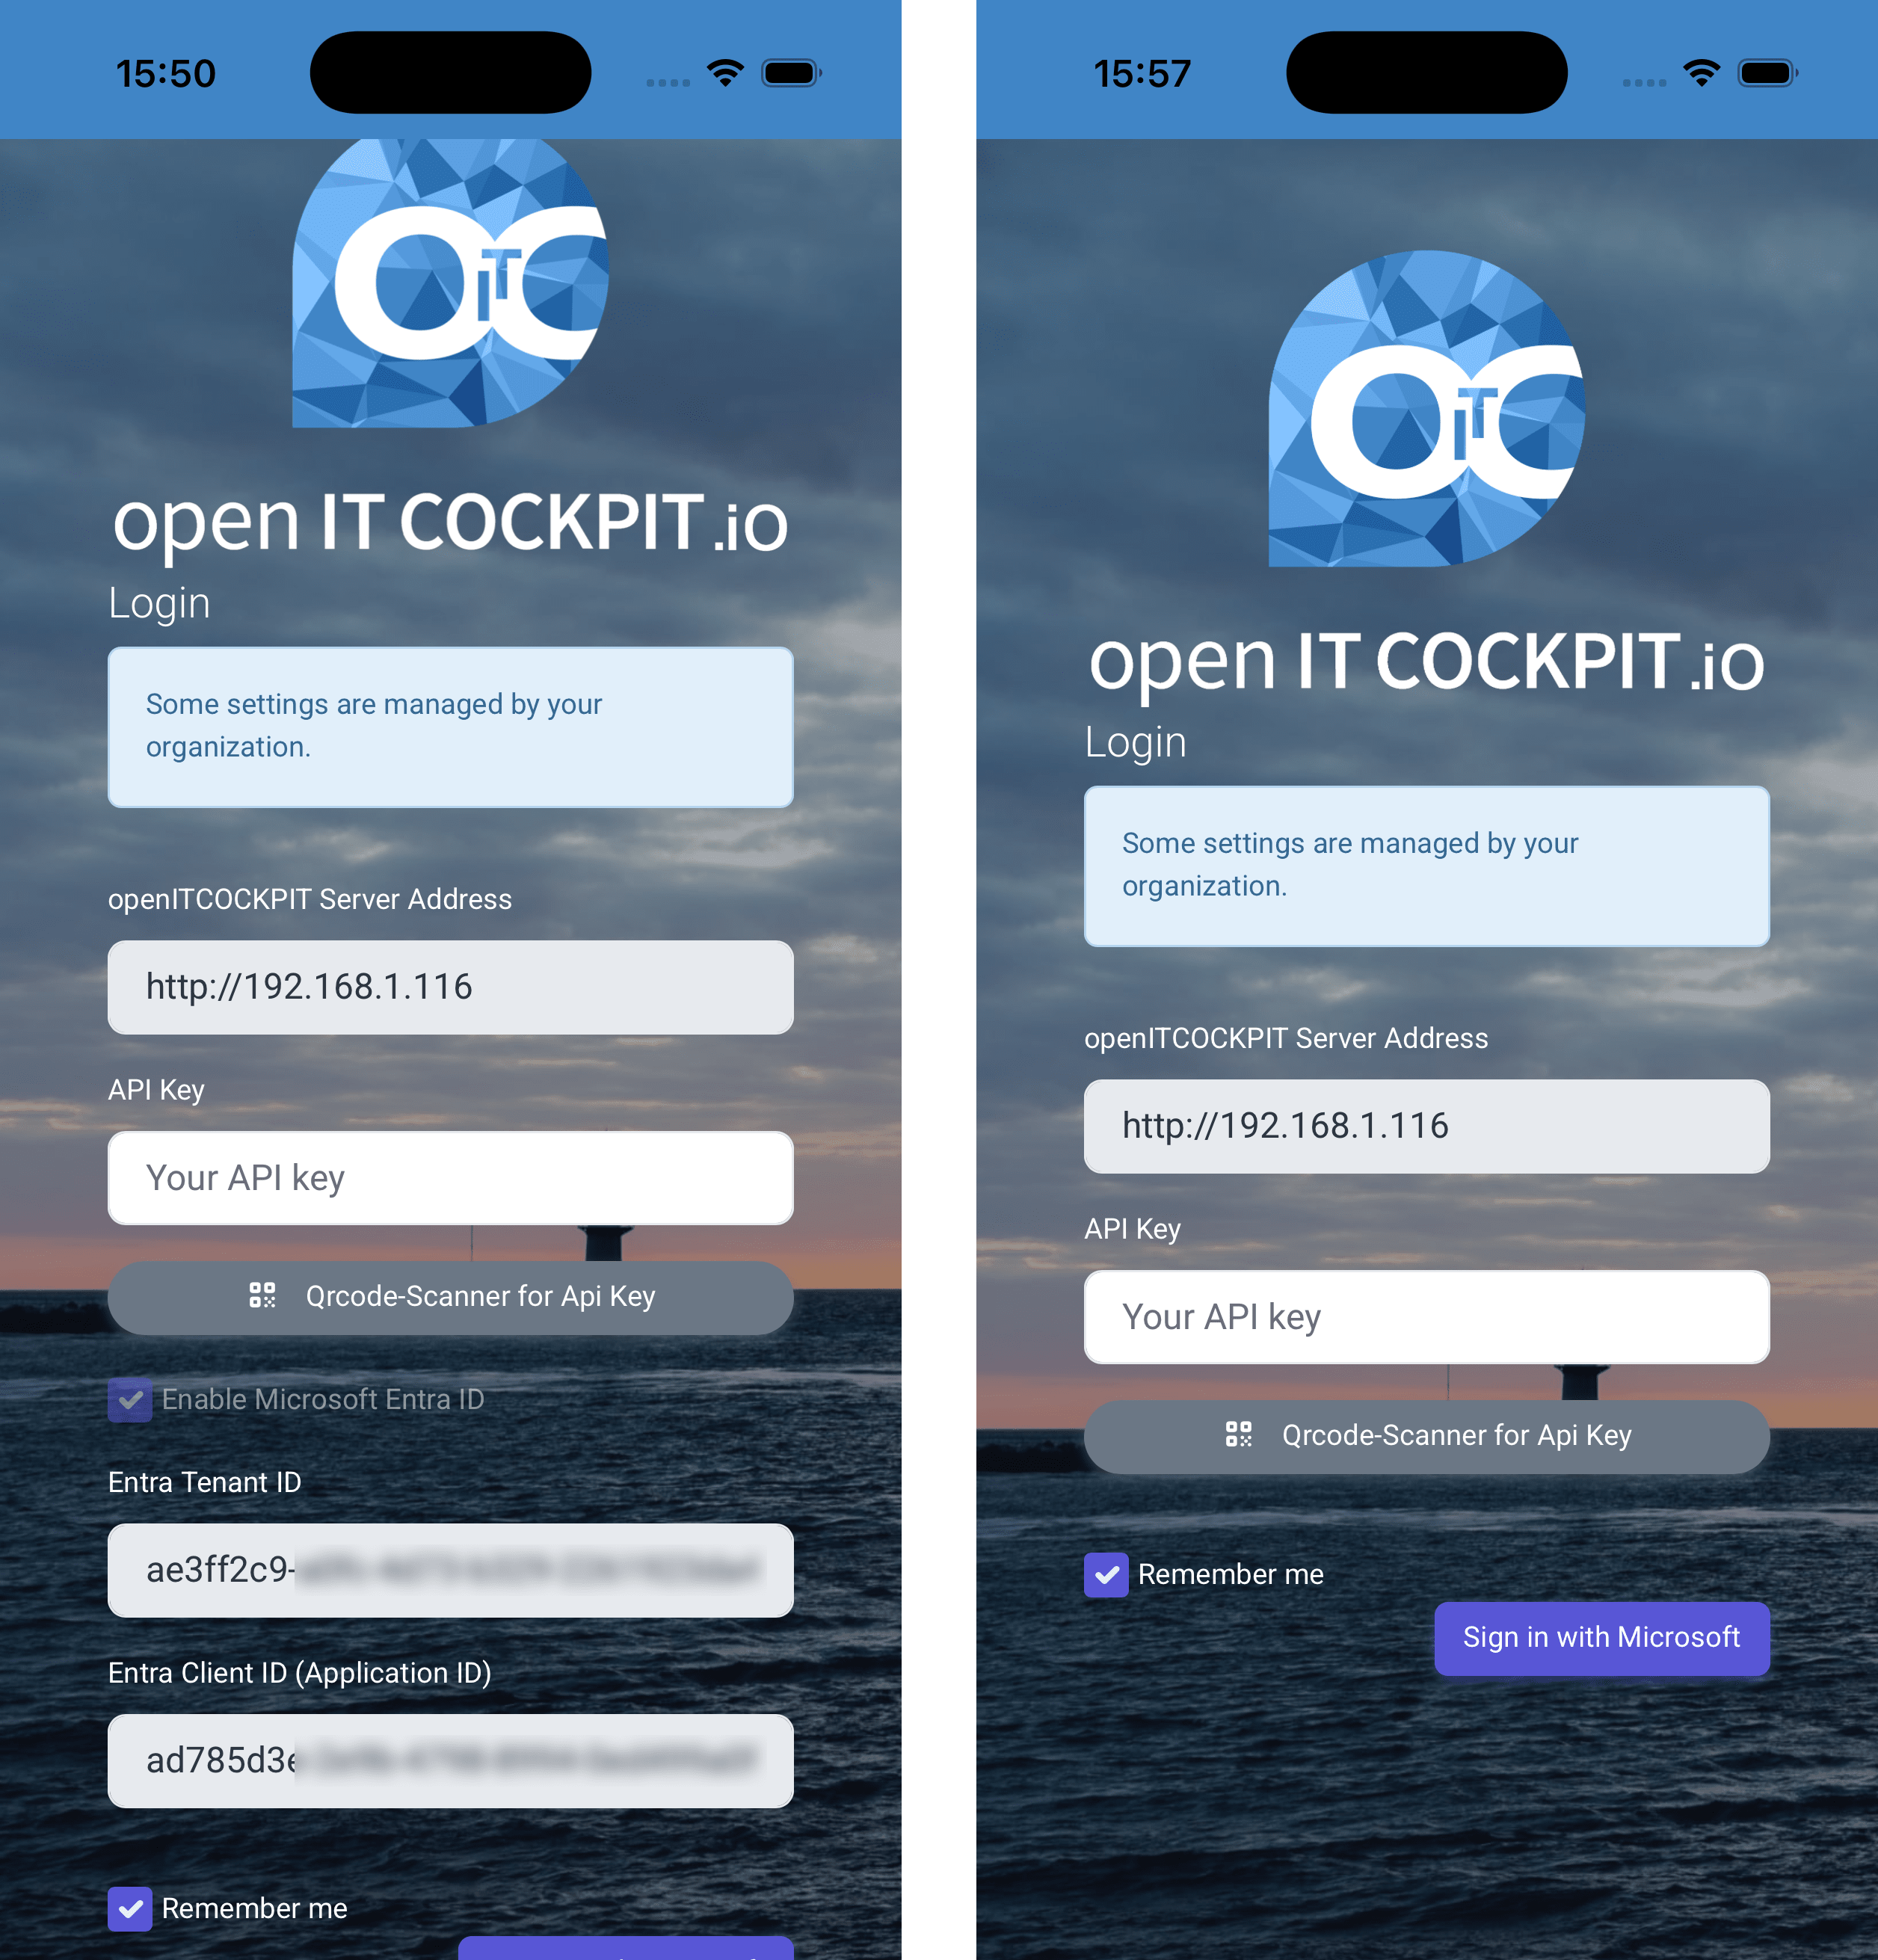
As soon as the app is installed on the user's device, the configuration will be applied automatically. All fields controlled by the MDM will be locked and cannot be changed by the user.
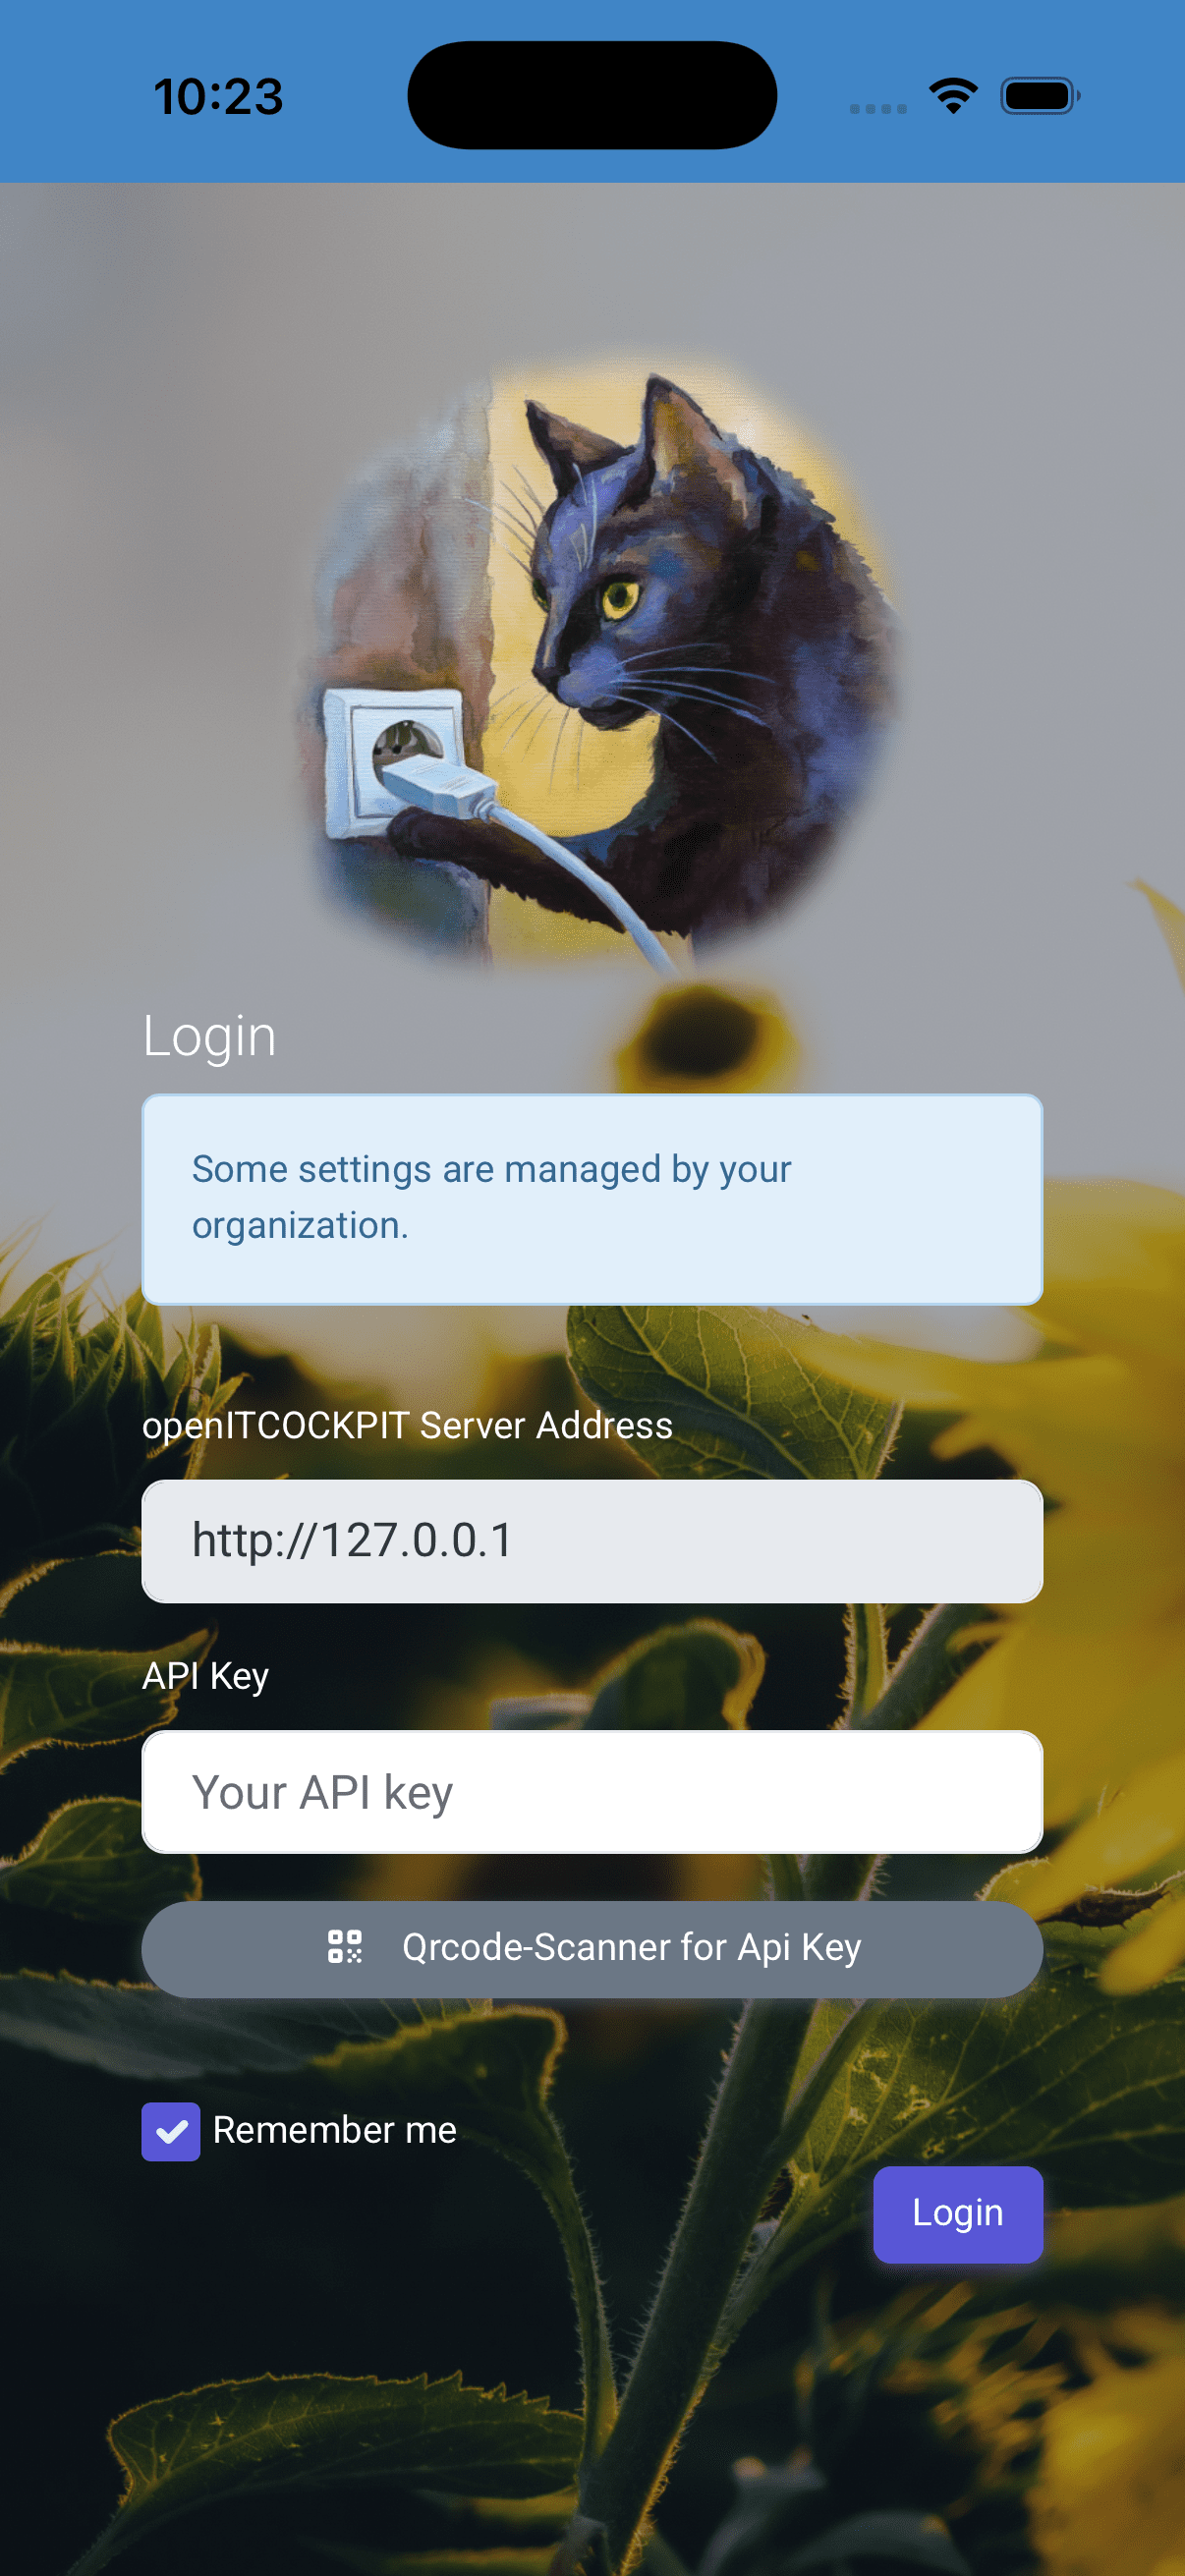
If a profile is active, the user will see the message Some settings are managed by your organization.
Danger
Before you delete the app configuration in the MDM, you must push an empty configuration with the same fields to the user devices. Otherwise, the fields controlled by the MDM in the app will be locked and cannot be changed anymore.
This is a known limitation of iOS/iPadOS and has nothing to do with the openITCOCKPIT app.
<dict>
  <key>apiKey</key>
  <string></string>

  <key>serverAddress</key>
  <string></string>

  <key>enableMicrosoftEntraID</key>
  <false/>

  <key>microsoftTenantId</key>
  <string></string>

  <key>microsoftClientId</key>
  <string></string>

  <key>hideMicrosoftEntraConfig</key>
  <false/>
</dict>
Configure via QR Code
This is an alternative way for configuring the openITCOCKPIT App for users that do not have a Mobile Device Management (MDM) solution. Instead of manually entering the server address or Microsoft Entra ID credentials, the user can scan a QR code to automatically configure the app.
Info
The easiest way to generate the QR code is to use our QR Code Generator on our website.
In case you want to generate the QR code manually, please use the following JSON structure:
{
   "serverAddress":"https://your.openitcockpit.server",
   "apiKey":"<API_KEY_OR_EMPTY_STRING>",
   "remember_me":true,
   "enable_microsoft_entra_id":false,
   "microsoft_tenant_id":"ae3ff2c9_OR_EMPTY_STRING",
   "microsoft_client_id":"ad785d3e_OR_EMPTY_STRING"
}
serverAddress field must be set to the URL of your openITCOCKPIT server. The microsoft_tenant_id and microsoft_client_id are optional and only relevant if enable_microsoft_entra_id is set to true.
In case you do not want to use Microsoft Entra ID, please set enable_microsoft_entra_id to false and leave the other two fields empty.
The apiKey field can also be left empty, as the user can enter there personal API key after scanning the QR code with the App configuration.
The workflow looks like this:
- The user scans the QR code containing the configuration for the openITCOCKPIT App.
- The user scans it's personal QR code, that contains the API key of the user.
- Tap on "Login" to log in to the openITCOCKPIT App.
Custom Logo and Background Image
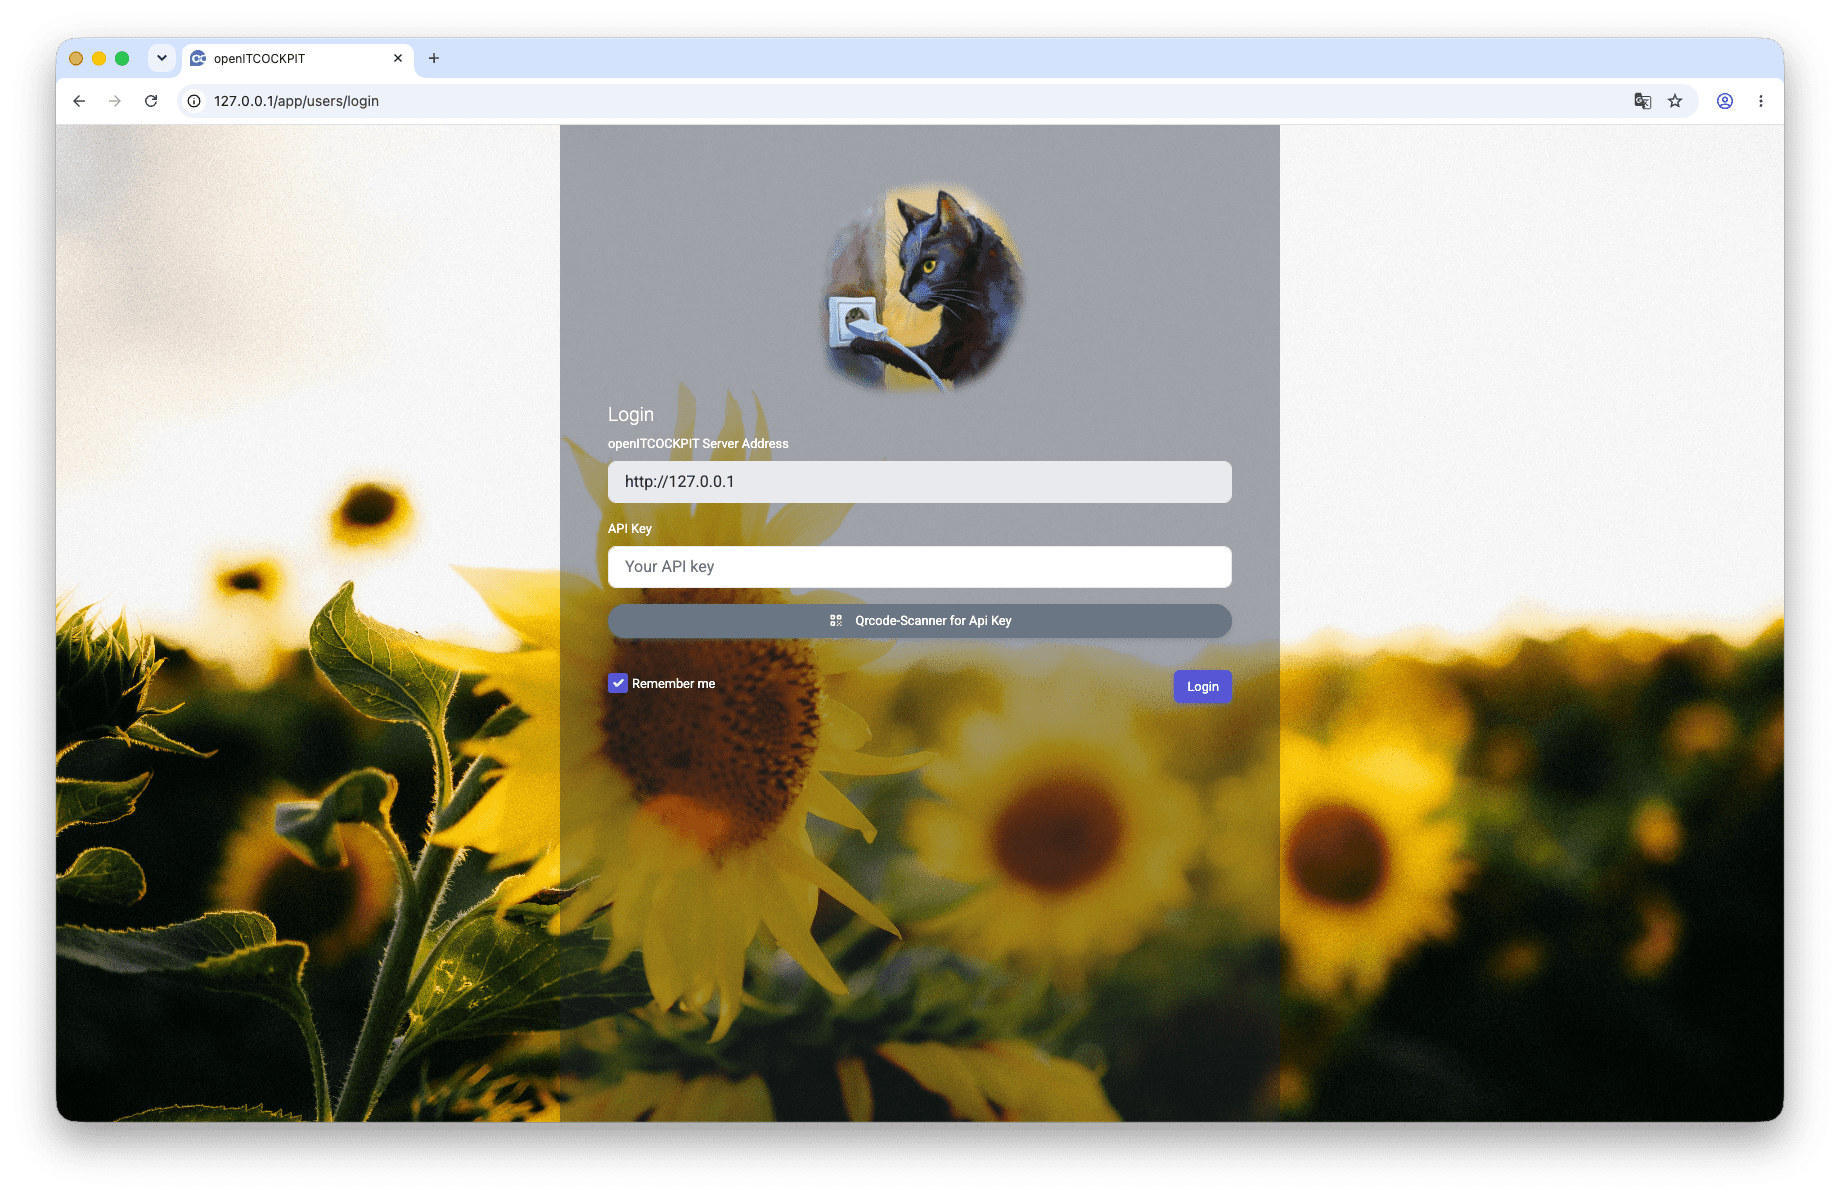
The Logo on the login screen and the background image can be customized. The images are stored in the WAF container and have to be mounted to /usr/share/nginx/html/custom_images. Only PNG and JPG images are supported. The file names of the images must be set as environment variables LOGIN_LOGO_IMAGE and LOGIN_BACKGROUND_IMAGE. Please make sure to not use any special characters or spaces in the file names. For example: LOGIN_BACKGROUND_IMAGE="sunflowers-background.jpg".
Unfortunately, loading custom images in the native openITCOCKPIT App is only possible, if the serverAddress is set via the MDM. This is because the App has to load the custom images from a specific URL, which is only possible if the server address is known. If the server address is set via QR code or manually, the app will not be able to load the custom images upfront.
How ever, when an MDM is used to set the server address, the app will load the custom images from the WAF automatically.
Example Docker run command with custom images:
docker run --rm -it \
--name openitcockpit-mobile-waf \
-p 80:80 \
-p 443:443 \
-e WEB_APP_ENABLED=1 \
-e OITC_SERVER=demo.openitcockpit.io \
-e SSL_CERT_PATH=/etc/nginx/certs/local.crt \
-e SSL_CERT_KEY_PATH=/etc/nginx/certs/local.key \
-v /path/on/host/certs:/etc/nginx/certs:ro \
-v /path/on/host/custom_images:/usr/share/nginx/html/custom_images:ro \
-e LOGIN_BACKGROUND_IMAGE="sunflowers-background.jpg" \
-e LOGIN_LOGO_IMAGE="cat-logo.png" \
cr.openitcockpit.io/openitcockpit-mobile-waf:latest
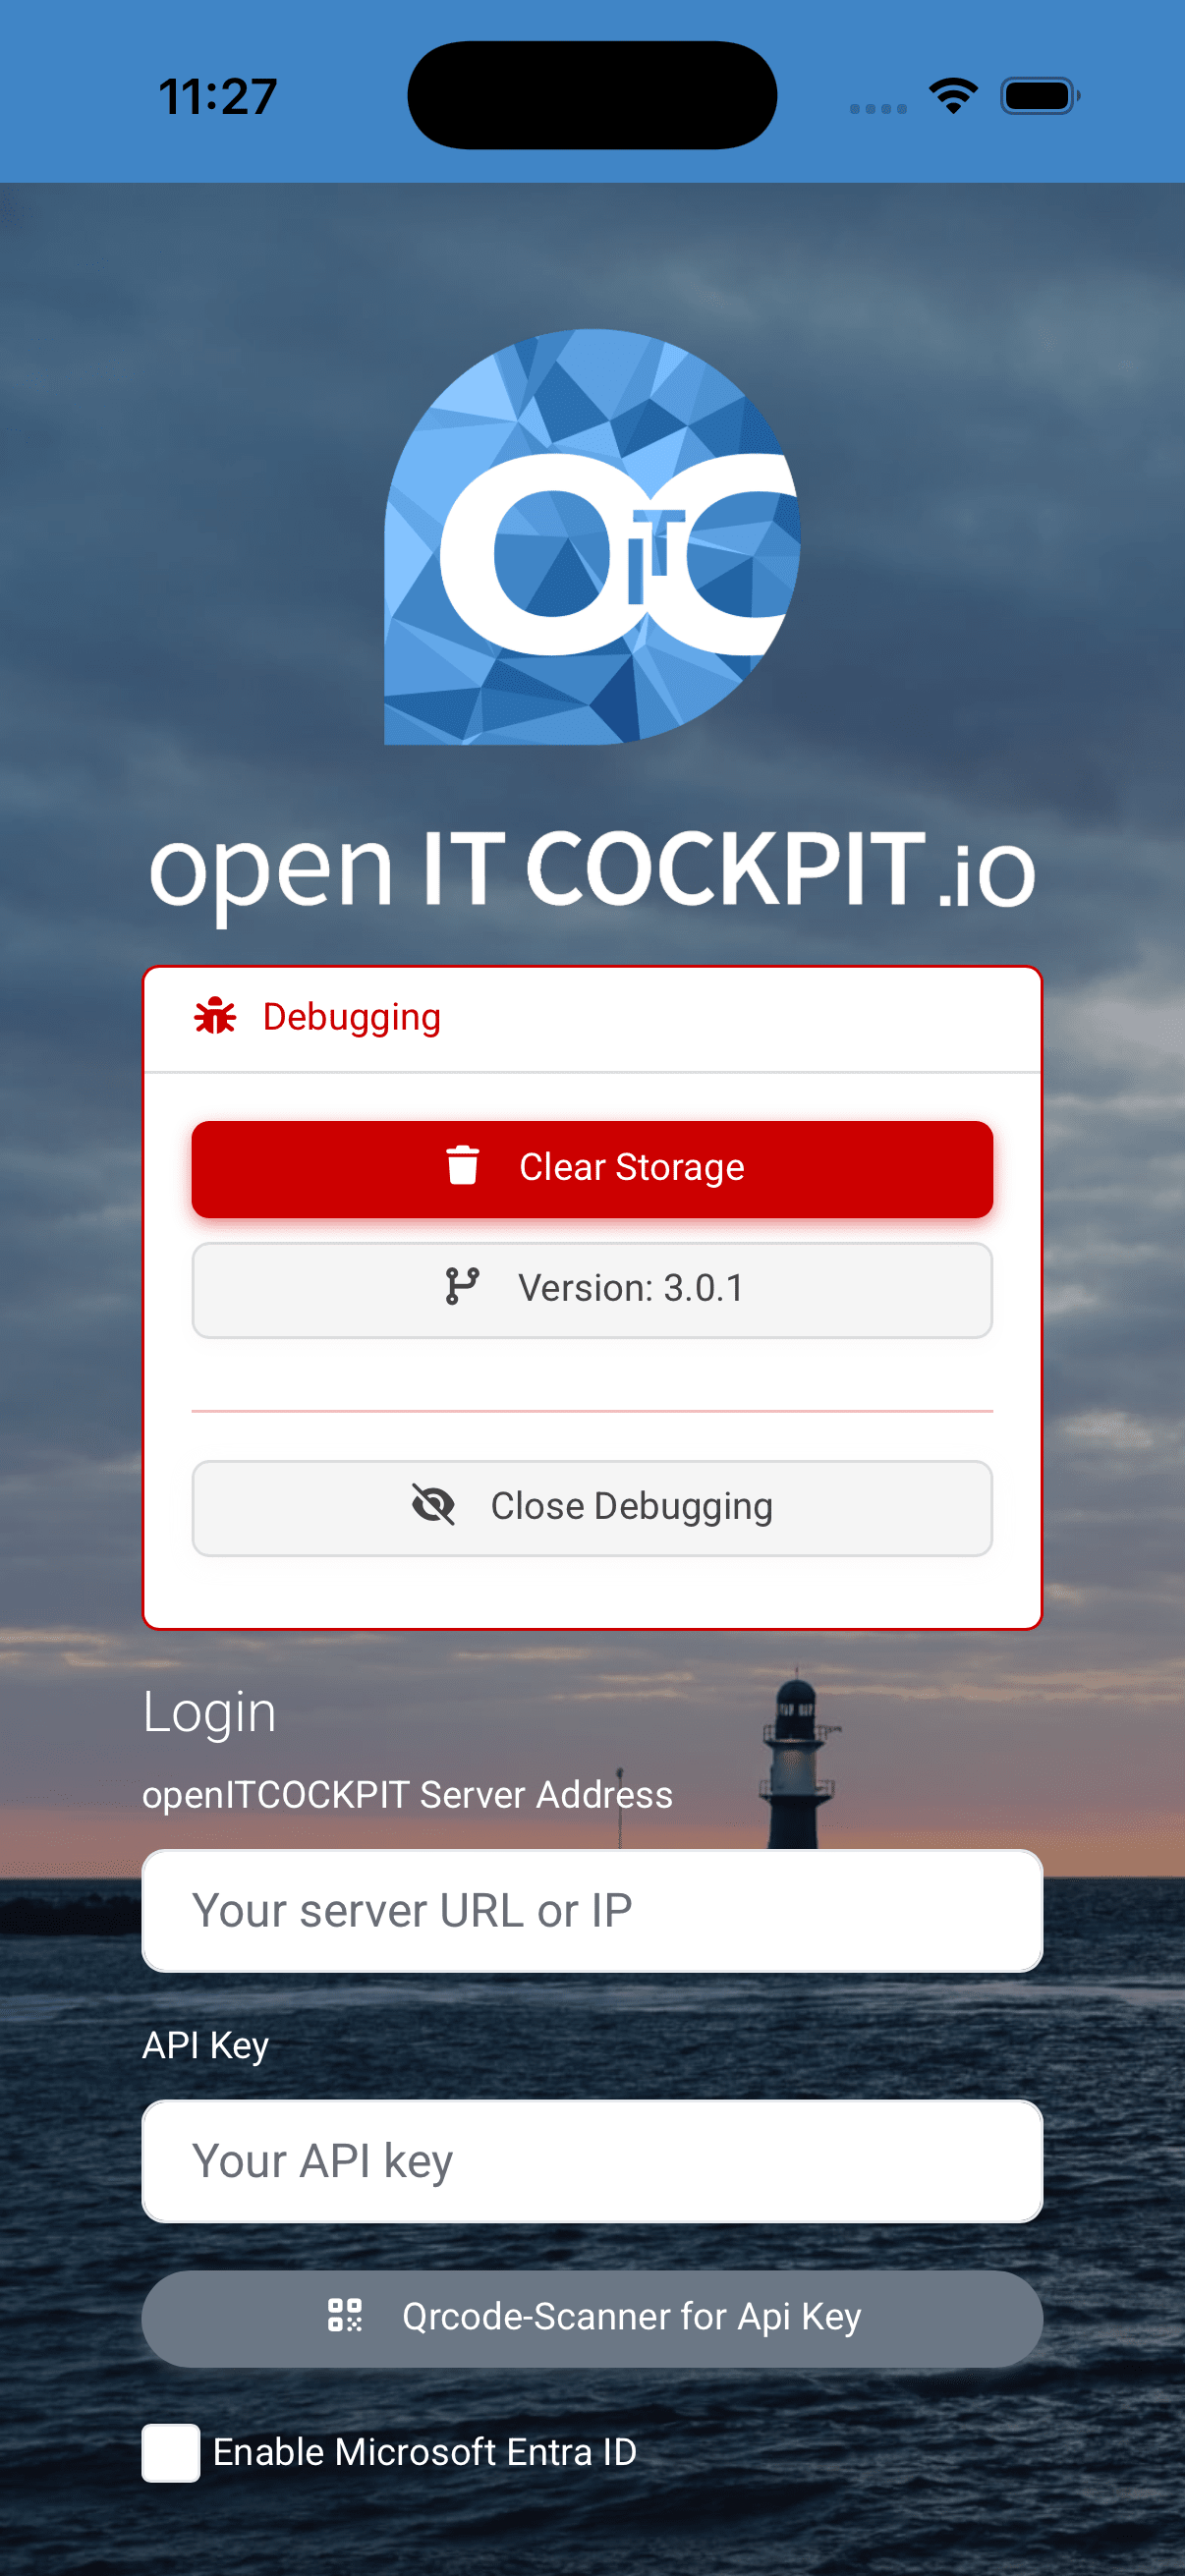
Debugging menu
The openITCOCKPIT App has a hidden debugging menu on the login screen, that can be accessed by tapping the openITCOCKPIT logo 5 times within 1.5 seconds. The debugging menu allows you to view the current app version and to clear the app storage.