Jira EE
What can I do with the Jira module?
The Jira Module allows you to create Jira issues from openITCOCKPIT notifications. Additionally, Jira can acknowledge issues in openITCOCKPIT through a webhook.
When a host or service sends a notification, openITCOCKPIT creates a new Jira issue. Only one issue is created per host or service problem. openITCOCKPIT will also close open issues when a host or service switches back to a recovery state.
openITCOCKPIT supports Jira Cloud and Jira Data Center installations.
Configuration
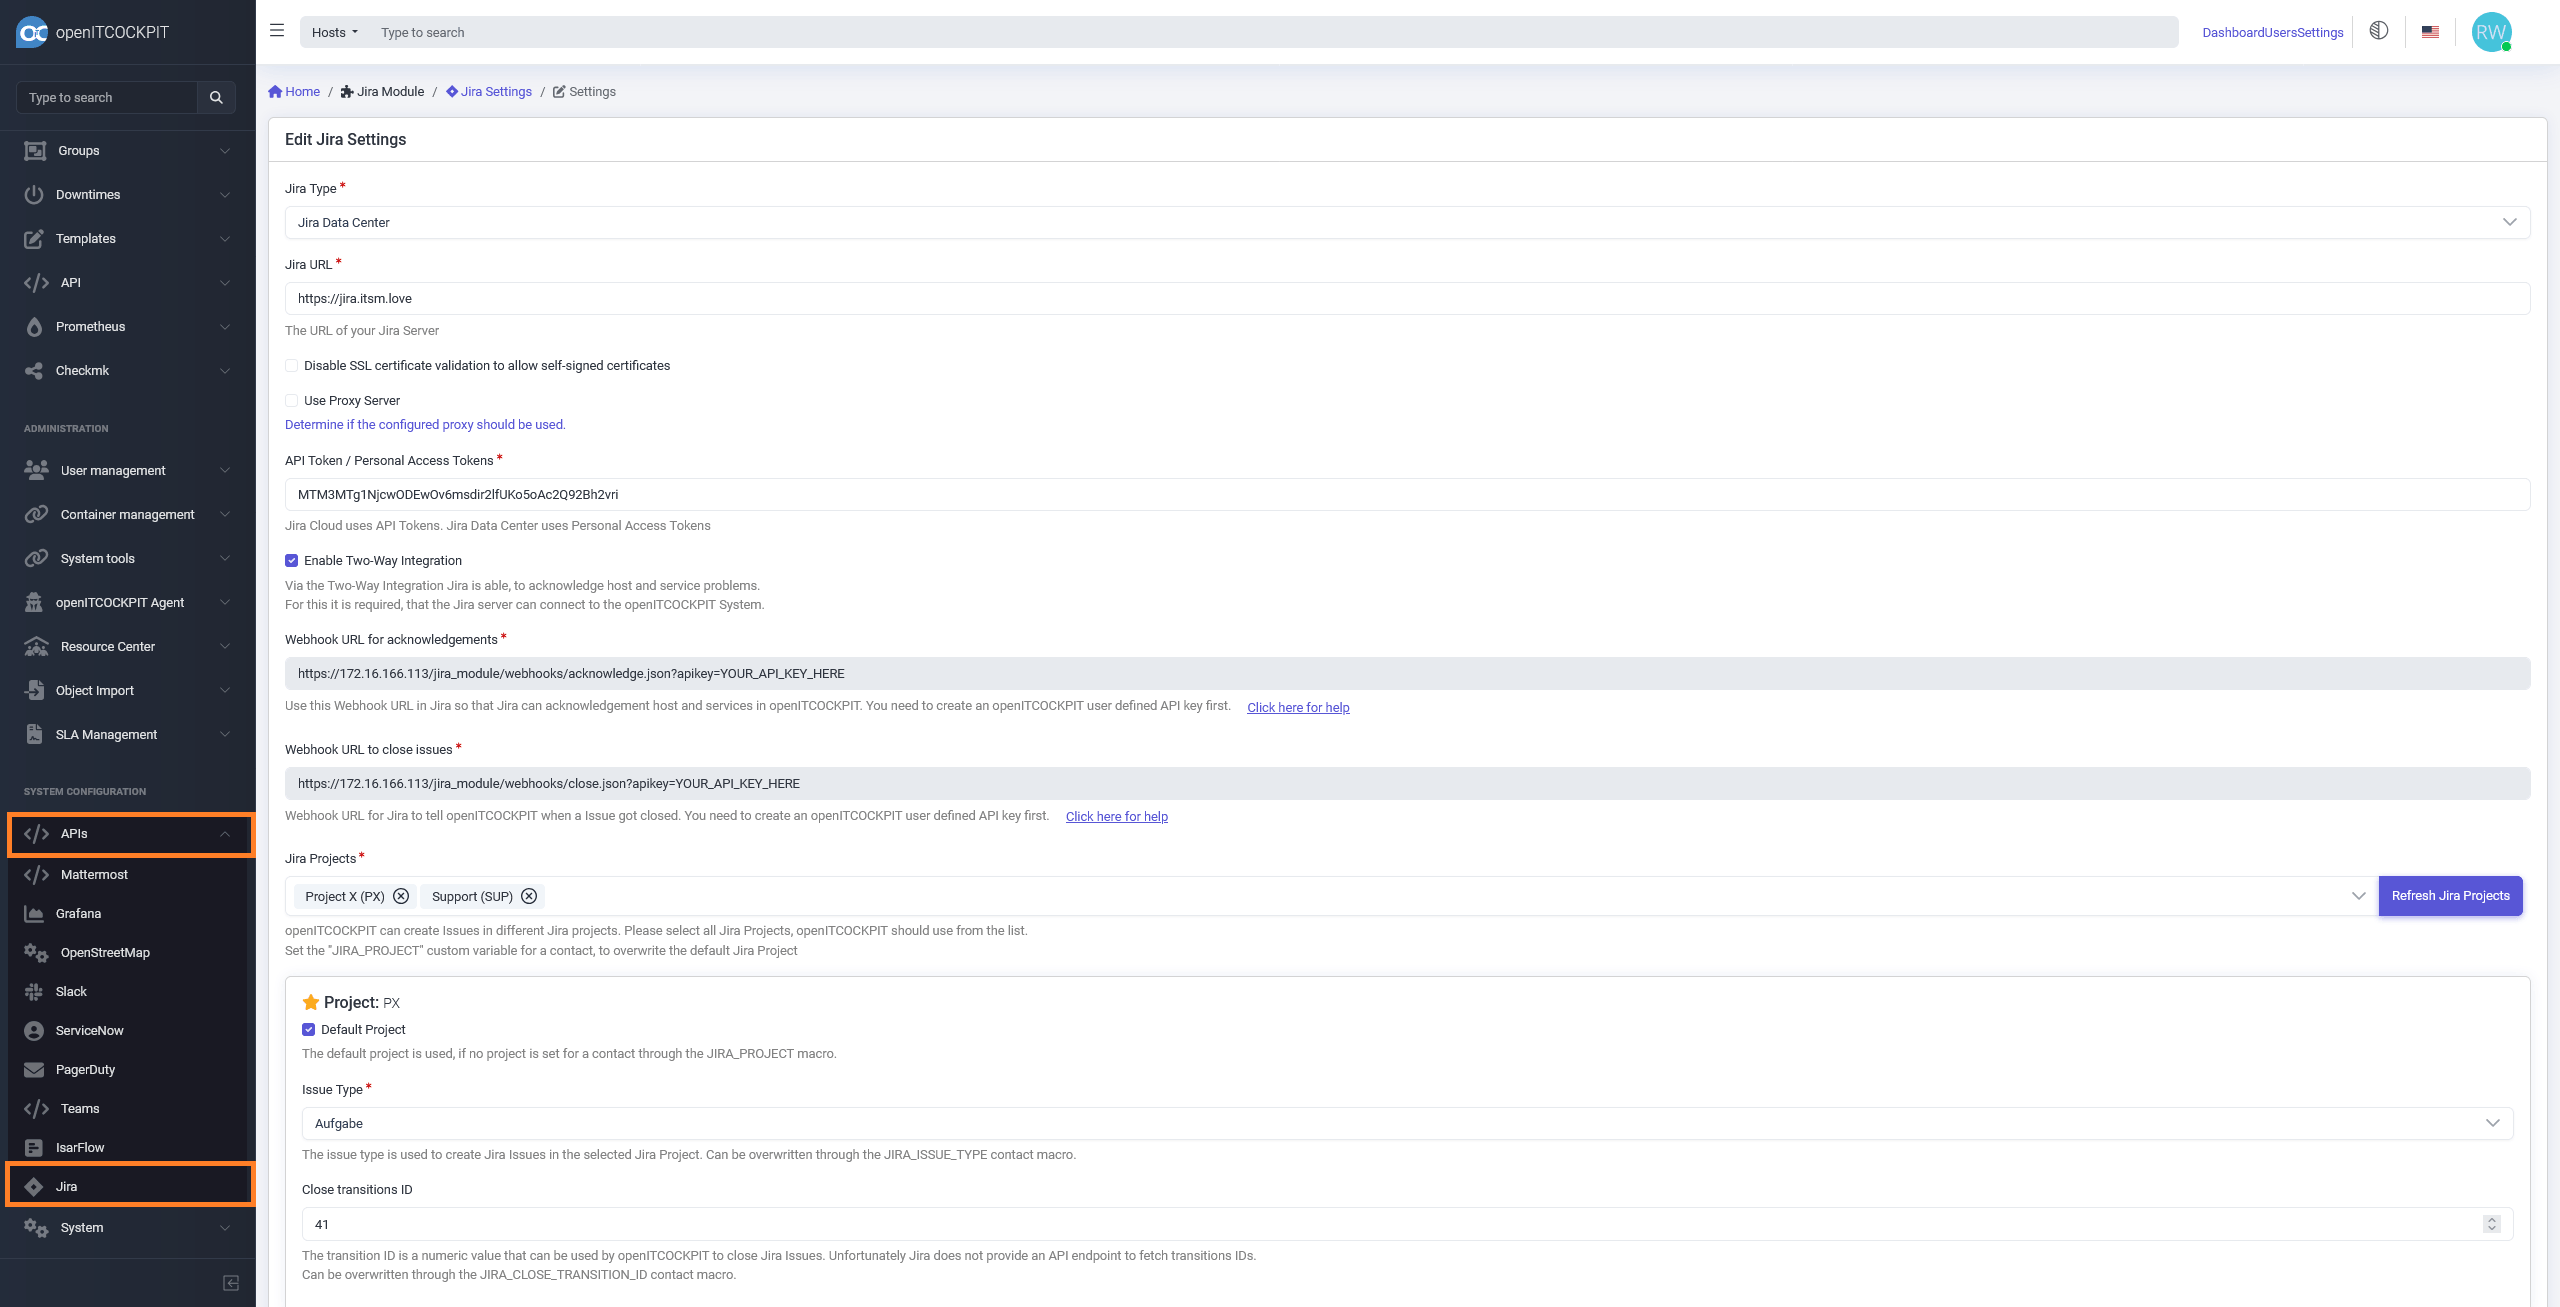
To set up the Jira integration, navigate to APIs -> Jira.
Select the Jira type, enter the Jira URL, and an API token. For Jira Cloud, a username is also required. Click "Refresh Jira Projects" to load a list of available Jira projects from your Jira server.
openITCOCKPIT can create issues in different Jira projects. Select all Jira projects where you want to create issues. At least one project must be selected.
If you select more than one project, you need to mark one project as the Default Project. All issues will be created in the default project unless overridden by setting the JIRA_PROJECT custom variable to the Jira project key (e.g., PX or SUP) in the contact, host, or service configuration. See the macros section for details.
Close transition ID
Jira Data Center
To close a Jira issue, openITCOCKPIT needs the ID of the close transition. This transition ID is required for openITCOCKPIT to automatically close Jira issues when a host or service recovers. If you do not provide a transition ID or enter an incorrect ID, openITCOCKPIT will still create issues in Jira but will not be able to close them.
Depending on your workflow, the transition ID can vary. Unfortunately, Jira does not provide an API to query the transition ID. You must manually look up the transition ID in the Jira web interface and enter the number.
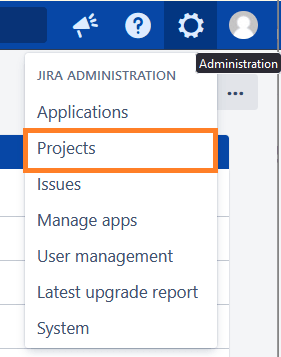
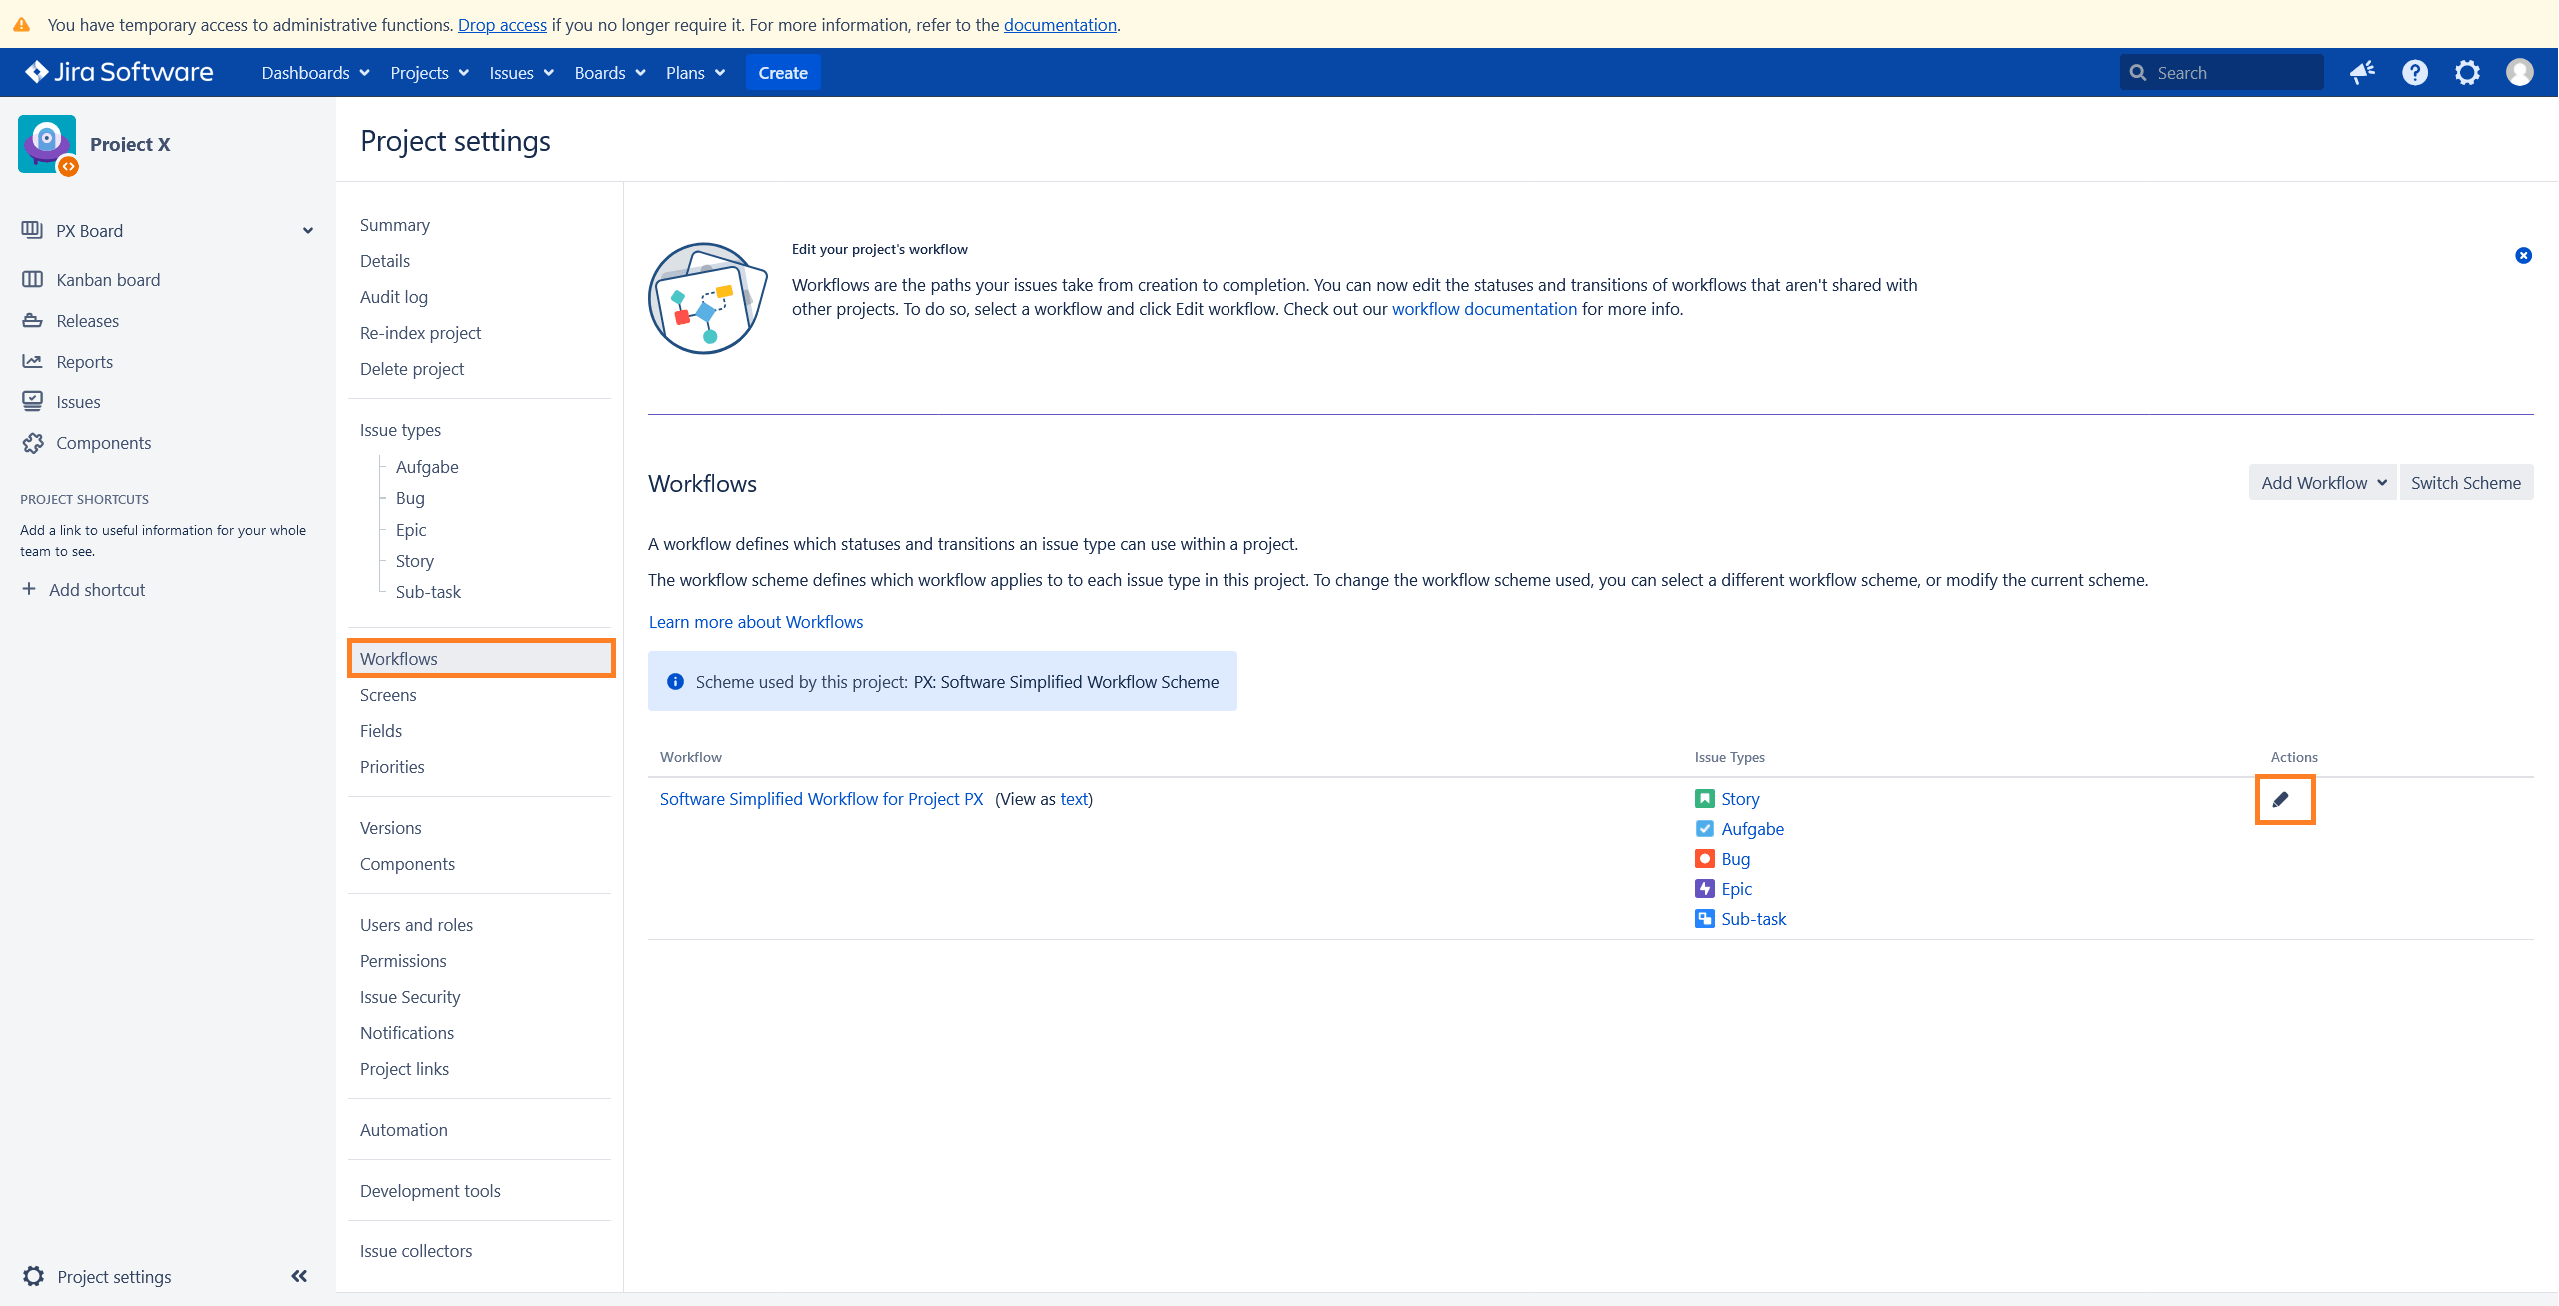
Navigate to Projects -> Select your project -> Workflows and click on the pencil icon.
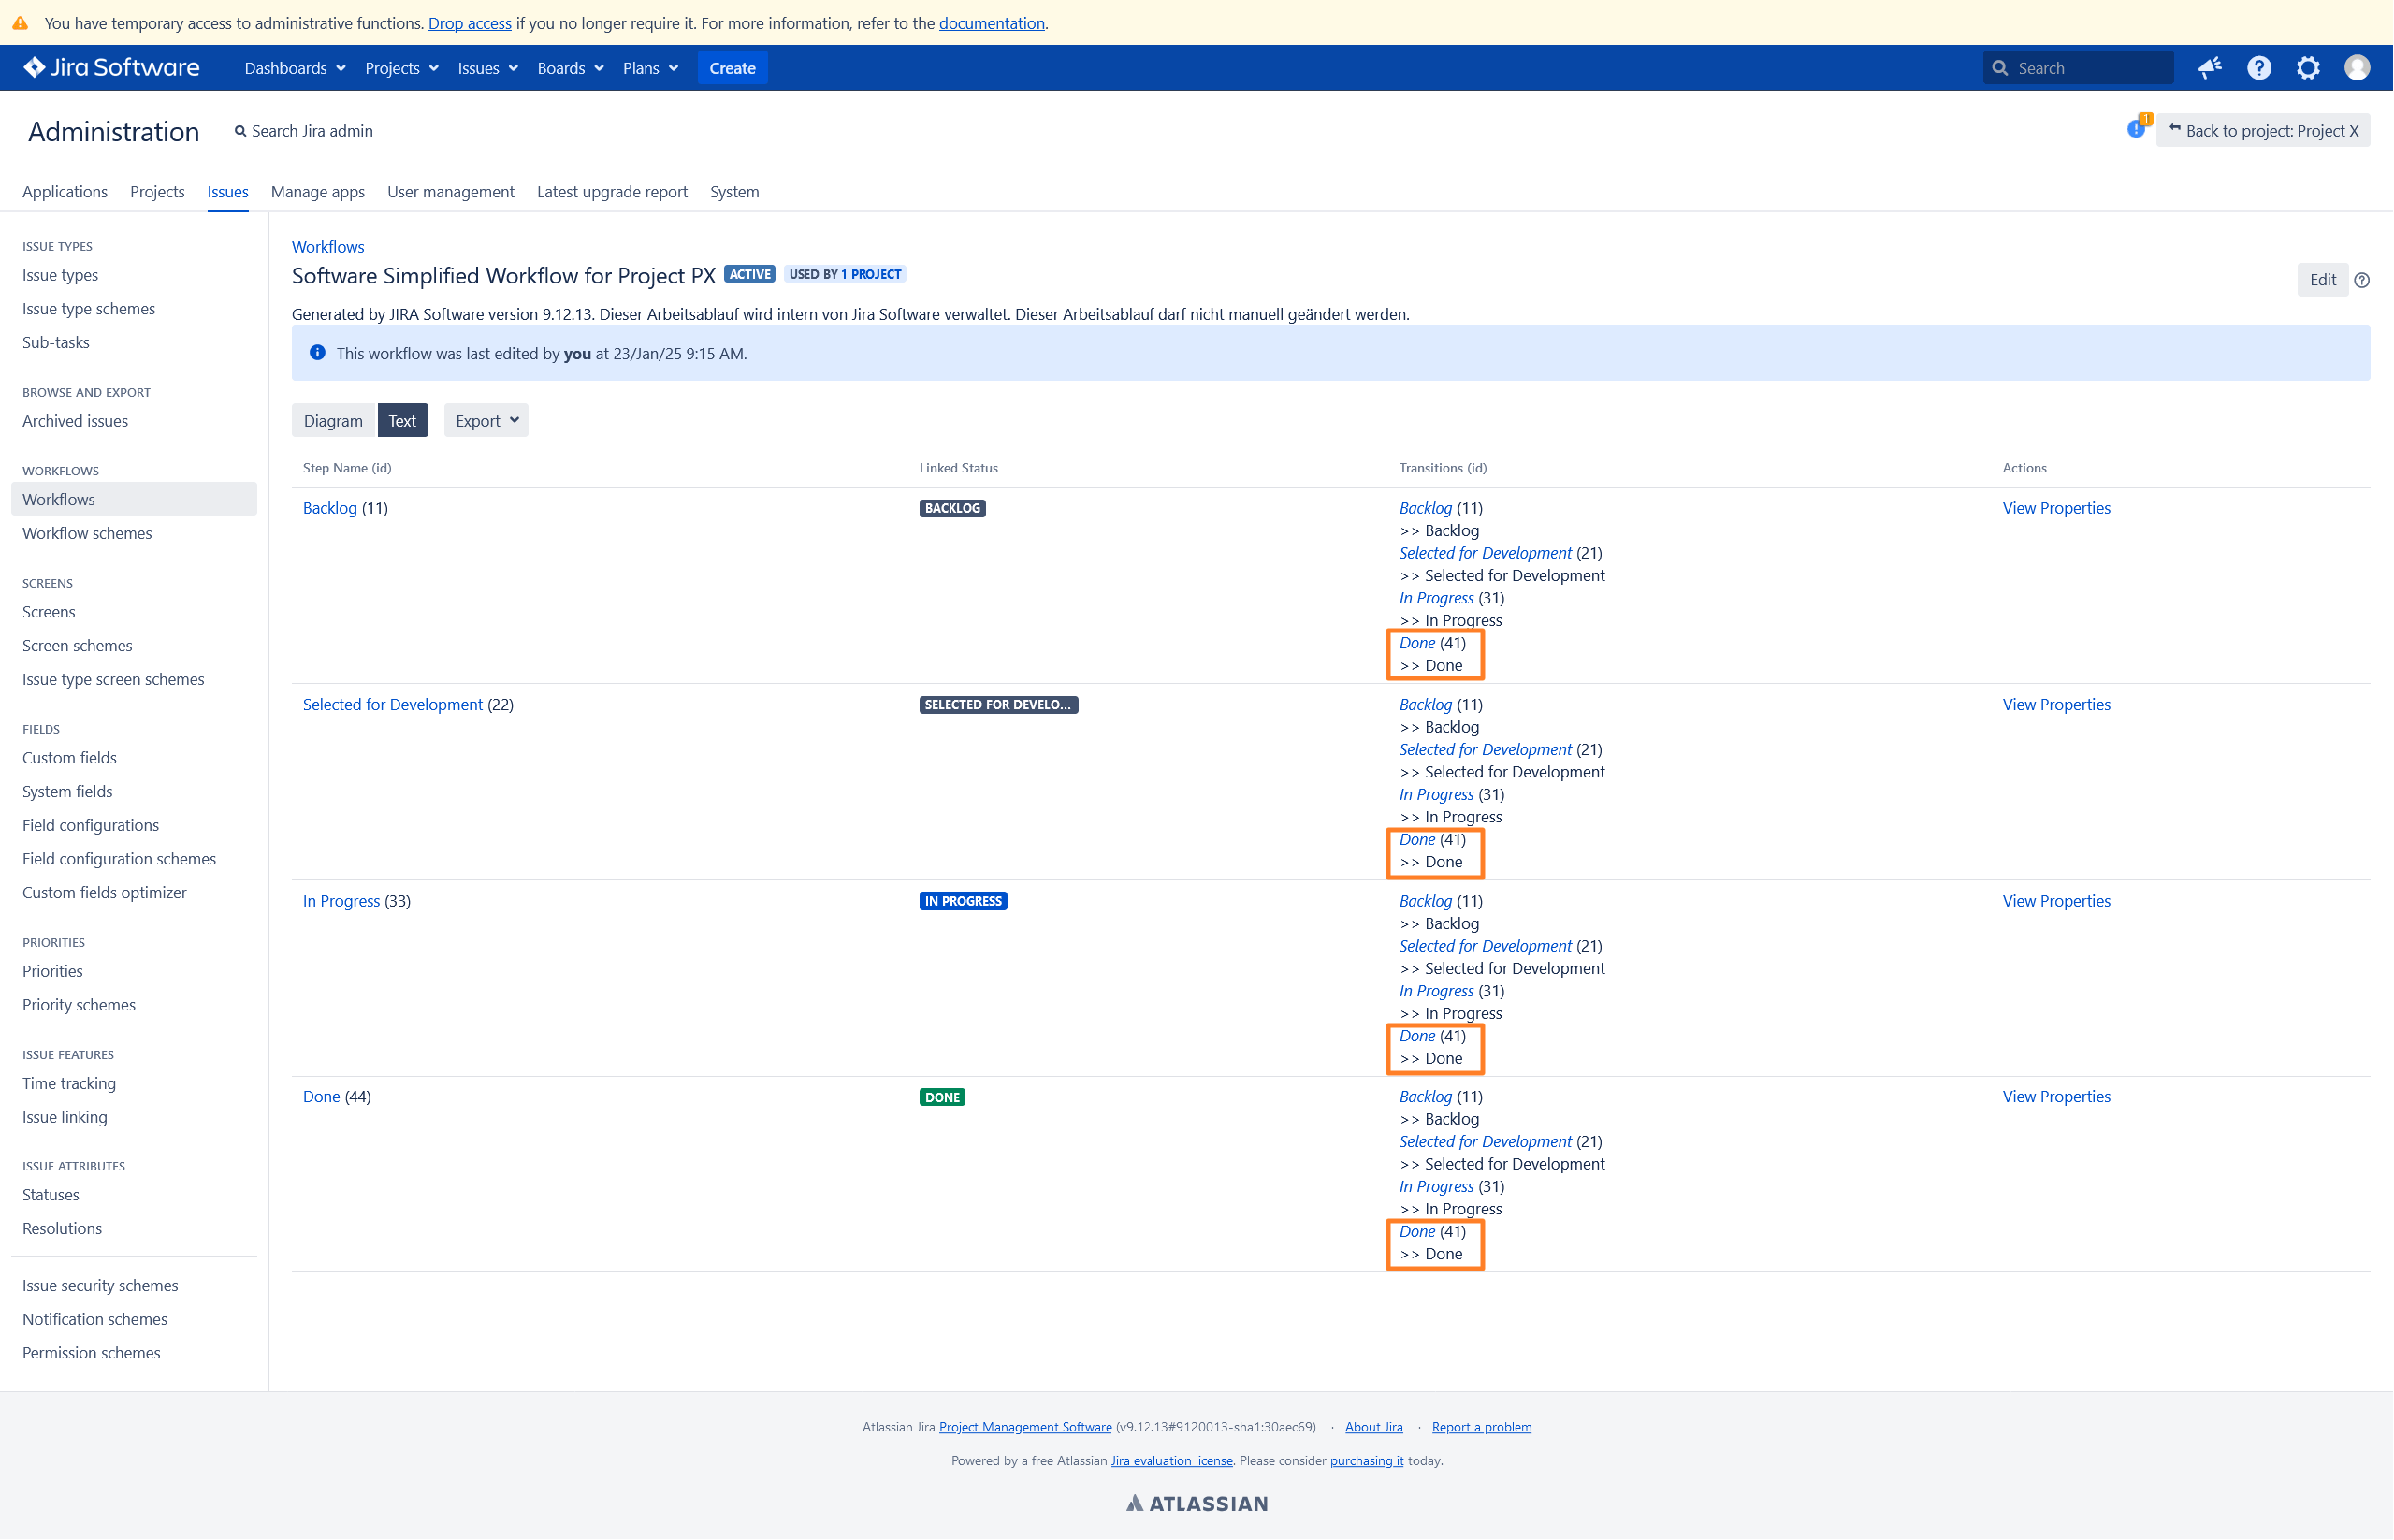
Now you will see a list of all transitions in the workflow. In this example, the Done transition will be used to mark issues as closed, with the ID 41.
Jira Cloud
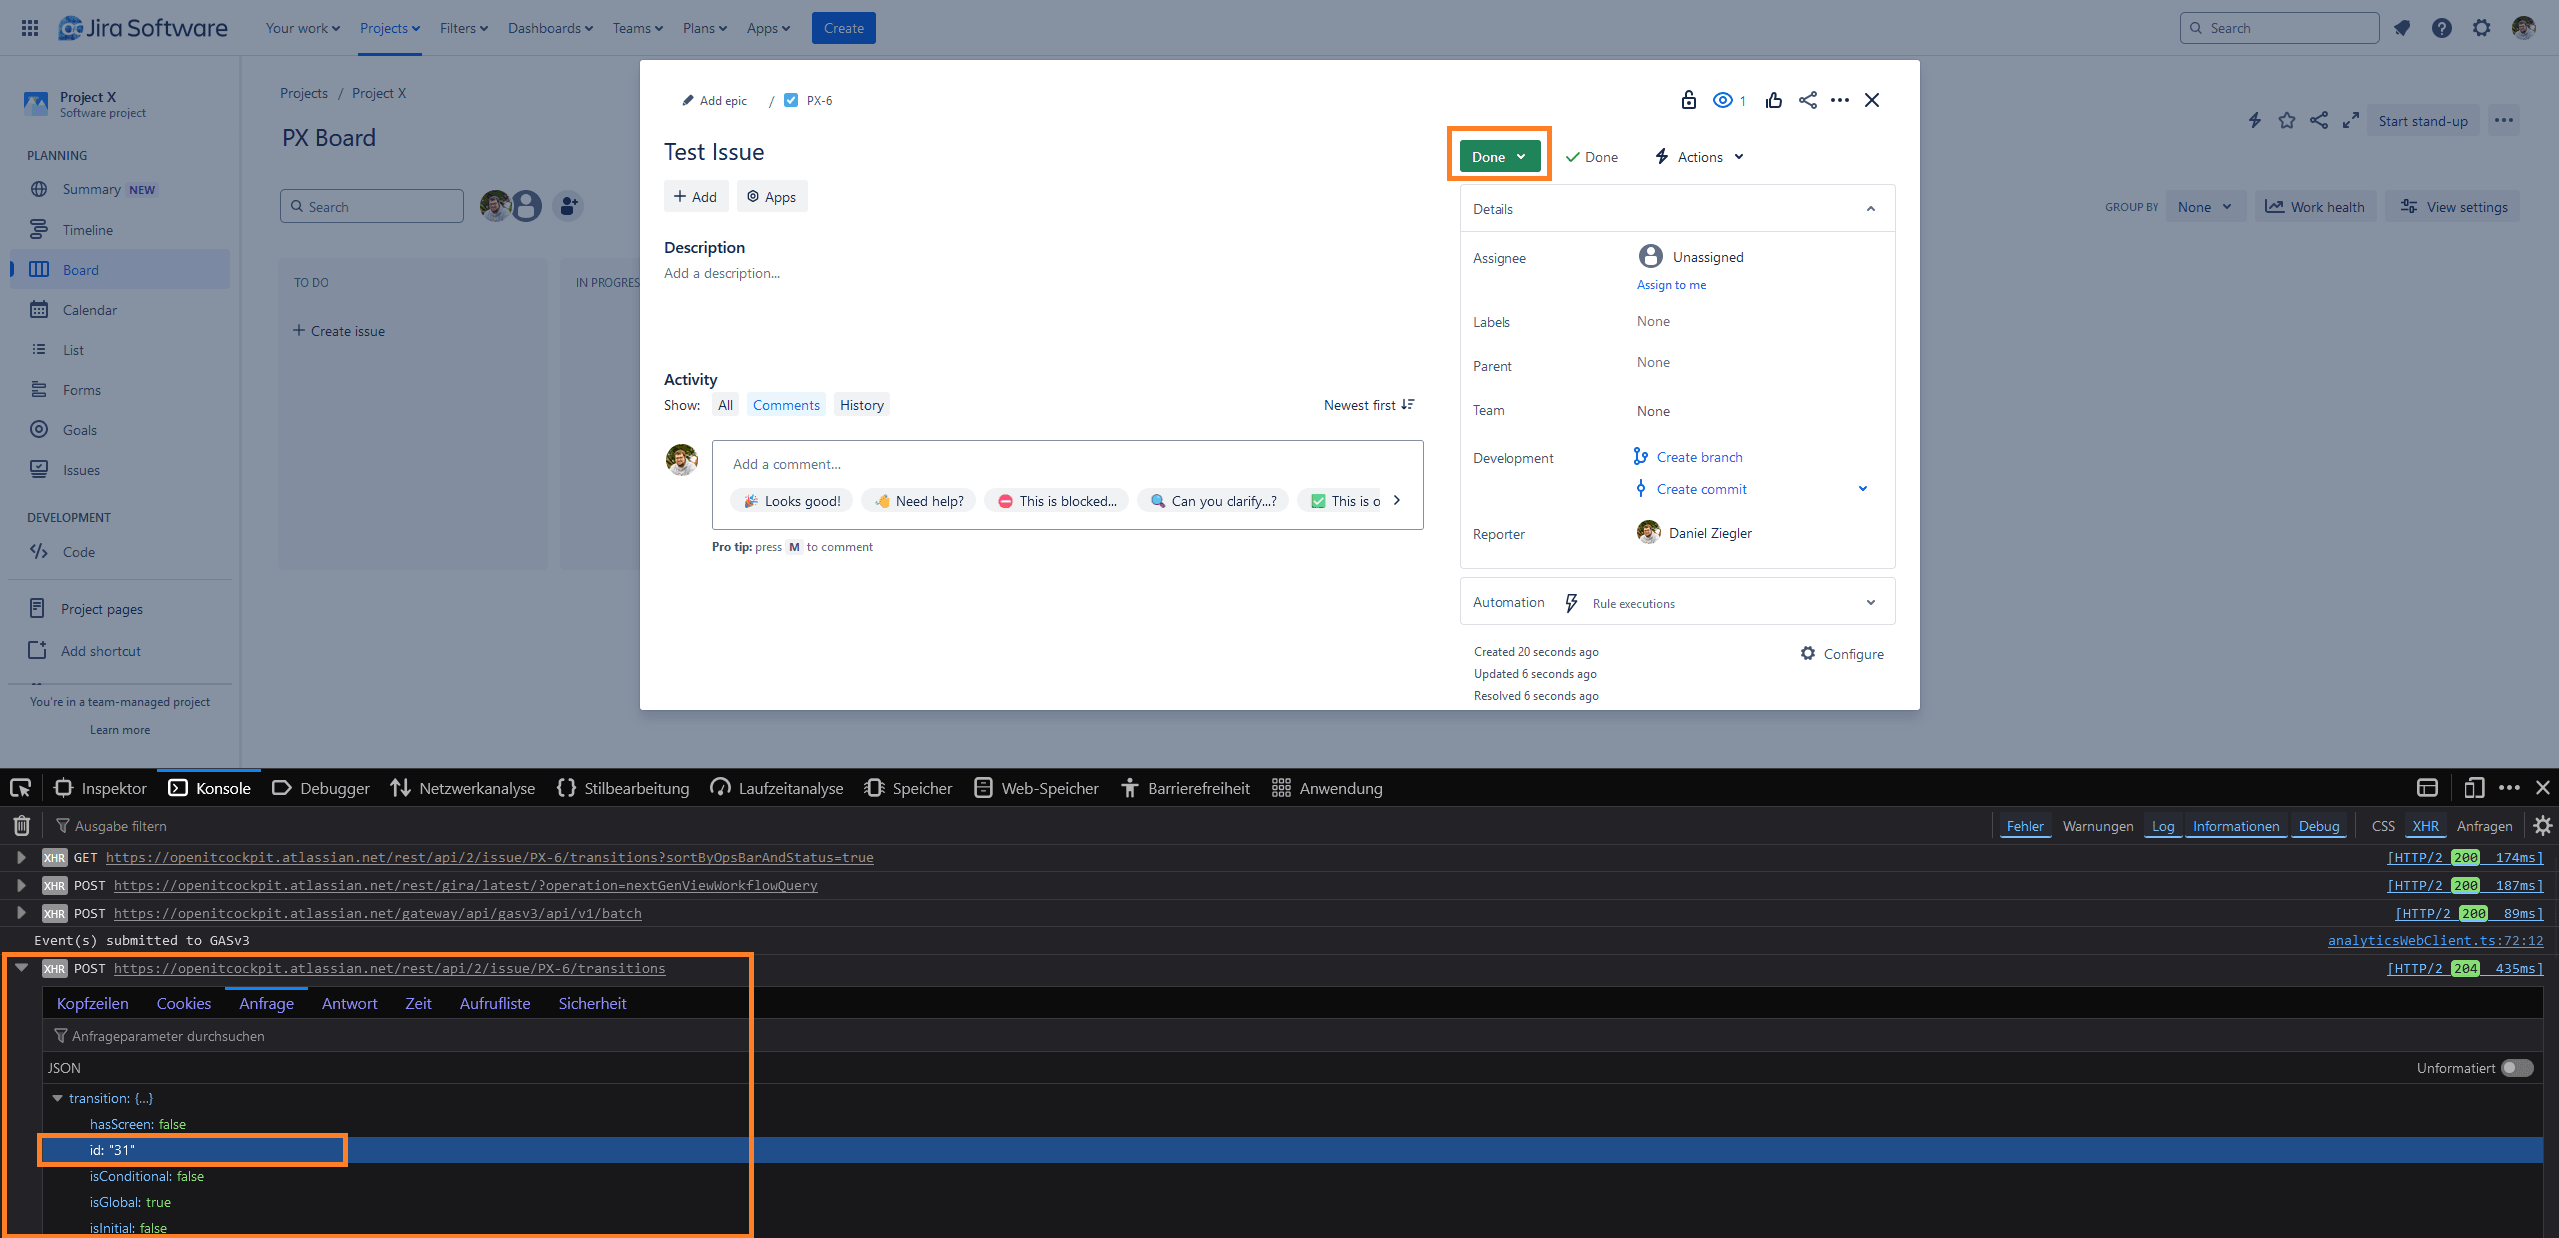
With Jira Cloud, the situation did not improved. The easiest method to get the Close transition ID is, to open your browsers developer console, and close an issue.
Jira API keys
Jira Data Center
Jira Data Center uses Personal Access Tokens. Please follow the official documentation to create a new access token: https://confluence.atlassian.com/enterprise/using-personal-access-tokens-1026032365.html.
Jira Cloud
Jira Cloud API tokens are bound to a user account. Please follow the official documentation: https://support.atlassian.com/atlassian-account/docs/manage-api-tokens-for-your-atlassian-account/.
Setup Webhooks
With webhooks, Jira can communicate with openITCOCKPIT. This is used to add an acknowledgment to openITCOCKPIT when a Jira issue moves from Backlog to In Progress. The acknowledgment will include the user or the assigned user.
Additionally, Jira will notify openITCOCKPIT when an issue is closed in Jira. This ensures that openITCOCKPIT will create a new issue if a problem remains unresolved.
Danger
For security reasons, it is recommended to create a new openITCOCKPIT user and user role without any permissions.
To set up webhooks, an openITCOCKPIT API Key is required.
Jira Data Center

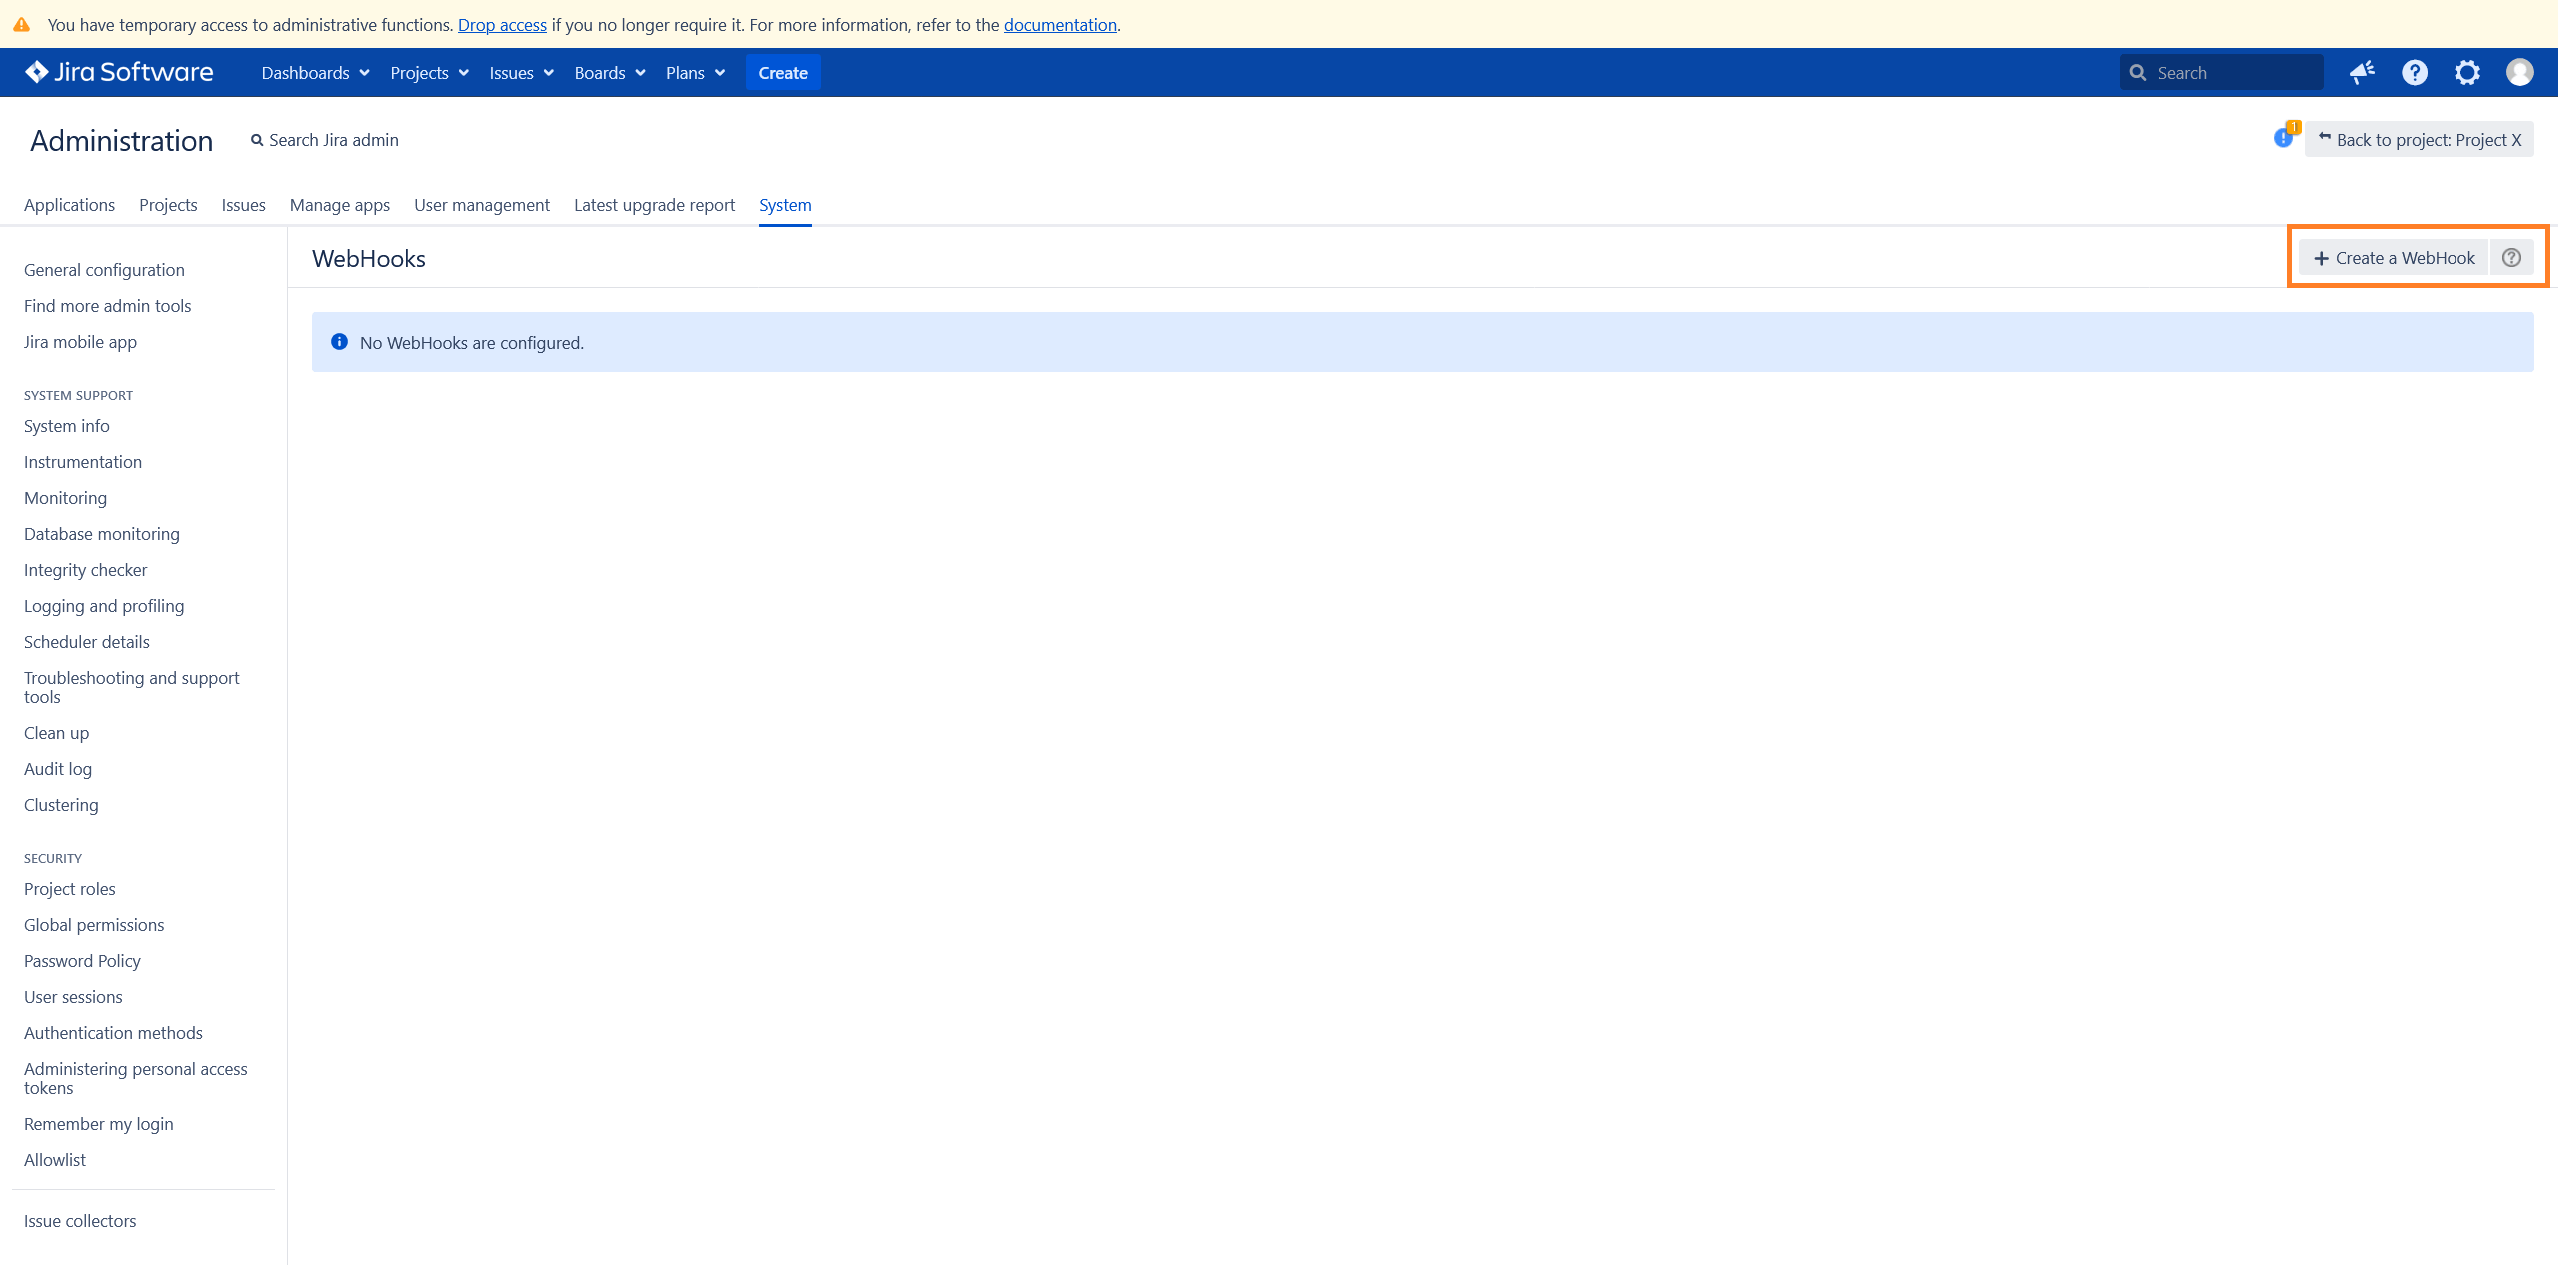
To create a webhook, navigate to System -> Webhooks and click on Create a Webhook in the top-right corner.
Acknowledge Webhook
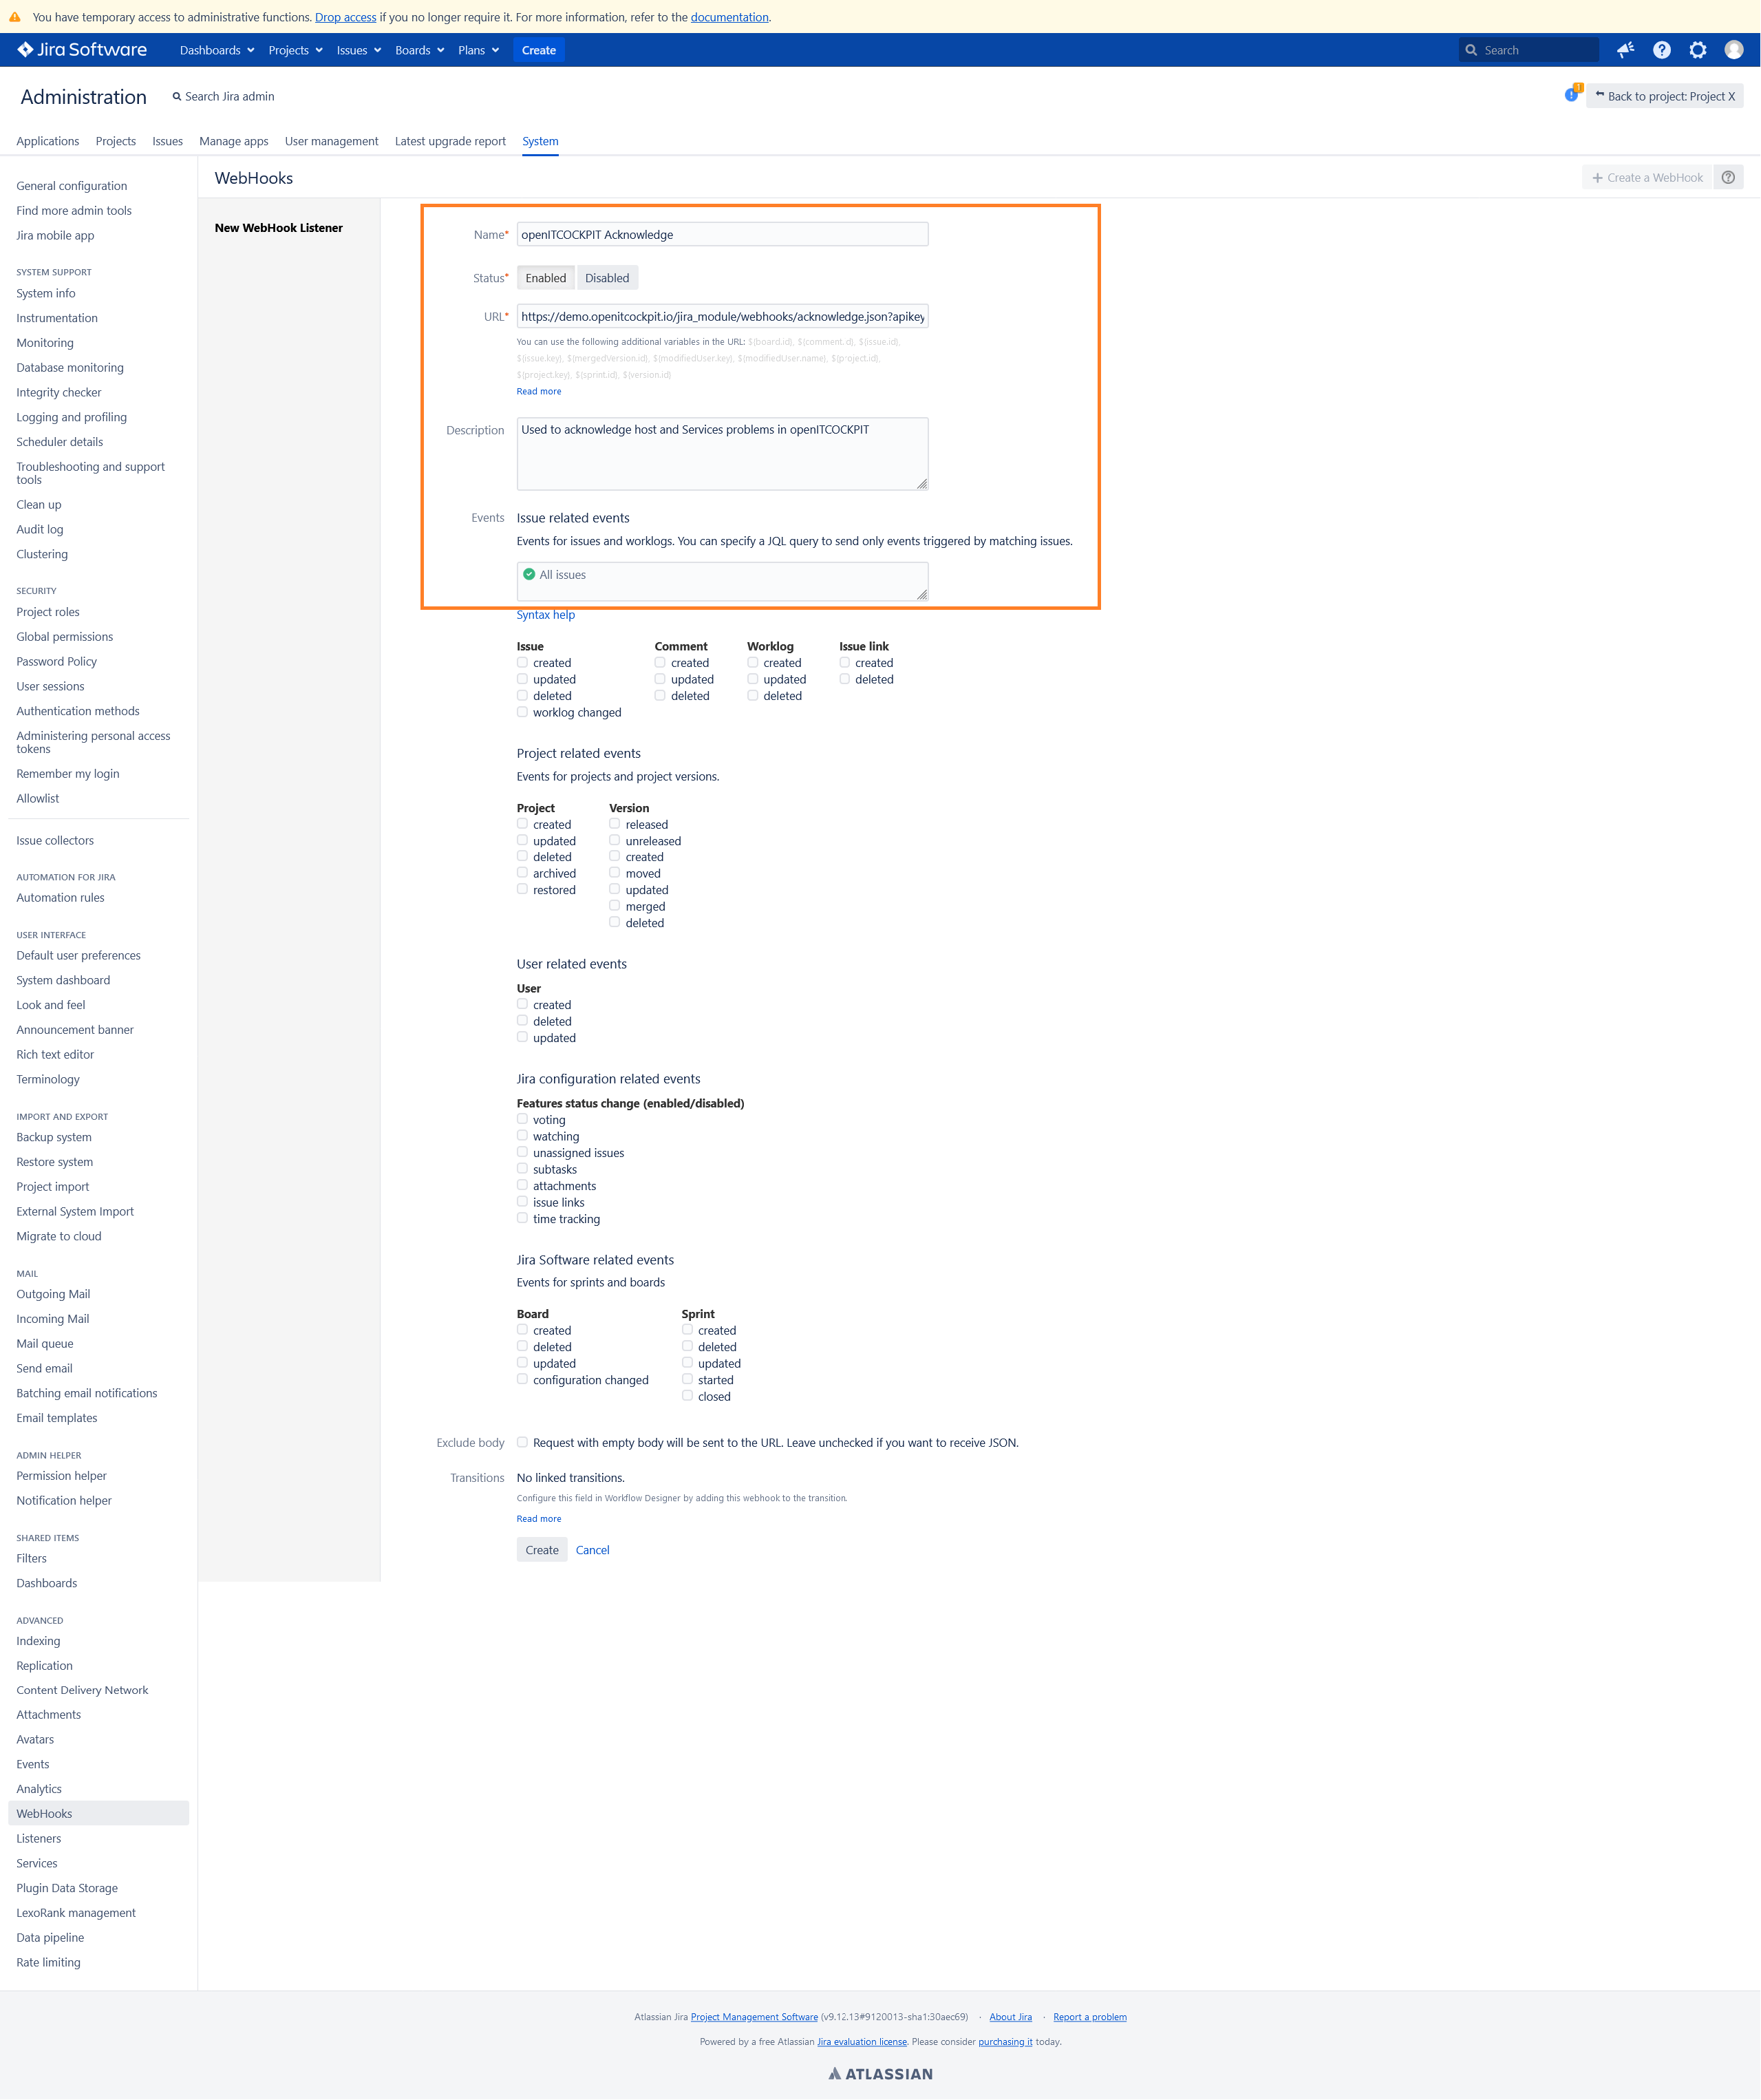
Copy and paste the webhook URL for acknowledgments displayed in the Jira settings in openITCOCKPIT.
Important settings are:
- Name:
openITCOCKPIT Acknowledge - URL: See openITCOCKPIT Jira Settings
- Description:
Used to acknowledge host and service problems in openITCOCKPIT
Warning
Jira requires a valid SSL certificate for the webhook endpoint!
Click Create at the bottom of the page to save the webhook.
Close Issue Webhook
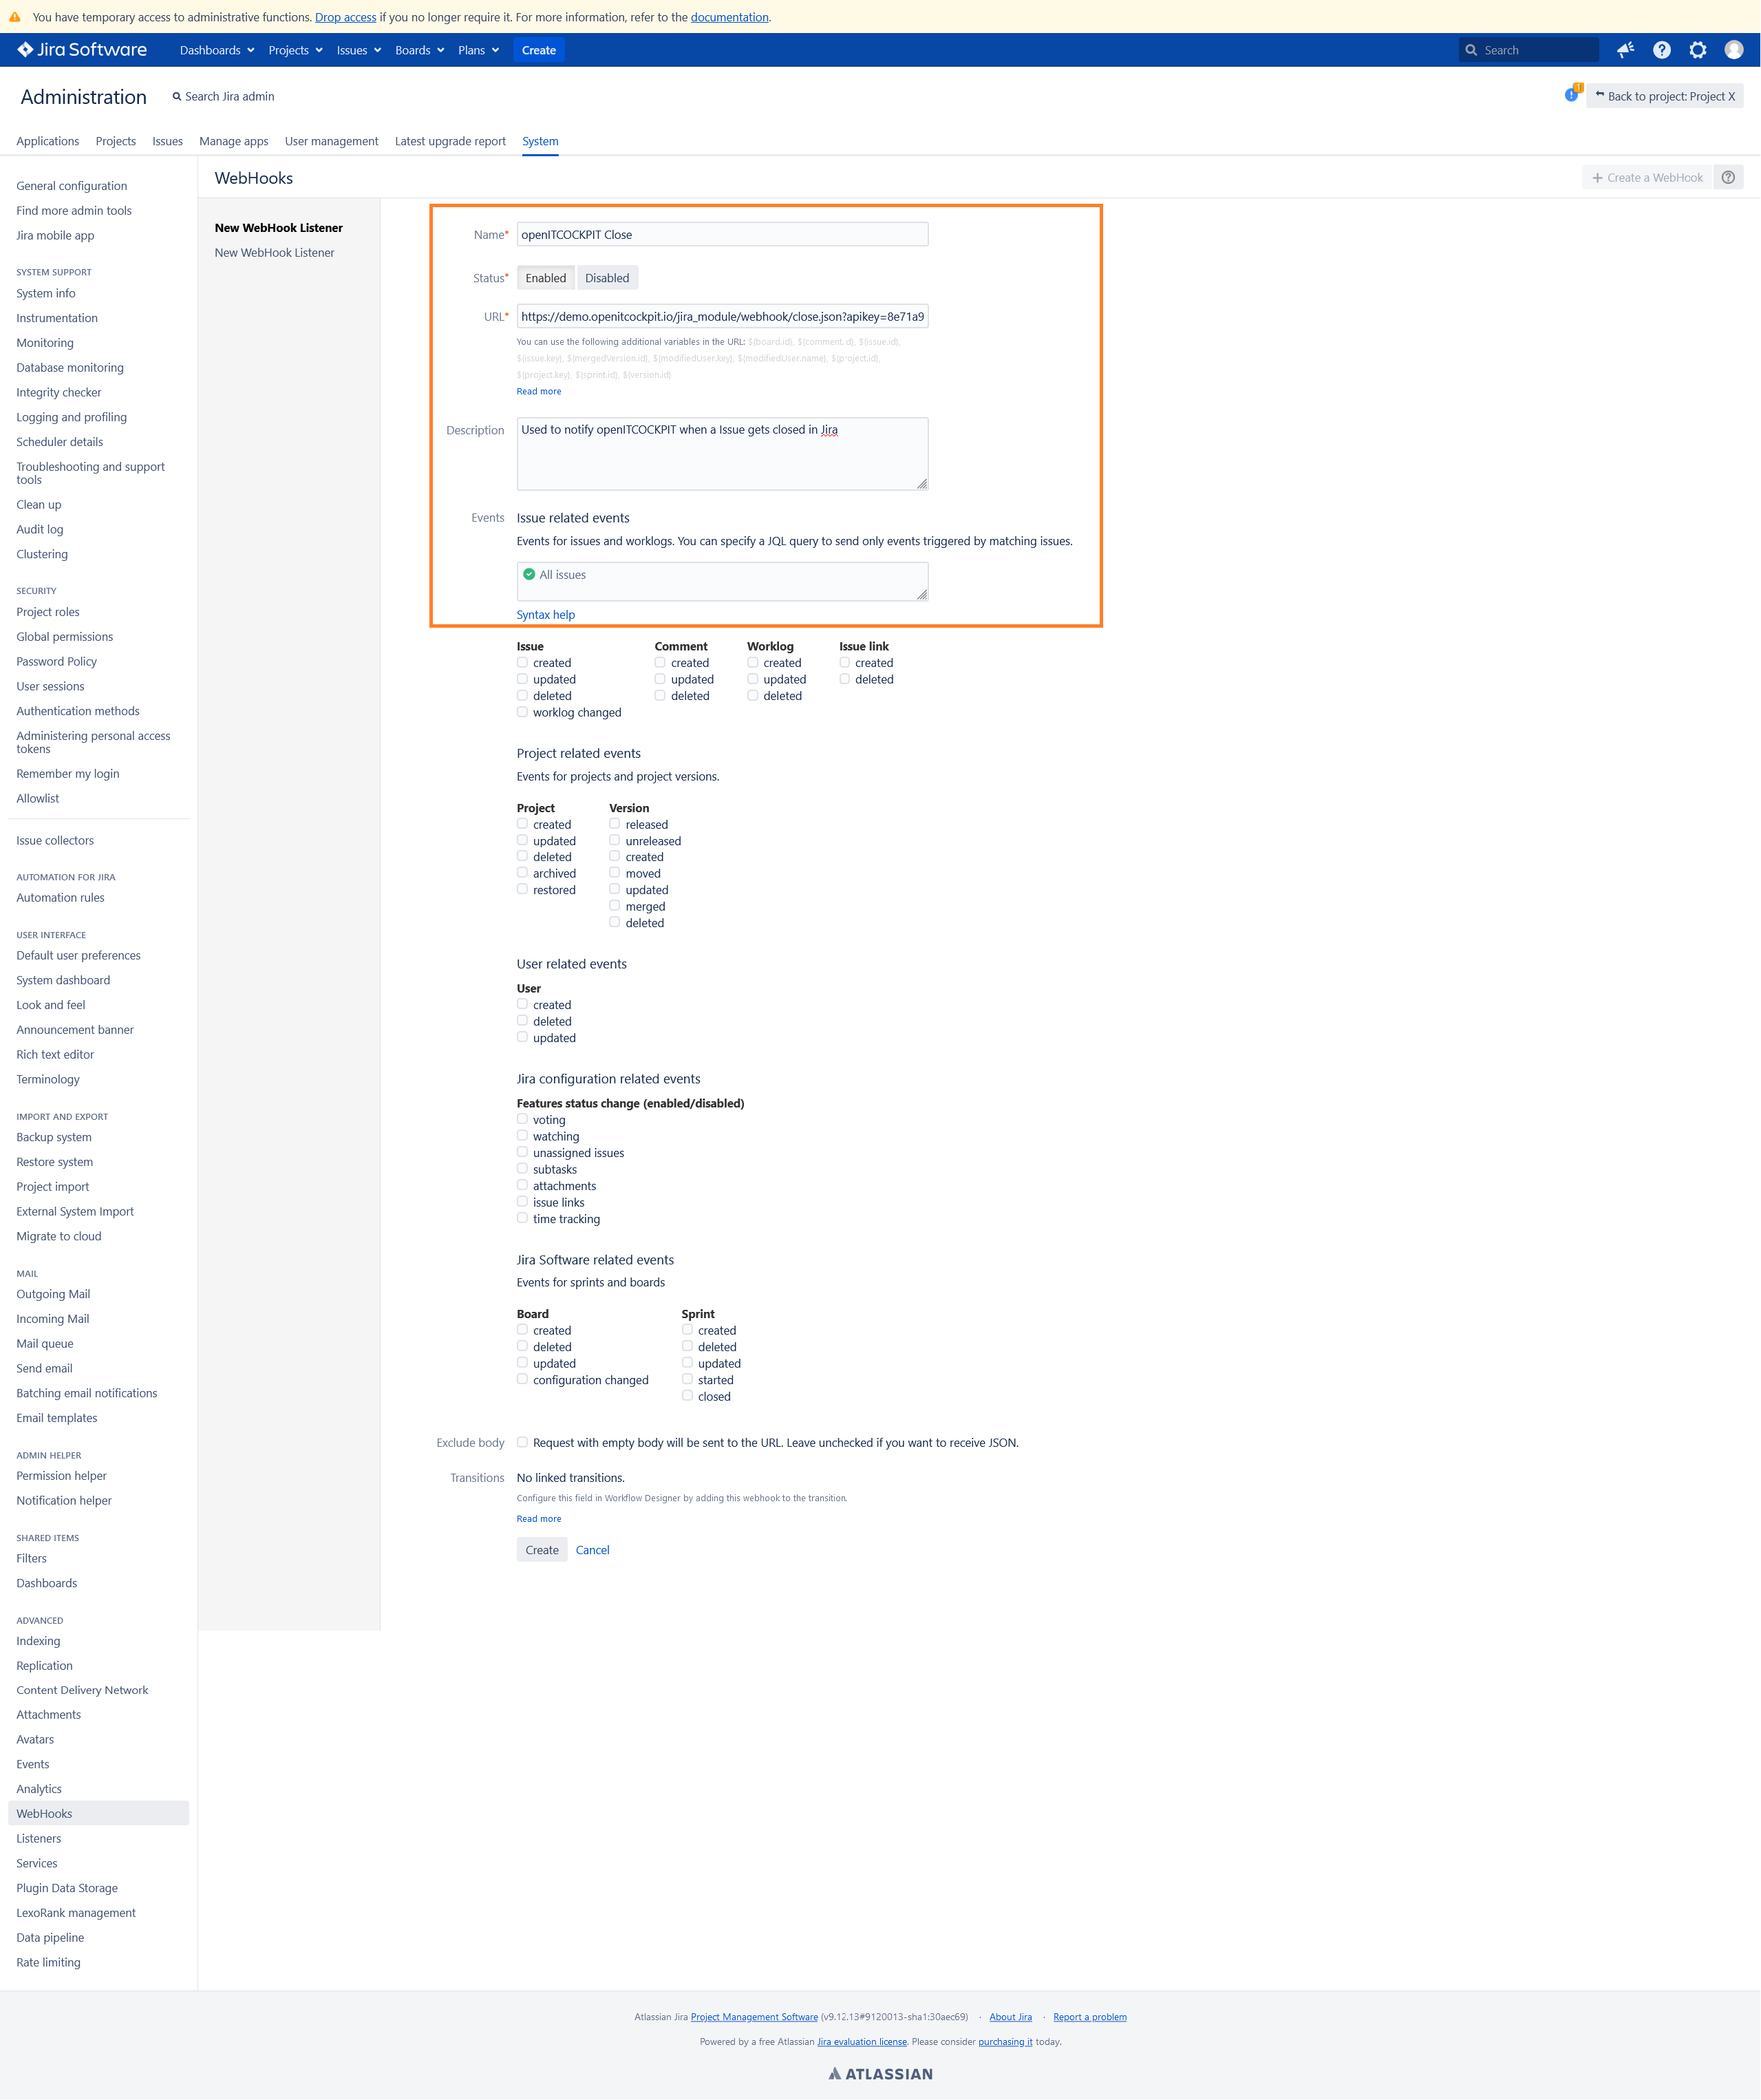
Create a second webhook to notify openITCOCKPIT when an issue is closed in Jira.
Copy and paste the webhook URL for closed issues displayed in the Jira settings in openITCOCKPIT.
Important settings are:
- Name:
openITCOCKPIT Close - URL: See openITCOCKPIT Jira Settings
- Description:
Used to notify openITCOCKPIT when an issue is closed in Jira
Click Create at the bottom of the page to save the webhook.
For more information about webhooks, refer to the official Jira documentation: https://confluence.atlassian.com/adminjiraserver/managing-webhooks-938846912.html
Edit Workflow
It is important to update the workflow of your Jira project; otherwise, Jira will not call the webhooks or inform openITCOCKPIT about issue updates.
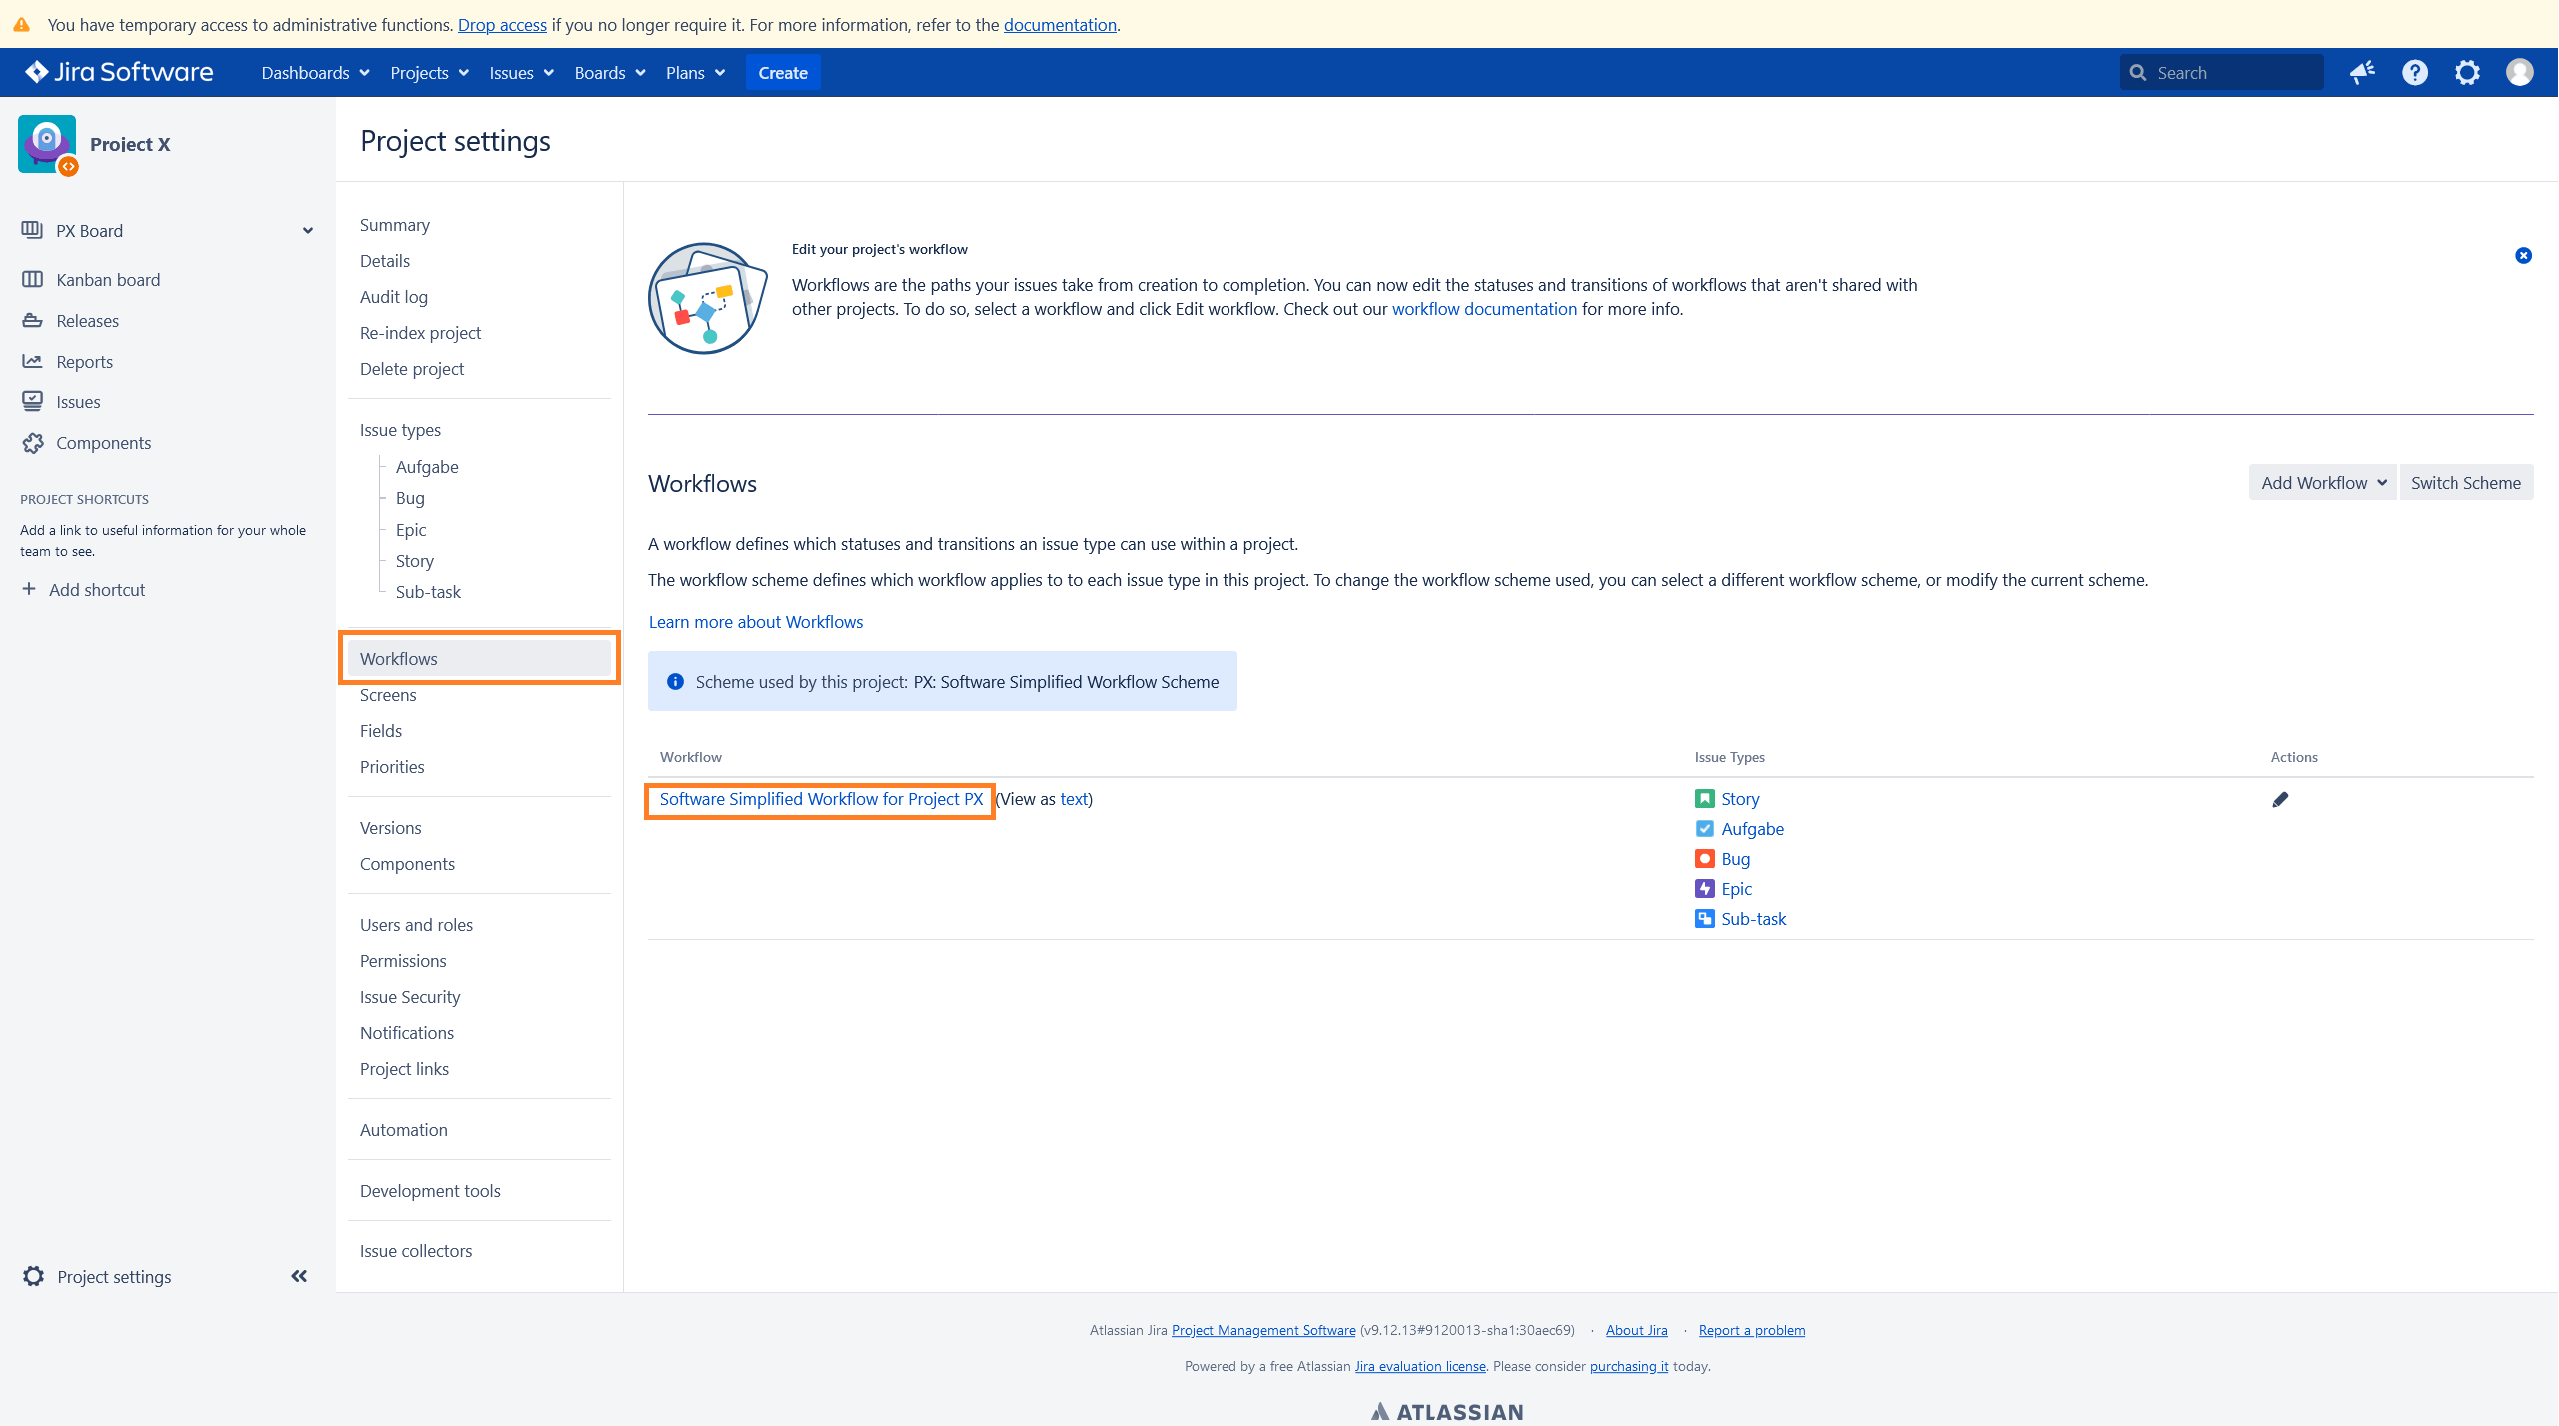
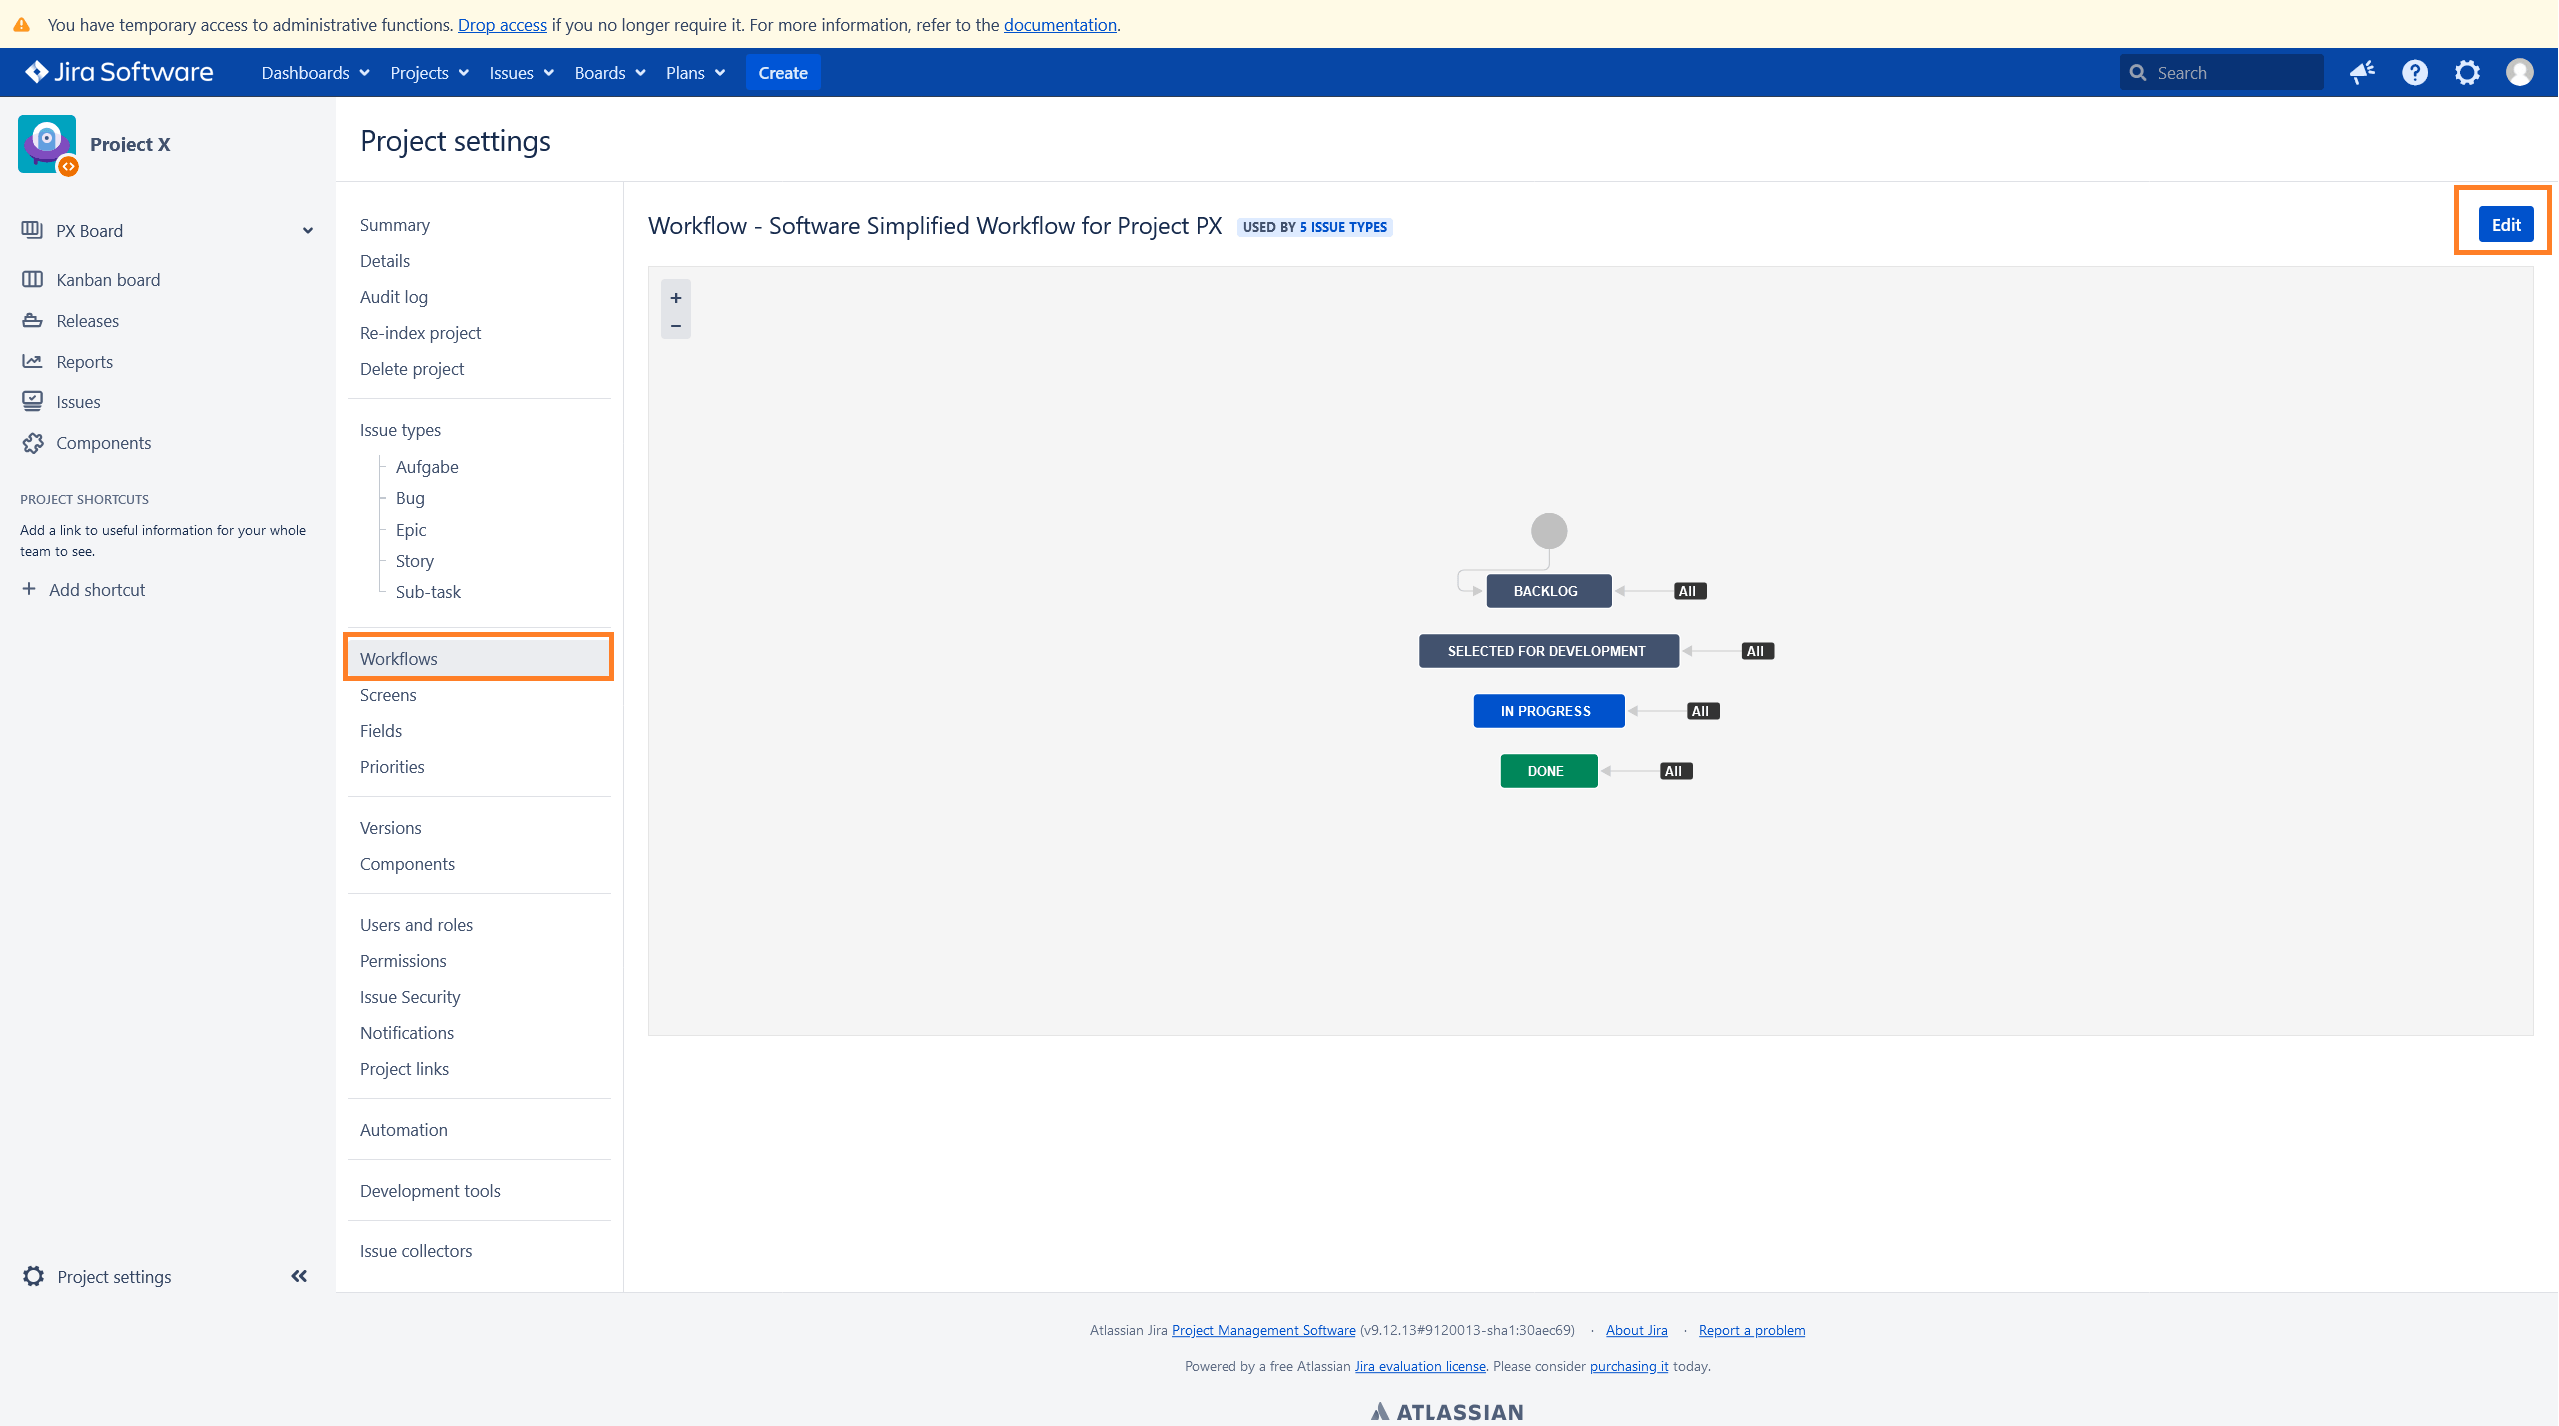
Navigate to Projects and select the corresponding Jira project. Click Workflows on the left side, then click on your workflow and select Edit in the top-right corner.
Trigger Acknowledge Webhook
In this case, configure Jira to create an acknowledgment in openITCOCKPIT when an issue is moved to In Progress. This may differ based on your workflow, but the basic principle is the same.
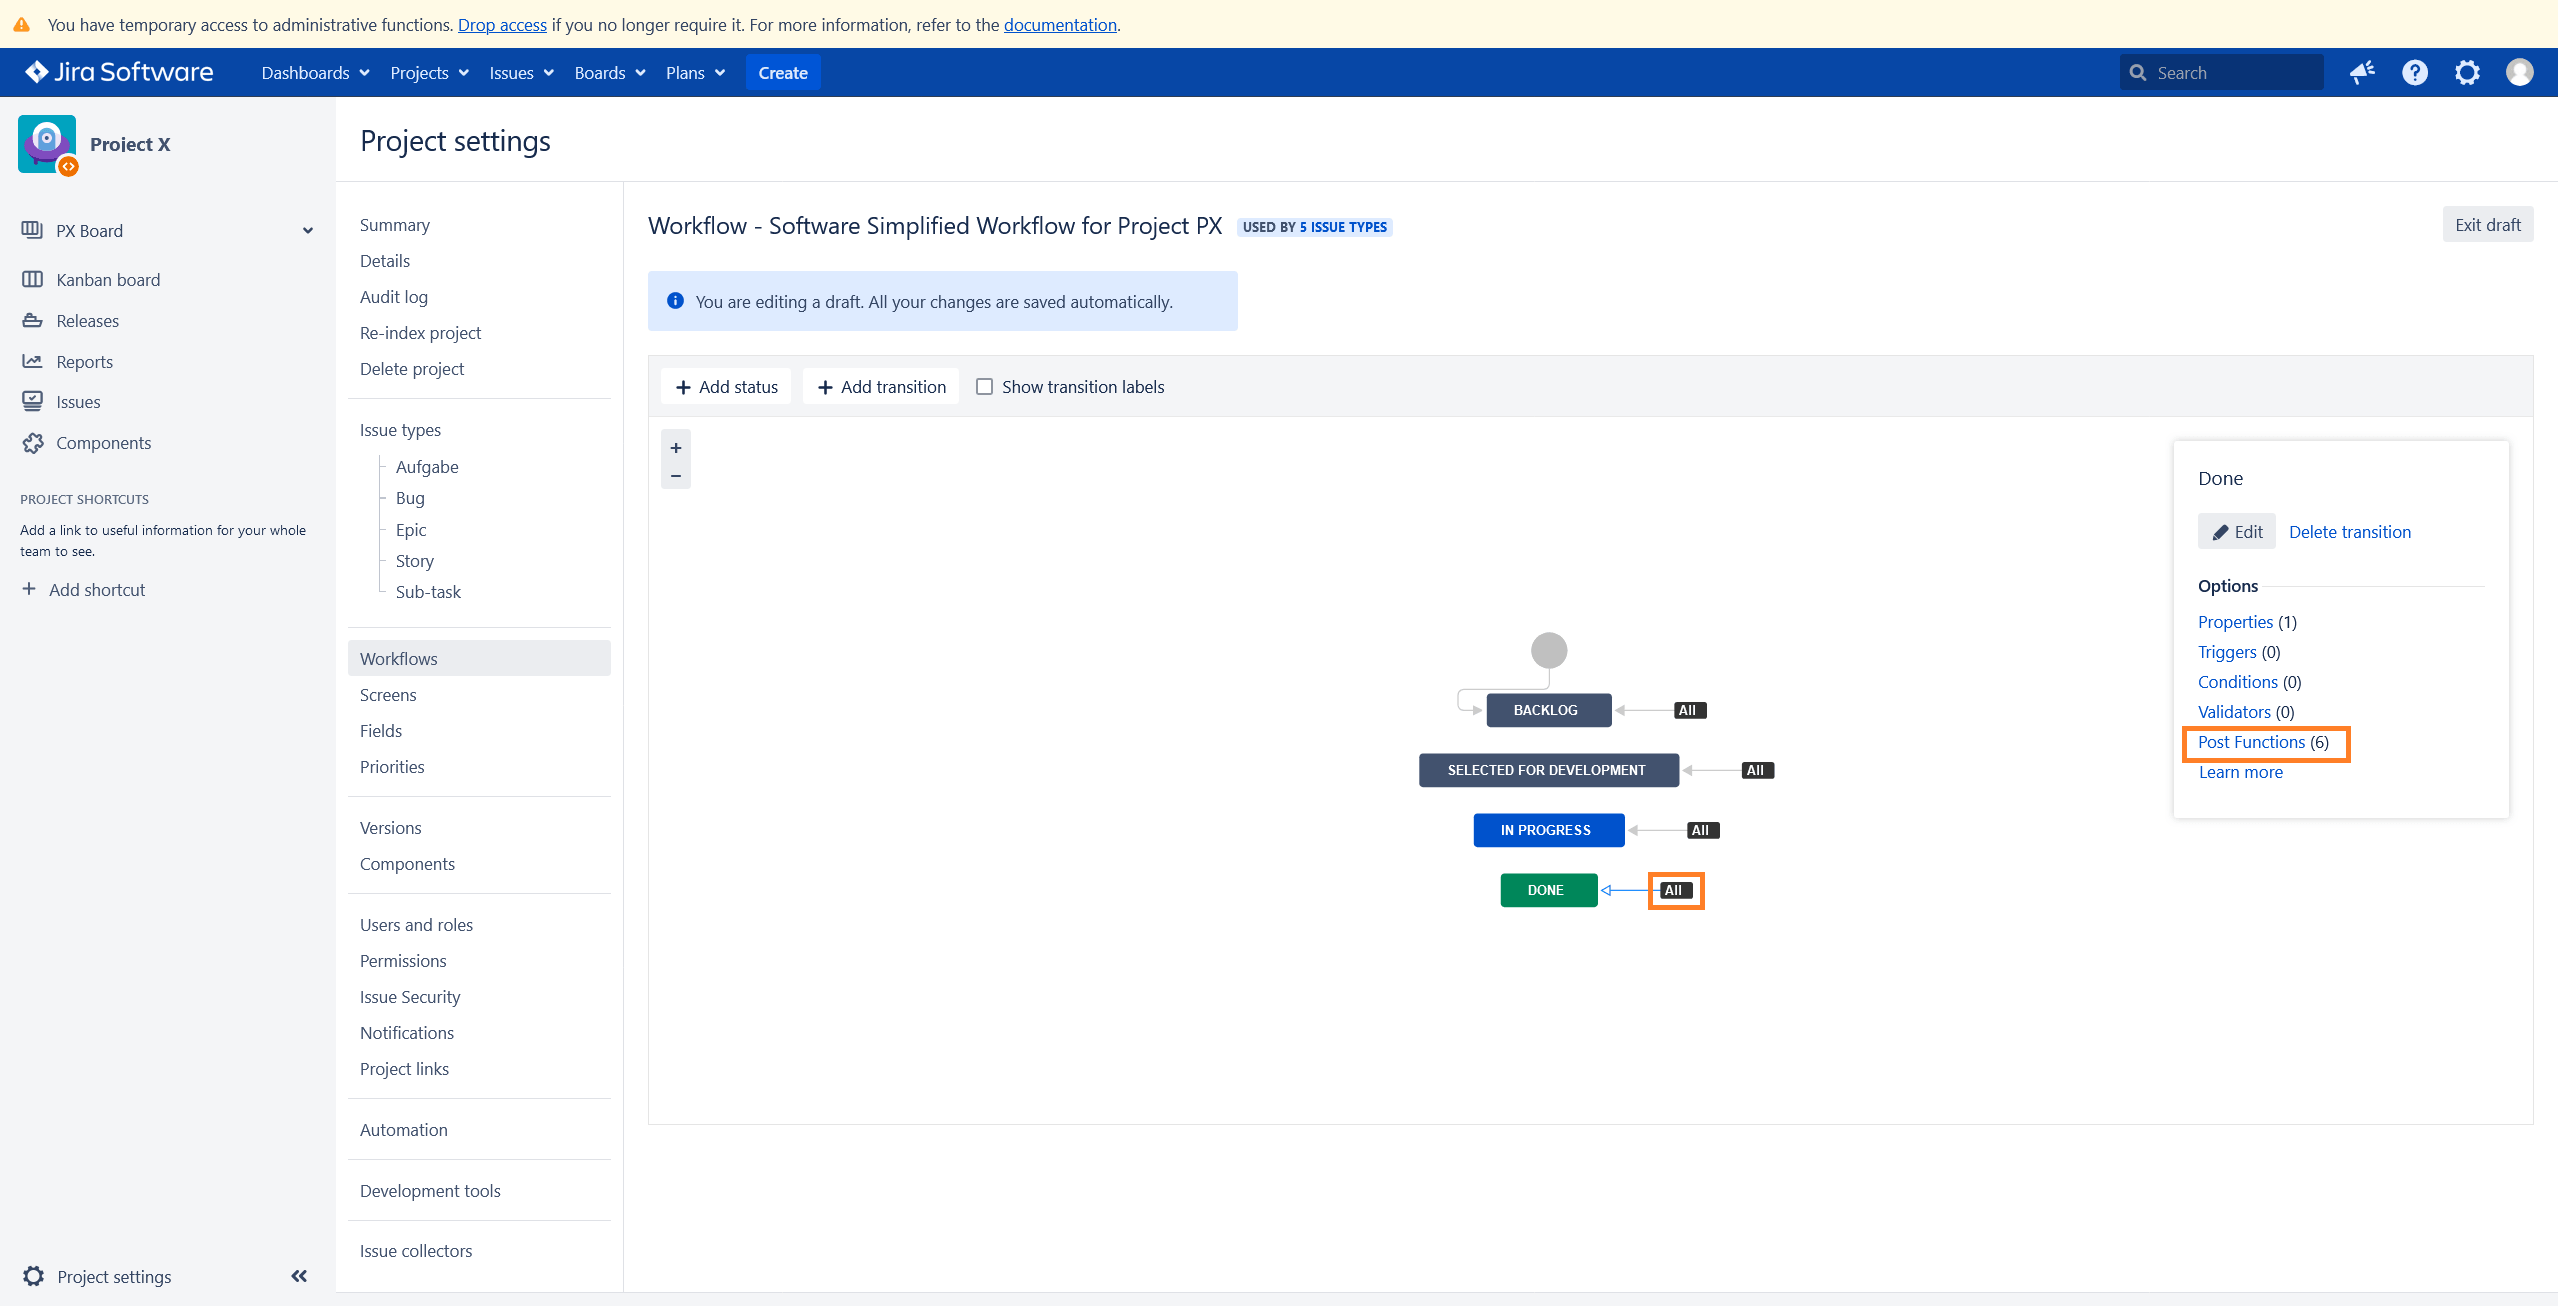
To execute the webhook, click on All and then on Post Functions on the right side.

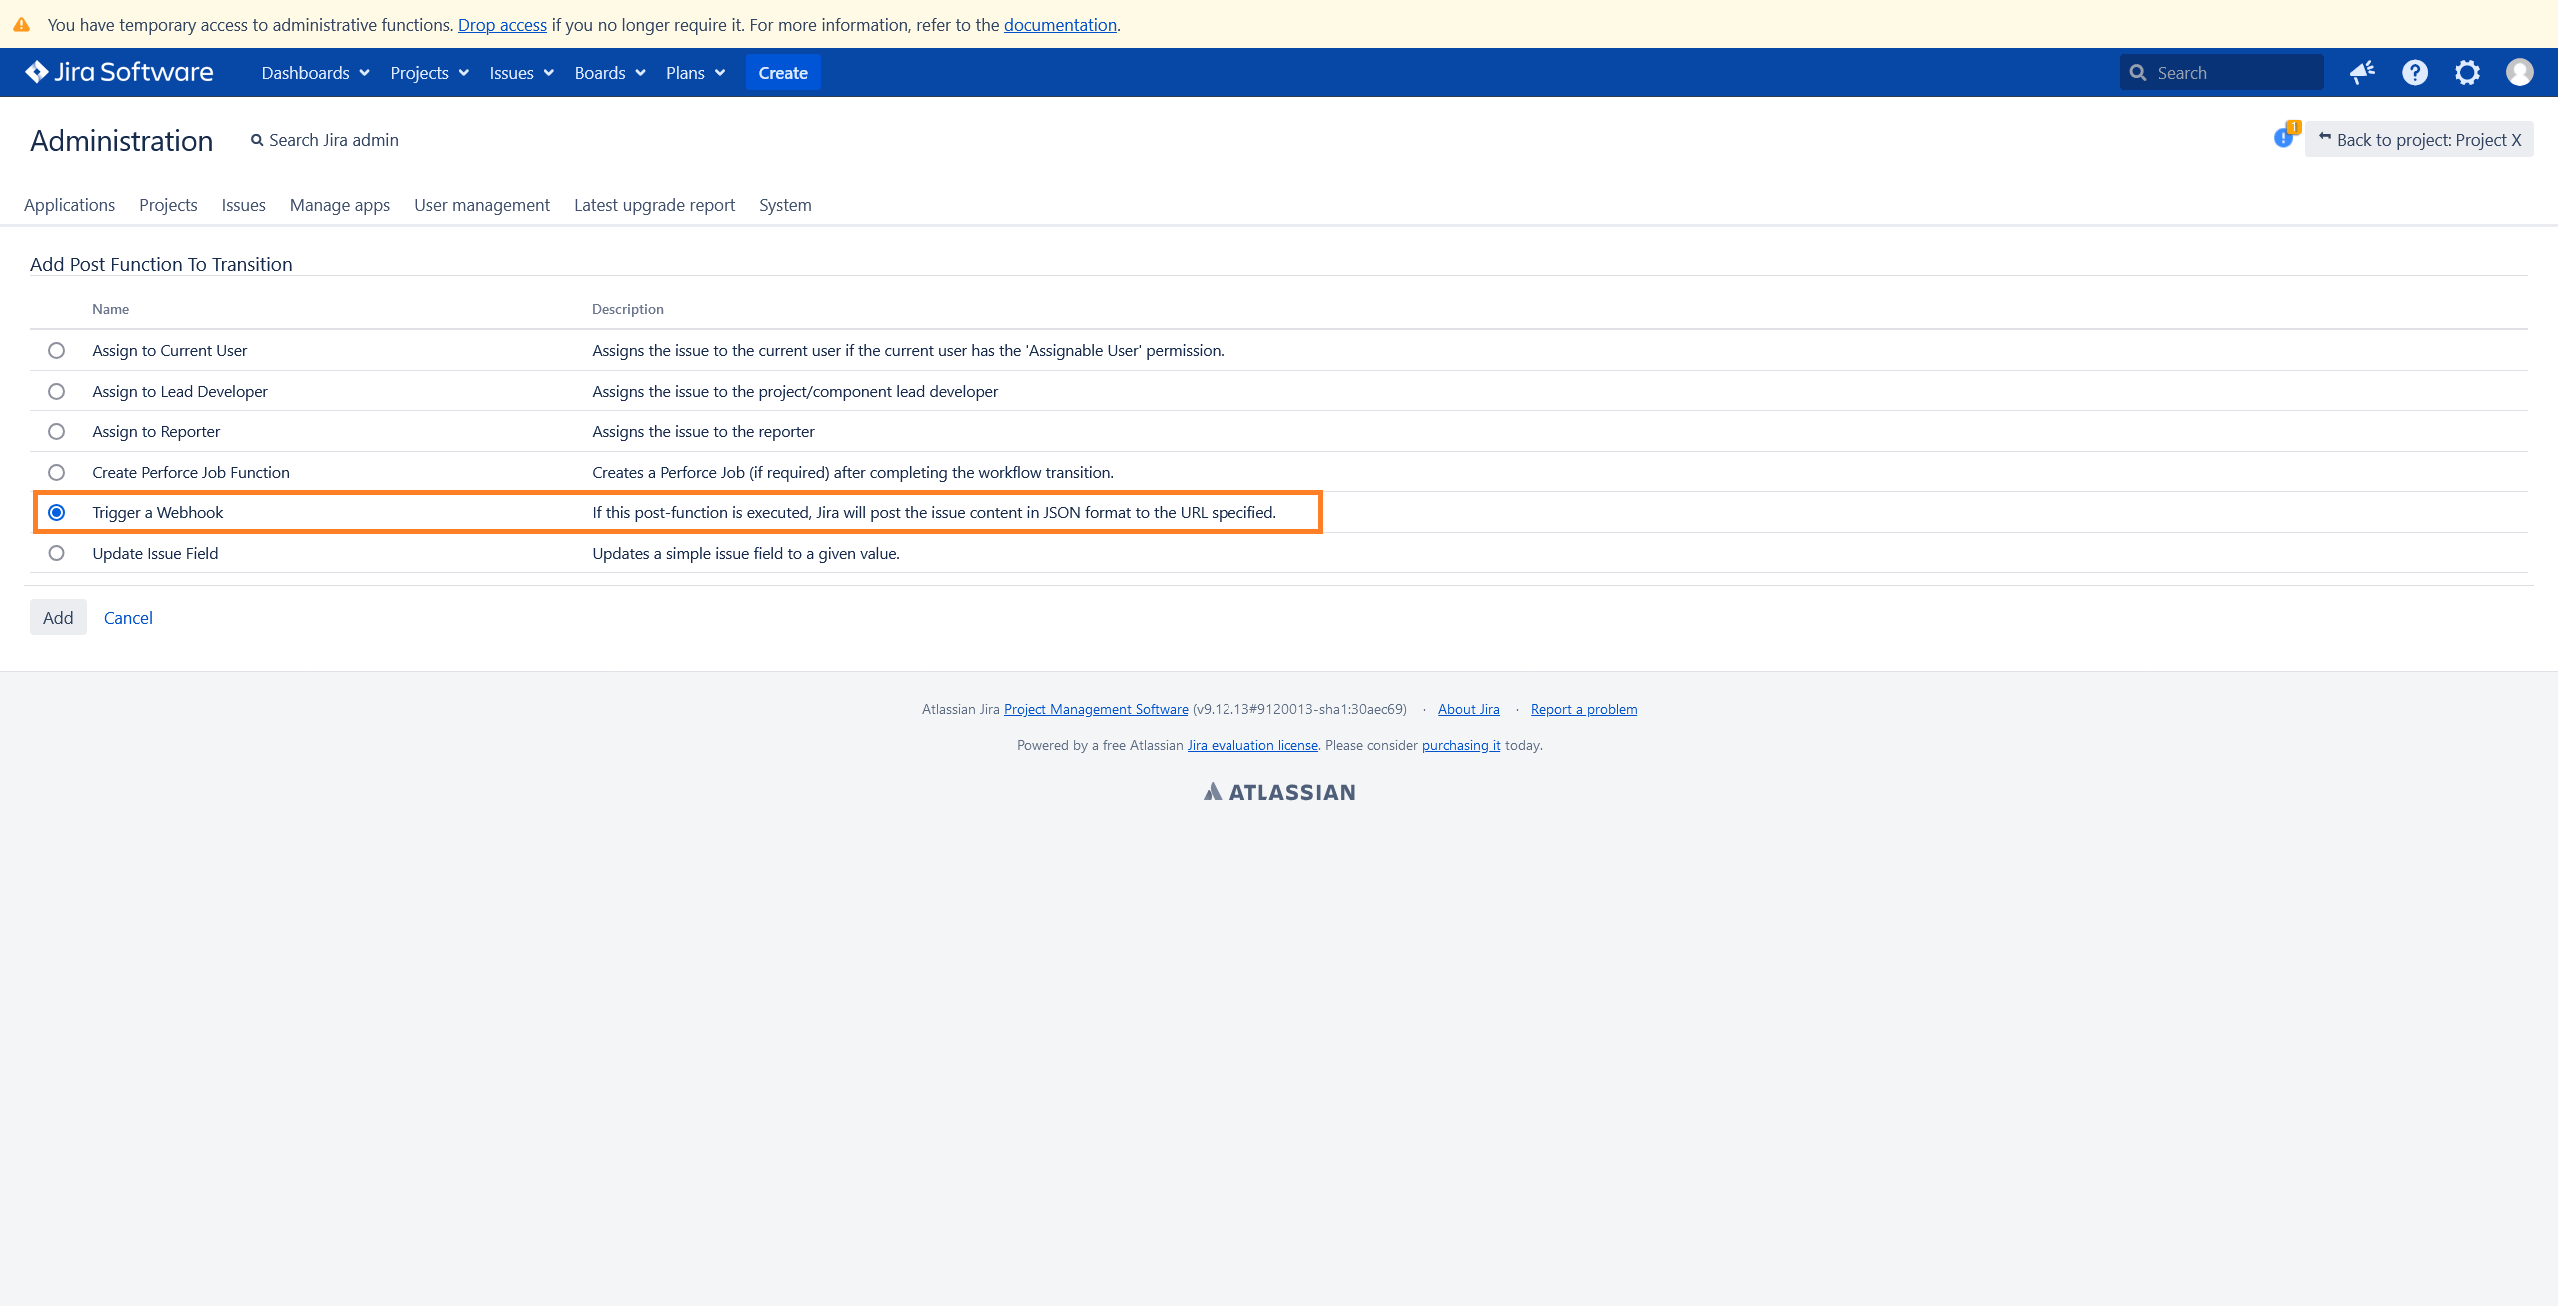
You will see a list of all default post functions. Click on Add post function.

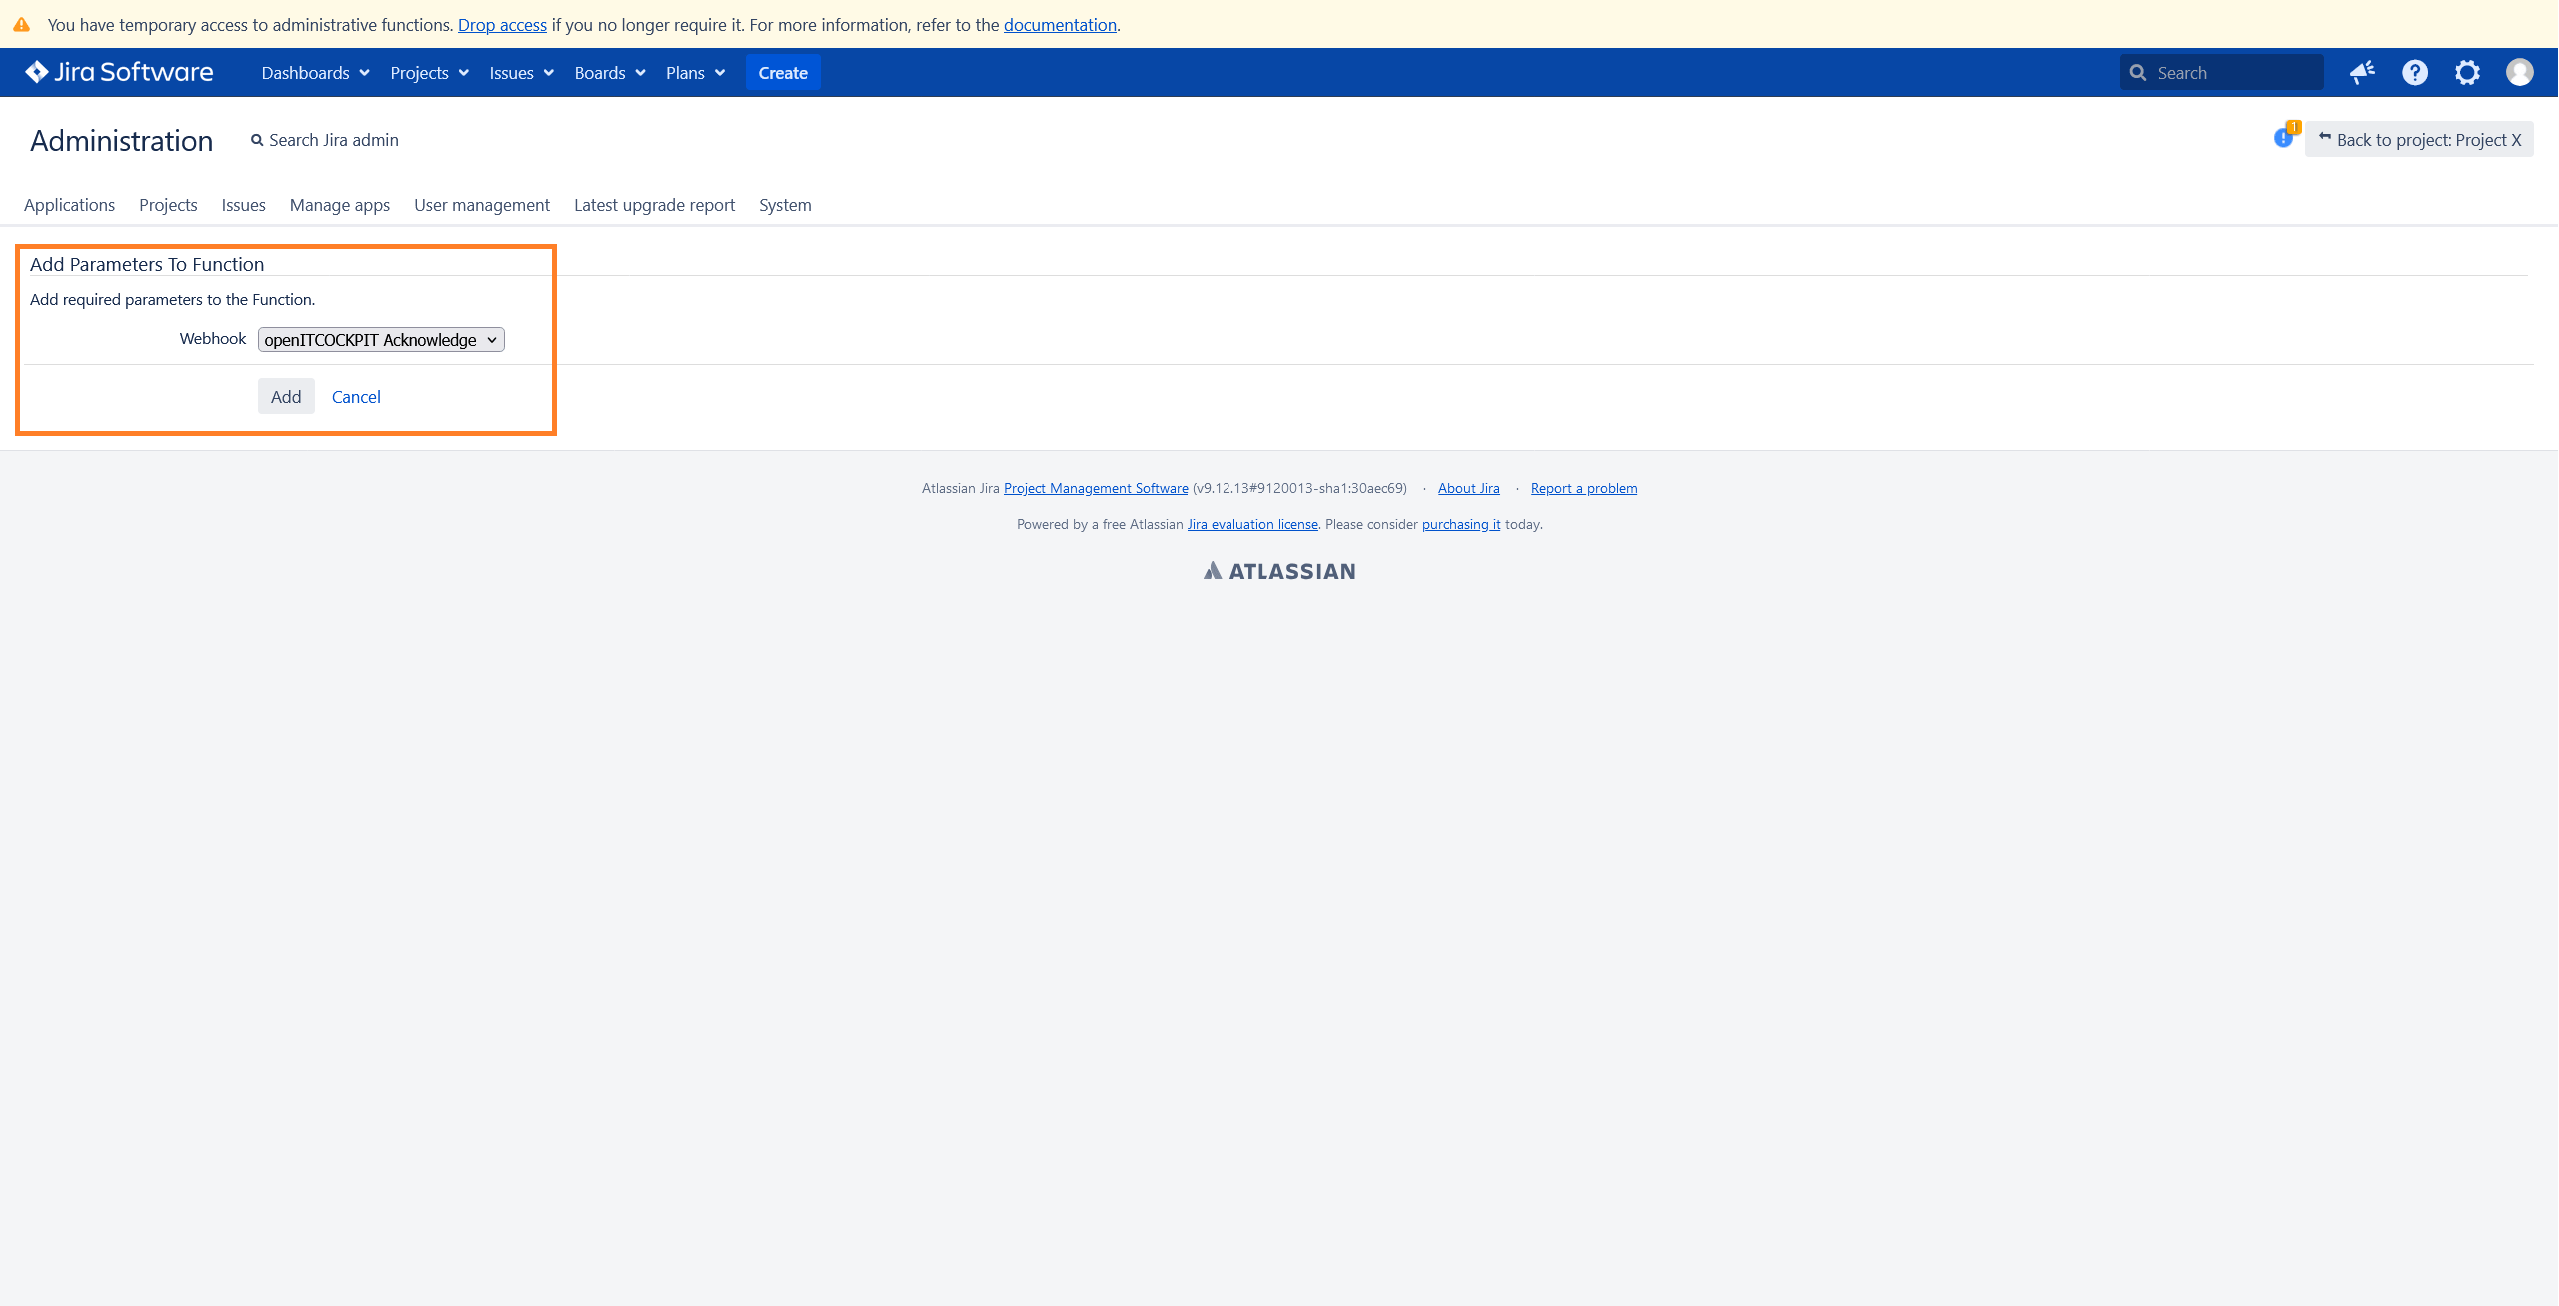
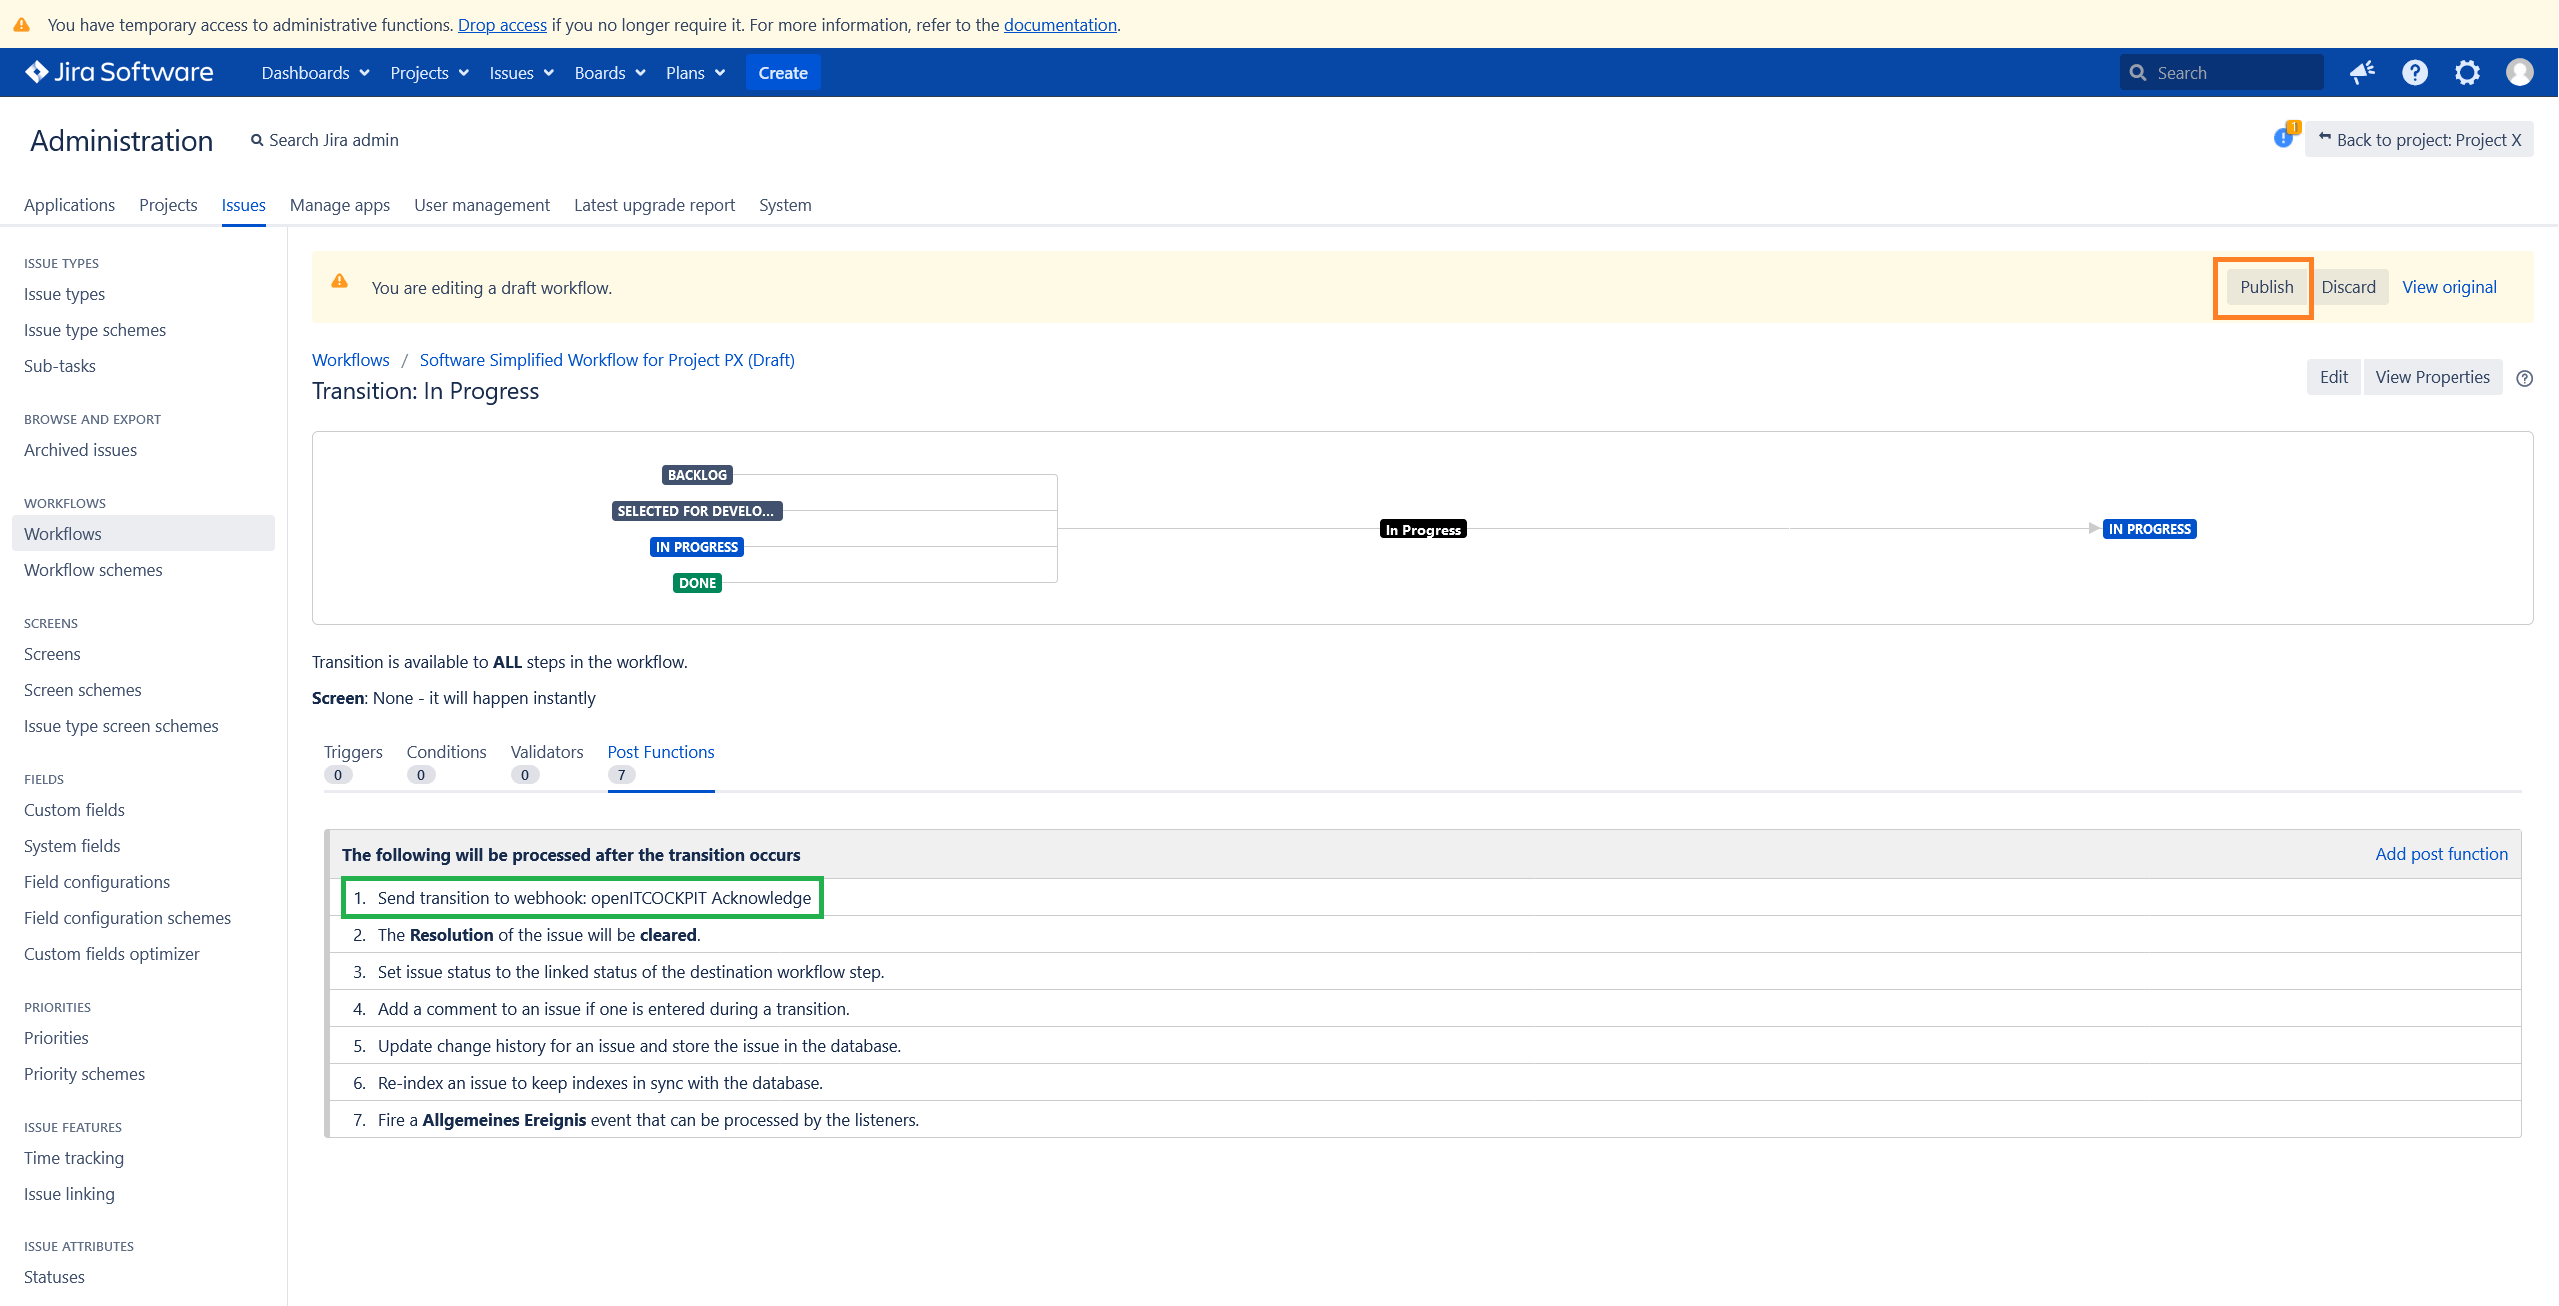
Select Trigger a Webhook and choose the openITCOCKPIT Acknowledge webhook.
Once done, the openITCOCKPIT webhook will be added to the list of post functions. To apply the settings, it is important to publish the new workflow.
Trigger Close Webhook
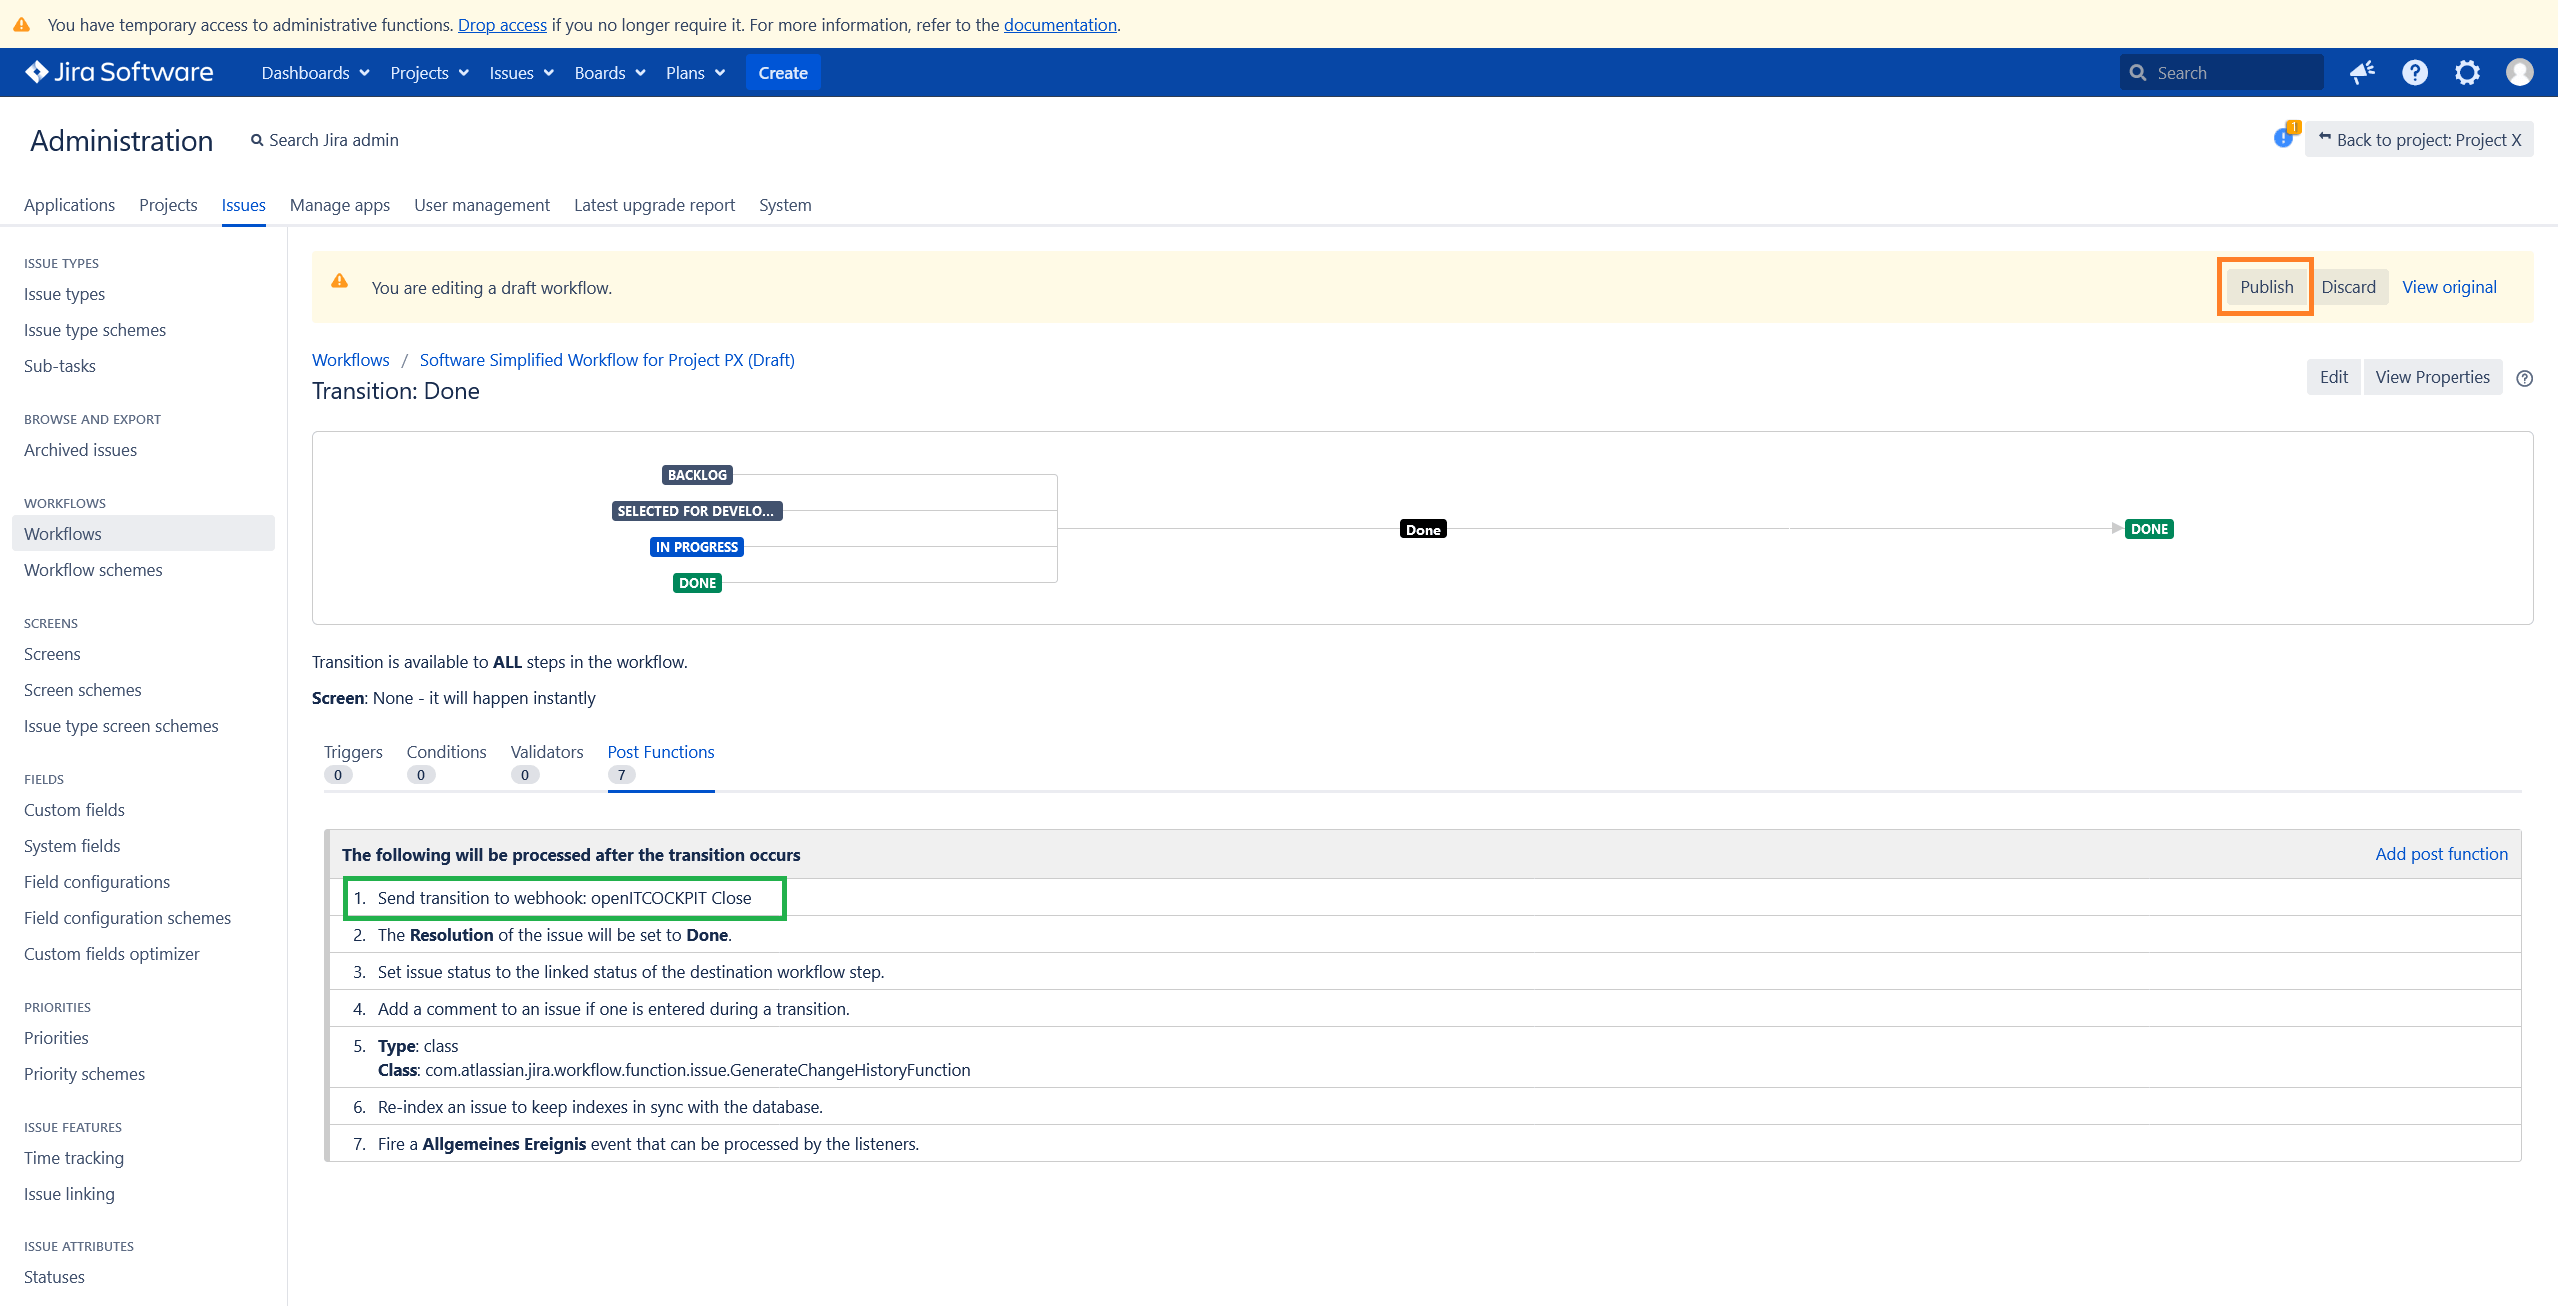
Repeat the steps described above, but this time add the post function to your Done state.
Jira Cloud
Jira Cloud provides Automations, which can be created with a simple Editor in the Project settings.
First navigate into the Project Settings, select Automation on the left hand side, select Rules and Create rule.
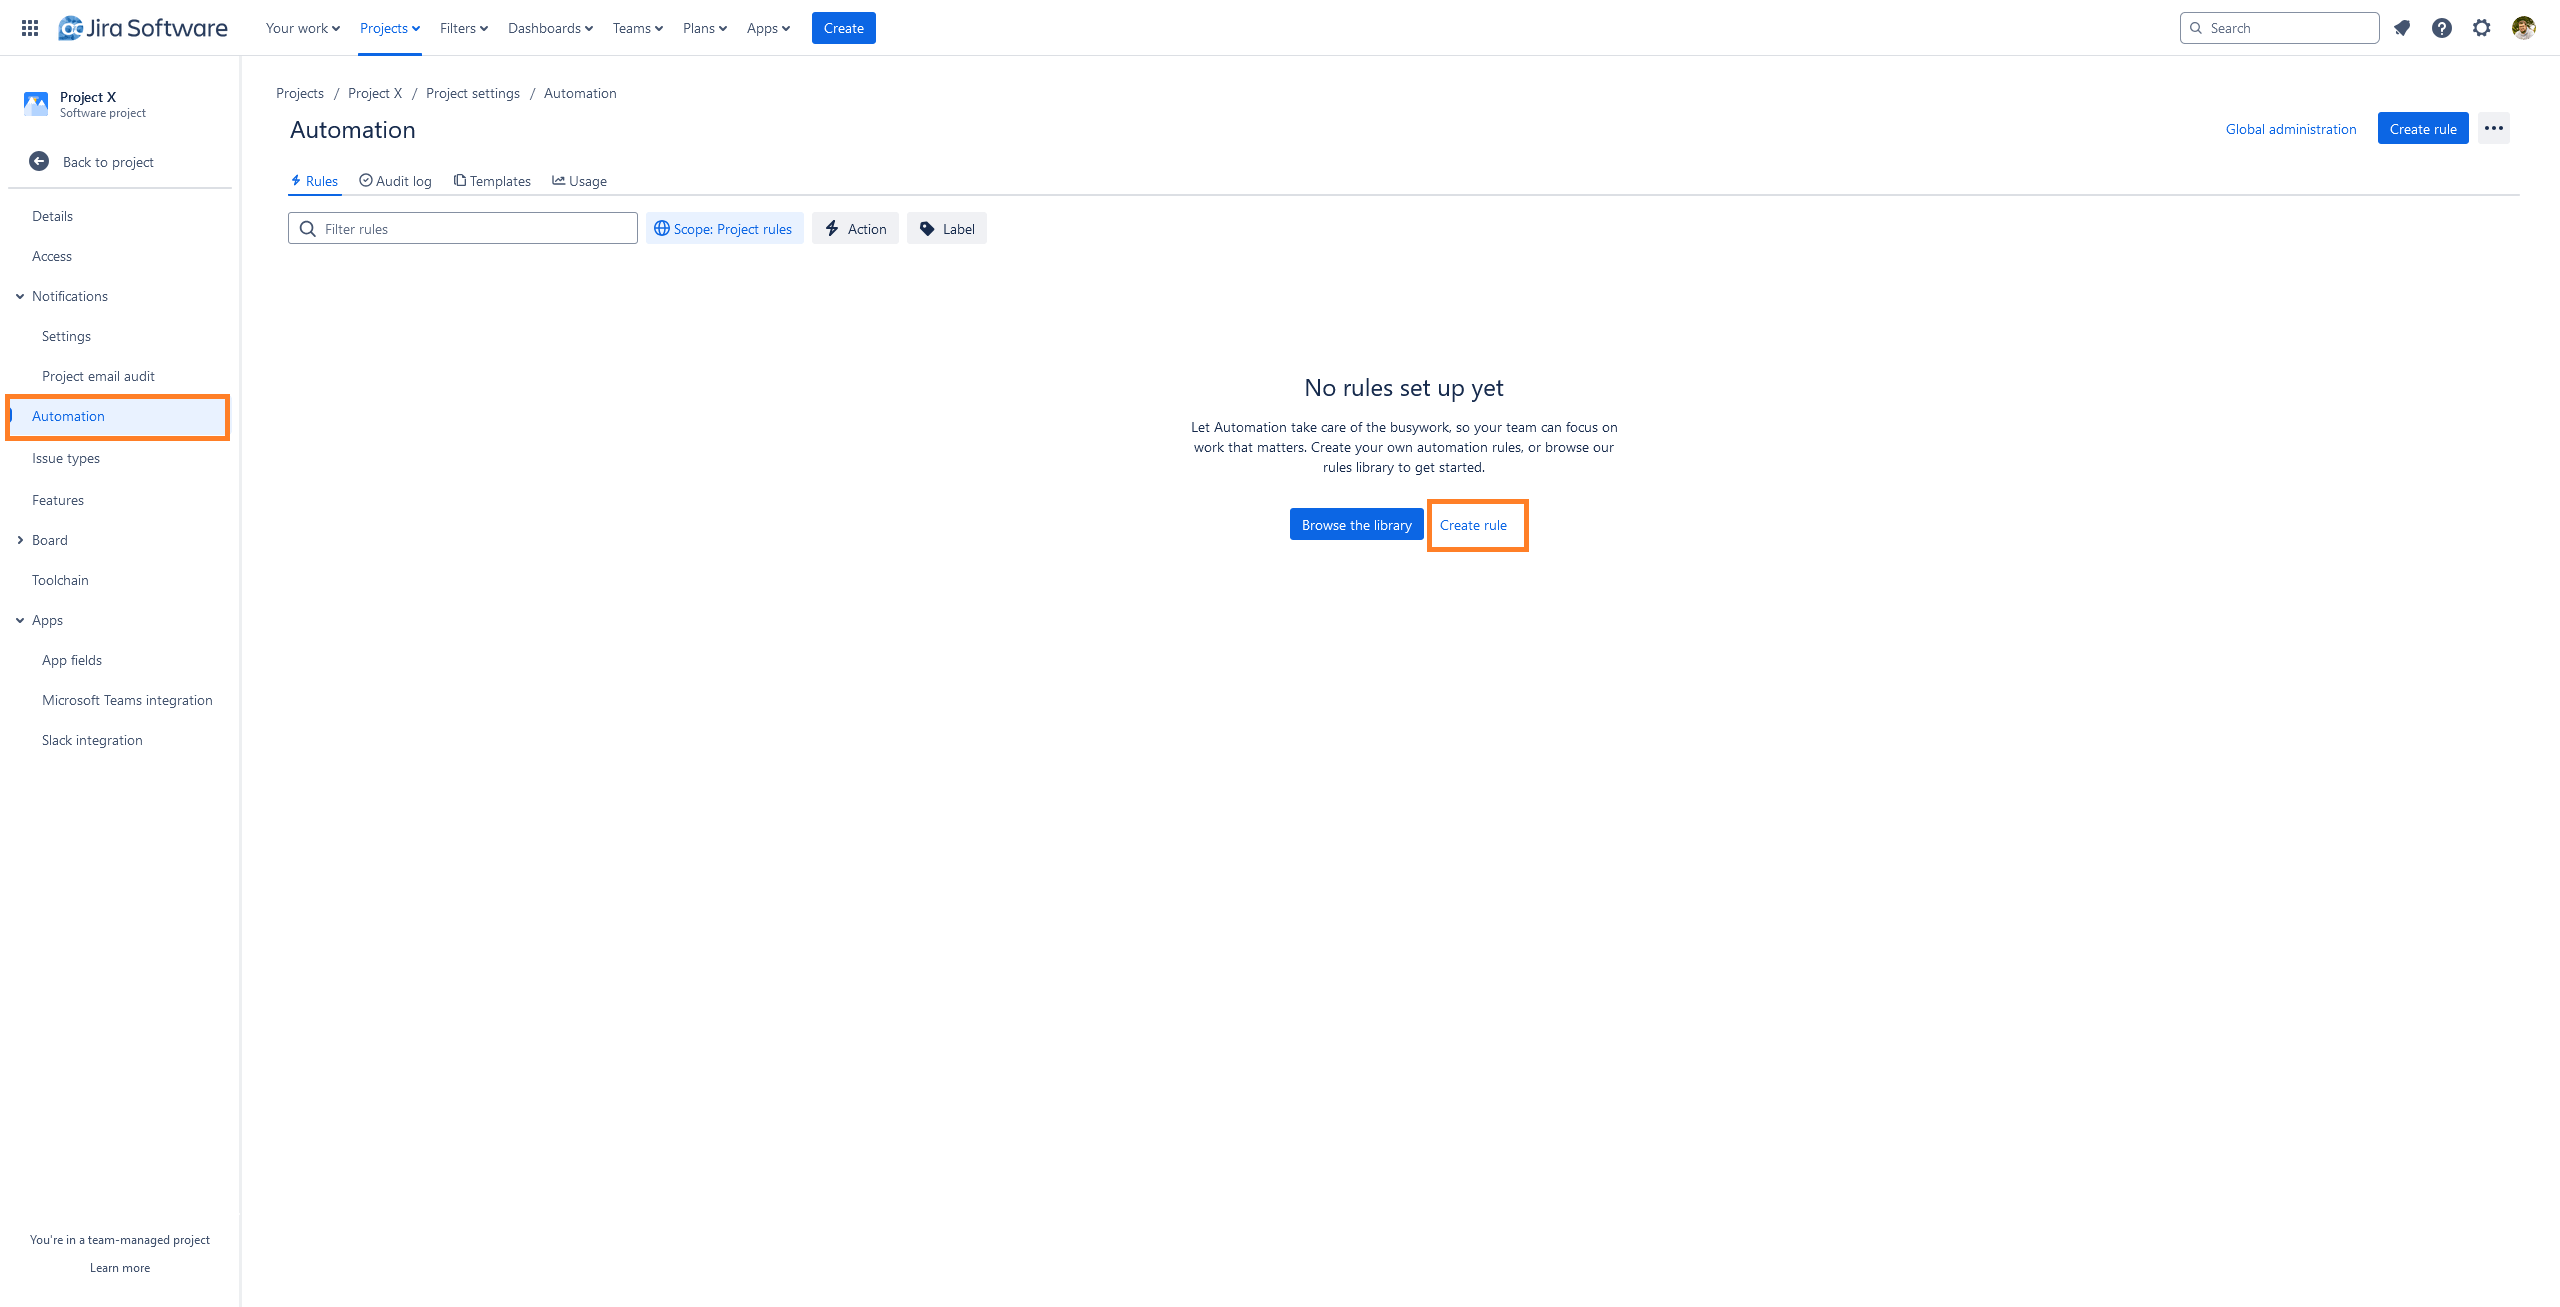
In case this is the first rule you create, the Jira Web interface will show you a little tutorial. It is recommended to read the tutorial.
Now, add a new Issue transitioned trigger. Select the states you like to call the Webhook, so from To Do -> In Progress in this case.
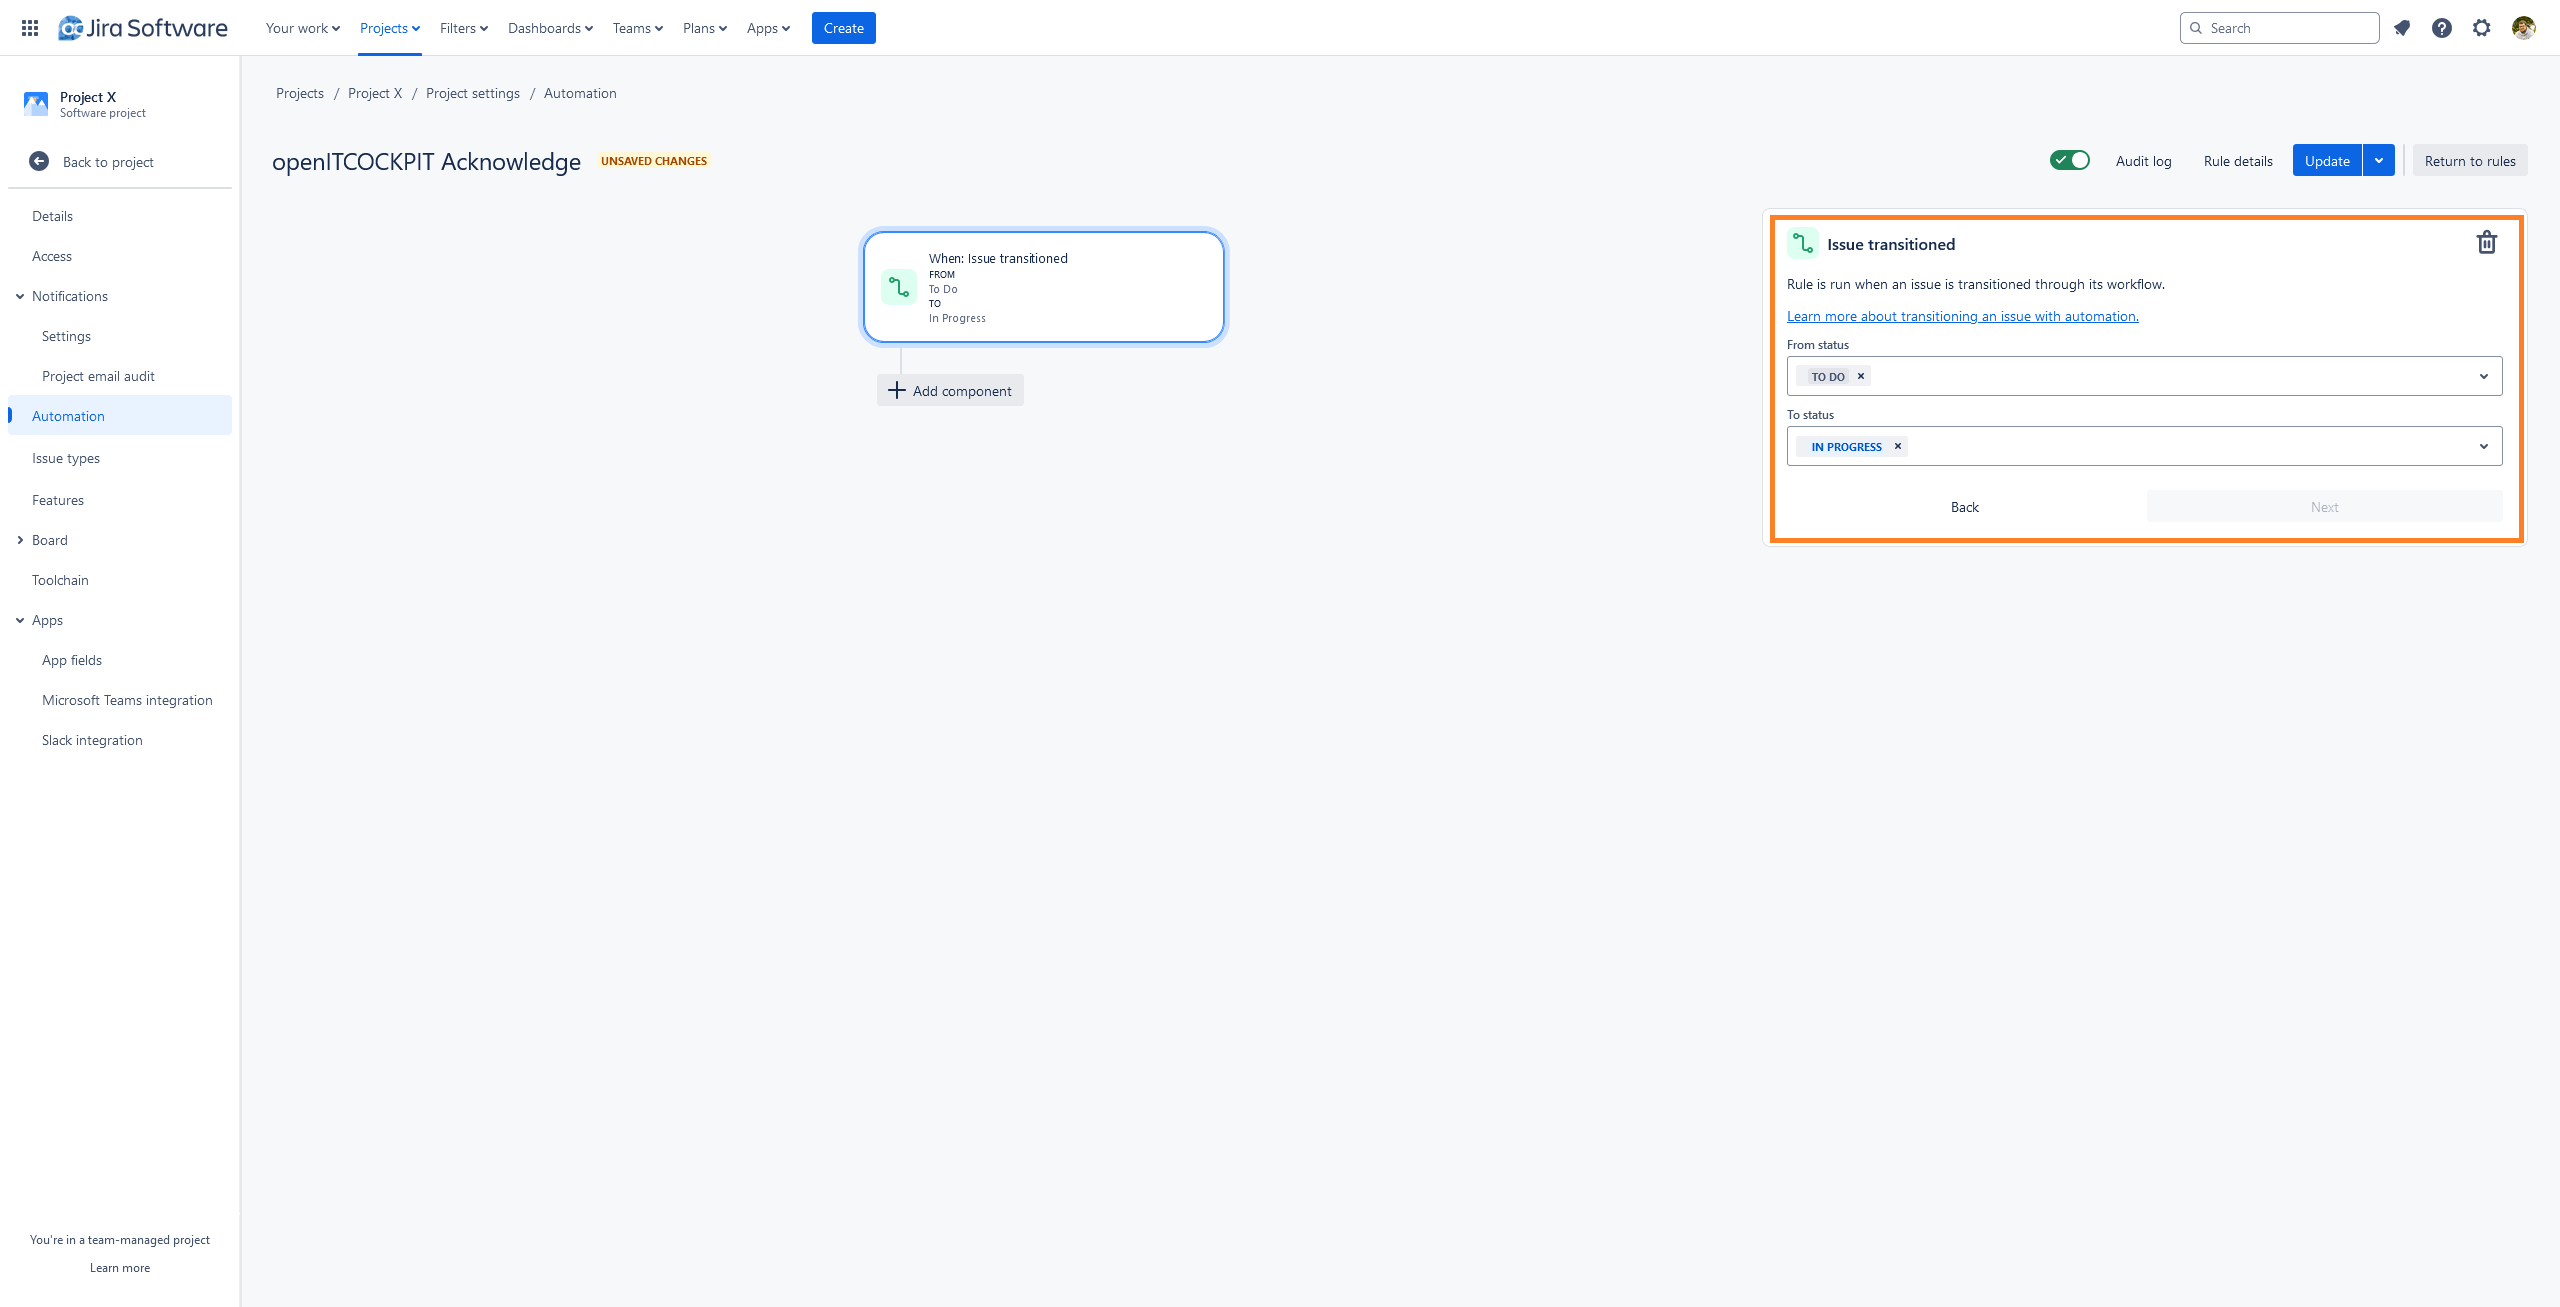
Click on Add component and add a new Action Send web request.
Important settings are:
- Web Request URL: See openITCOCKPIT Jira Settings and copy the webhook URL
- HTTP method:
POST - Web request body:
Issue data (Jira format)
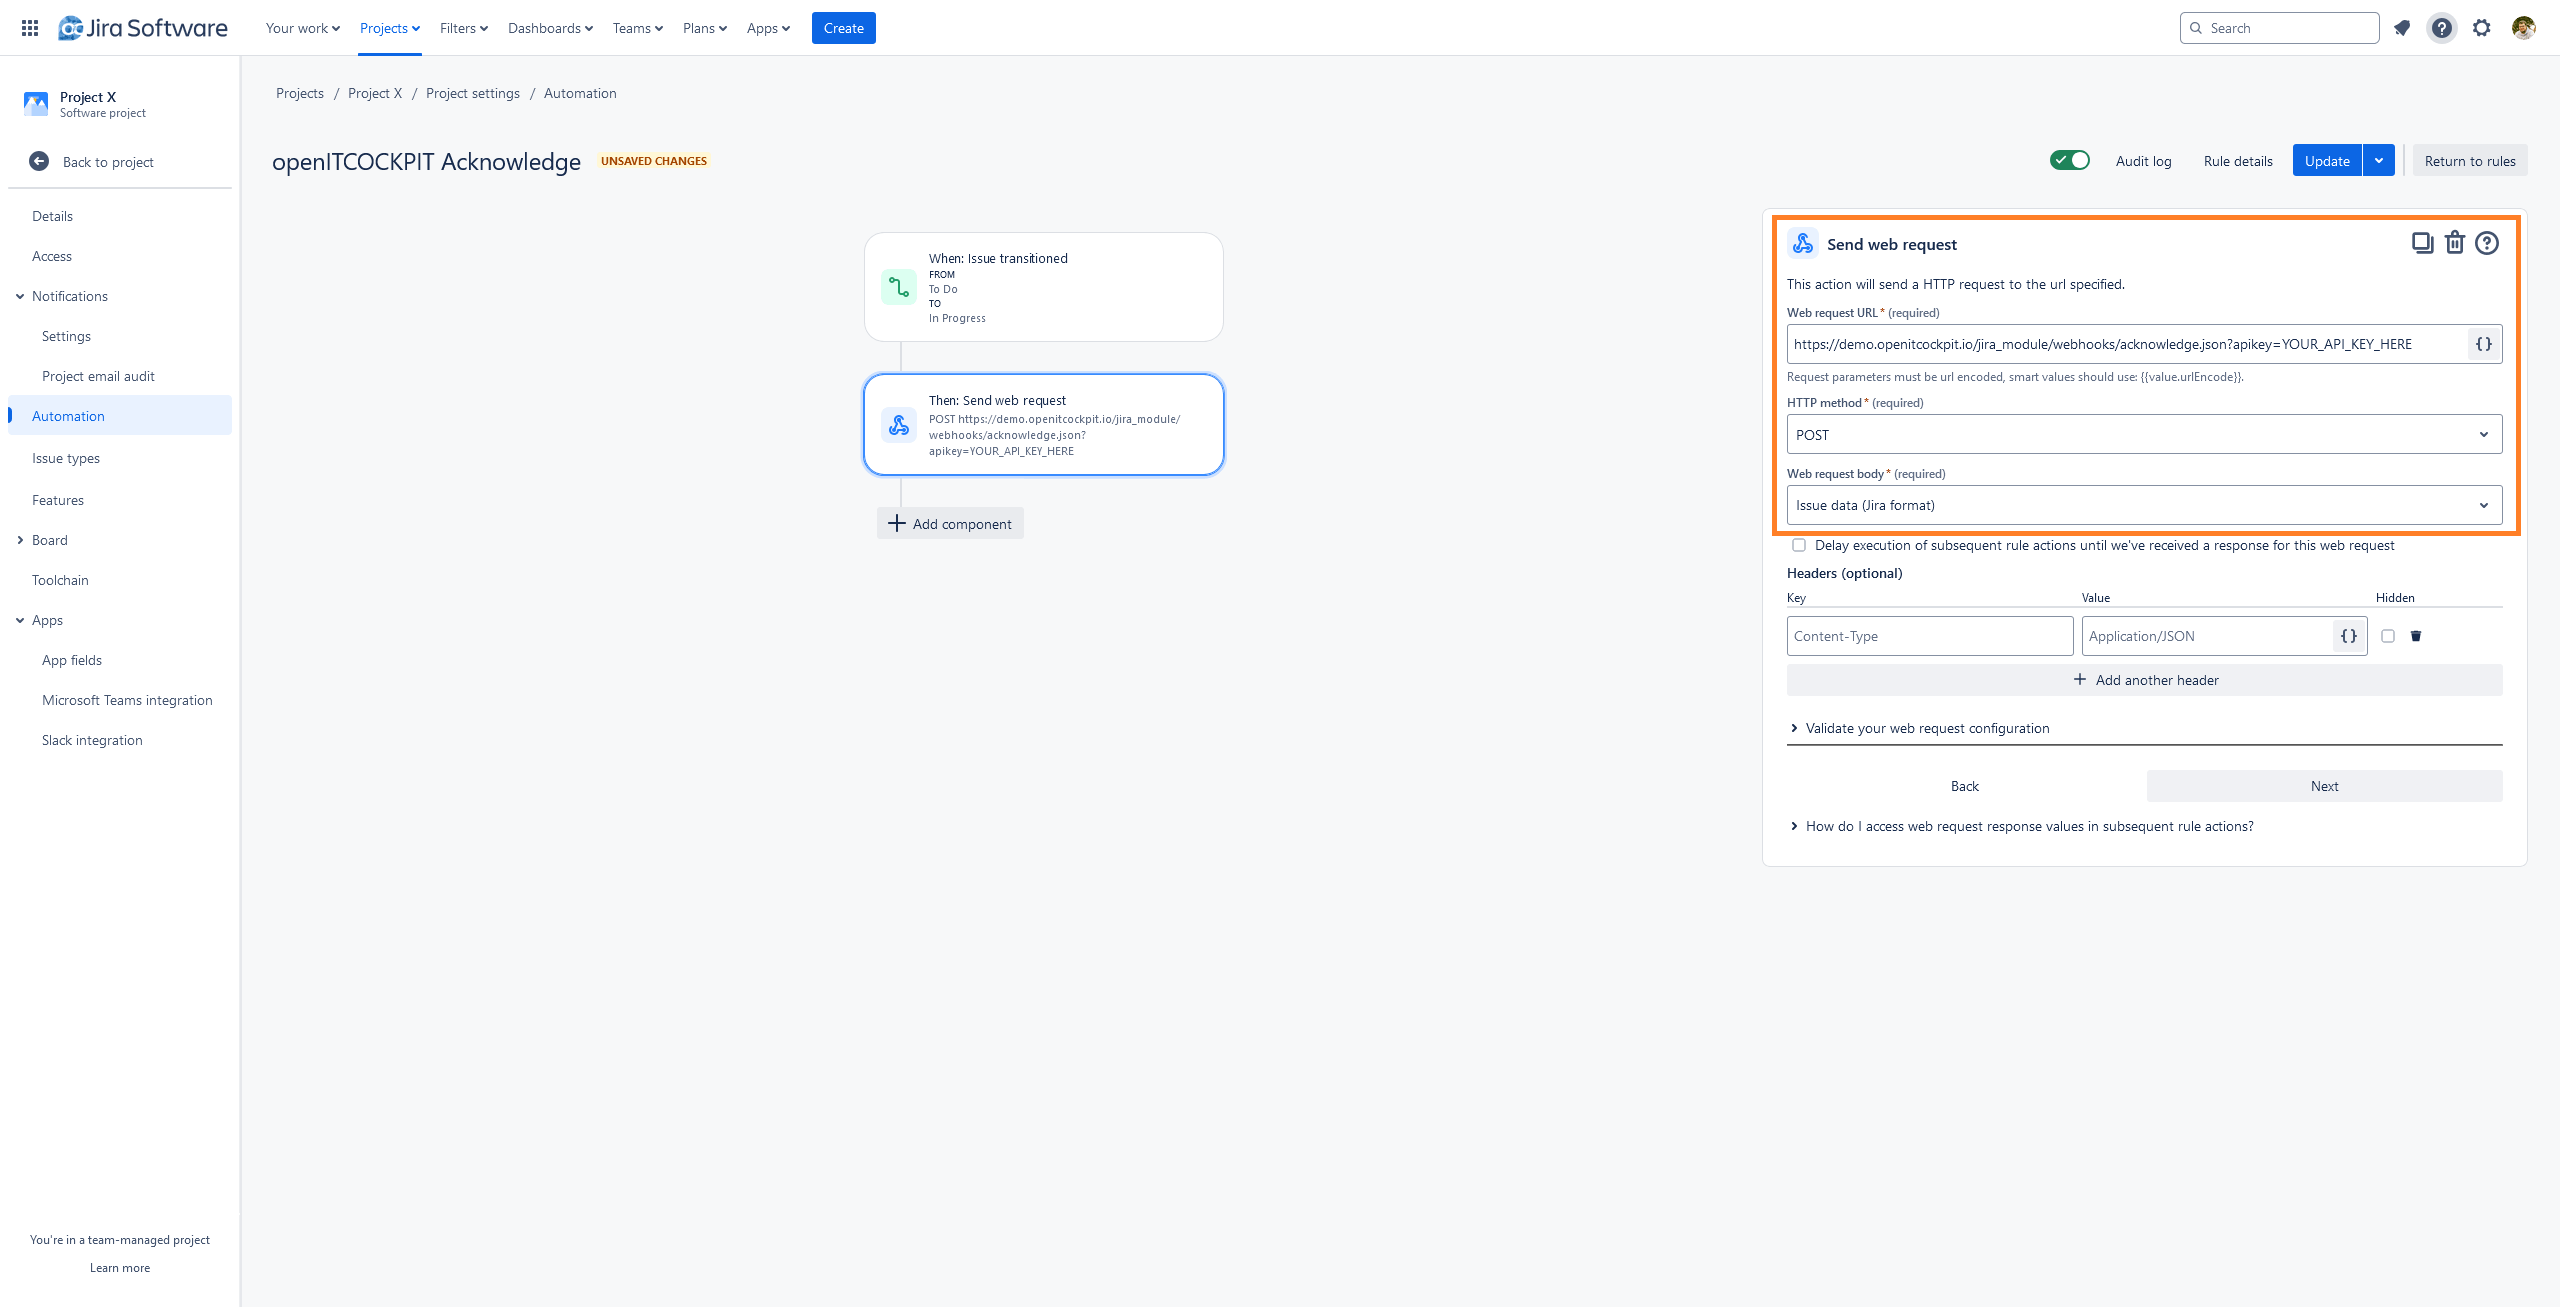
Save the Automation in the top right corner and repeat the steps for the close transition and the close webhook.
Macros
Macros (custom variables) can be used to override the default Jira project, add an assignee or parent issue, or change the issue type. These settings can be defined as custom variables for hosts, services, or contacts.
JIRA_ASSIGNEE- Jira username likejdoeto assign the issueJIRA_PROJECT- Project key to override the default project, e.g.,PXJIRA_ISSUE_TYPE- To override the default issue type, e.g.,BugorTaskJIRA_PARENT_ISSUE- A valid Jira issue to assign as a "related issue" (e.g.,PX-30)
Notice
Jira Cloud Users: The macro JIRA_ISSUE_TYPE requires to pass the Issue Type ID (e.g. 10001) for Jira Cloud!
Commands
By default, openITCOCKPIT provides the notification commands host-notify-by-jira and service-notify-by-jira. Both can be used in the contact configuration to create Jira issues from alerts.
host-notify-by-jira
/opt/openitc/frontend/bin/cake JiraModule.jira_notification -q --type host --hostuuid "$HOSTNAME$" --notificationtype "$NOTIFICATIONTYPE$" --state $HOSTSTATEID$ --output "$HOSTOUTPUT$" --longoutput "$LONGHOSTOUTPUT$"
service-notify-by-jira
/opt/openitc/frontend/bin/cake JiraModule.jira_notification -q --type service --hostuuid "$HOSTNAME$" --serviceuuid "$SERVICEDESC$" --notificationtype "$NOTIFICATIONTYPE$" --state $SERVICESTATEID$ --output "$SERVICEOUTPUT$" --longoutput "$LONGSERVICEOUTPUT$"
You can pass an assignee, project, issue type, or parent issue as a parameter. Most of the time, you will likely use contact, host, or service custom variables to do so. The following examples show how to pass parameters as custom variables.

host-notify-by-jira-macros
/opt/openitc/frontend/bin/cake JiraModule.jira_notification -q --type host --hostuuid "$HOSTNAME$" --notificationtype "$NOTIFICATIONTYPE$" --state $HOSTSTATEID$ --output "$HOSTOUTPUT$" --longoutput "$LONGHOSTOUTPUT$" --jira-assignee "$_CONTACTJIRA_ASSIGNEE$" --jira-project "$_HOSTJIRA_PROJECT$" --jira-issue-type "$_HOSTJIRA_ISSUE_TYPE$" --jira-parent-issue "$_HOSTJIRA_PARENT_ISSUE$"
service-notify-by-jira-macros
/opt/openitc/frontend/bin/cake JiraModule.jira_notification -q --type service --hostuuid "$HOSTNAME$" --serviceuuid "$SERVICEDESC$" --notificationtype "$NOTIFICATIONTYPE$" --state $SERVICESTATEID$ --output "$SERVICEOUTPUT$" --longoutput "$LONGSERVICEOUTPUT$" --jira-assignee "$_CONTACTJIRA_ASSIGNEE$" --jira-project "$_HOSTJIRA_PROJECT$" --jira-issue-type "$_HOSTJIRA_ISSUE_TYPE$" --jira-parent-issue "$_HOSTJIRA_PARENT_ISSUE$"