Datenbankzugriff
openITCOCKPIT nutzt das ORM von CakePHP um Zugriff zur Datenbank zu erlangen. Nutzen sie immer das ORM und schreiben Sie niemals eigene plain SQL abfragen
Neue Tabelle in der Datenbank erstellen
Um Schema updates zu managen, nutzt openITCOCKPIT das CakePHP Migrations plugin
Neue Tabelle erstellen
Gehen wir davon aus, Sie möchten zusätzliche Informationen zu einem Host speichern. Dazu erstellen wir eine neue Tabelle, die diese zusätzlichen Daten speichert.
Danger
Manipulieren Sie NIEMALS existierende Tabellen!
Um eine neue, leere "migration" Datei anzulegen, führen Sie bitte folgendes Kommando aus:
oitc migrations create -p ExampleModule Initial
Beispielausgabe des Kommandos:
root @ /opt/openitc/frontend/plugins/ExampleModule - [ExampleModule] # oitc migrations create -p ExampleModule Initial
using migration paths
- /opt/openitc/frontend/plugins/ExampleModule/config/Migrations
using seed paths
- /opt/openitc/frontend/plugins/ExampleModule/config/Seeds
using migration base class Migrations\AbstractMigration
using alternative template /opt/openitc/frontend/vendor/cakephp/migrations/templates/Phinx/create.php.template
created config/Migrations/20200331090547_initial.php
renaming file in CamelCase to follow CakePHP convention...
renaming file in CamelCase to follow CakePHP convention...
File successfully renamed to /opt/openitc/frontend/plugins/ExampleModule/config/Migrations/20200331090547_Initial.php
root @ /opt/openitc/frontend/plugins/ExampleModule - [ExampleModule] #
Um Dateiberechtigungen zu setzen, wird zusätzlich empfohlen, den folgenden Befehl auszuführen:
oitc rights
Das System hat eine neue, leere "migration" Datei unter dem folgenden Pfad erstellt:
/opt/openitc/frontend/plugins/ExampleModule/config/Migrations/<timestamp>_Initial.php
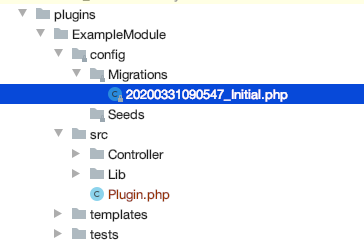
In dieser Datei können Sie nun das Schema ihrer neuen Tabelle definieren.
plugins/ExampleModule/config/Migrations/20200331090547_Initial.php
<?php
declare(strict_types=1);

use Migrations\AbstractMigration;

/**
 * Class Initial
 *
 * Created via:
 * oitc migrations create -p ExampleModule Initial
 */
class Initial extends AbstractMigration {

    /**
     * Whether the tables created in this migration
     * should auto-create an `id` field or not
     *
     * This option is global for all tables created in the migration file.
     * If you set it to false, you have to manually add the primary keys for your
     * tables using the Migrations\Table::addPrimaryKey() method
     *
     * @var bool
     */
    public $autoId = false;

    /**
     * Change Method.
     *
     * More information on this method is available here:
     * https://book.cakephp.org/phinx/0/en/migrations.html#the-change-method
     * @return void
     */
    public function change() : void {

        $this->table('example_notes')
            ->addColumn('id', 'integer', [
                'autoIncrement' => true,
                'default'       => null,
                'limit'         => 11,
                'null'          => false,
            ])
            ->addPrimaryKey(['id'])
            ->addColumn('host_id', 'integer', [
                'default' => null,
                'limit'   => 11,
                'null'    => false,
            ])
            ->addColumn('notes', 'string', [
                'default' => null,
                'limit'   => 255,
                'null'    => false,
            ])
            ->create();
    }
}
In diesem Beispiel wird die neue Tabelle "example_notes" mit den Feldern id, host_id und notes erstellt.
Um die neue Tabelle in der Datenbank zu erstellen, führen Sie den folgenden Befehl aus:
openitcockpit-update --no-system-files
Sie können die MySQL CLI oder phpMyAdmin zur überprüfung nutzen
Tabelle:
$ # mysql --defaults-file=/opt/openitc/etc/mysql/mysql.cnf
mysql> show tables like 'example_%';
+-------------------------------------+
| Tables_in_openitcockpit (example_%) |
+-------------------------------------+
| example_module_phinxlog             |
| example_notes                       |
+-------------------------------------+
2 rows in set (0.00 sec)

mysql>
Tabellenschema:
mysql> show create table example_notes\G
*************************** 1. row ***************************
       Table: example_notes
Create Table: CREATE TABLE `example_notes` (
  `id` int(11) NOT NULL AUTO_INCREMENT,
  `host_id` int(11) NOT NULL,
  `notes` varchar(255) NOT NULL,
  PRIMARY KEY (`id`)
) ENGINE=InnoDB DEFAULT CHARSET=utf8
1 row in set (0.00 sec)

mysql>
Einfügen von Beispieldaten
Um den Entwicklungsprozess weniger abstrakt zu gestalten, empfehlen wir, einige Beispieldaten in die neue Tabelle einzufügen. Sie können das folgende SQL Statement nutzen, um einen Eintrag für jeden Host zu erstellen.
INSERT INTO `example_notes` (`host_id`, `notes`) SELECT id, CONCAT('Notes for the host: ', name) FROM `hosts`;
Ein neues Tabellenobjekt erstellen (CakePHP)
Um auf eine Datenbanktabelle über das CakePHP ORM zugreifen zu können, ist ein Tabellenobjekt nötig.
oitc bake model ExampleNotes -p ExampleModule
Beispielausgabe des Befehls:
oot @ /opt/openitc/frontend/plugins/ExampleModule - [ExampleModule] # oitc bake model ExampleNotes -p ExampleModule

One moment while associations are detected.

Baking table class for ExampleNotes...

Creating file /opt/openitc/frontend/plugins/ExampleModule/src/Model/Table/ExampleNotesTable.php
Wrote `/opt/openitc/frontend/plugins/ExampleModule/src/Model/Table/ExampleNotesTable.php`

Baking entity class for ExampleNote...

Creating file /opt/openitc/frontend/plugins/ExampleModule/src/Model/Entity/ExampleNote.php
Wrote `/opt/openitc/frontend/plugins/ExampleModule/src/Model/Entity/ExampleNote.php`

Baking test fixture for ExampleNotes...

Creating file /opt/openitc/frontend/plugins/ExampleModule/tests/Fixture/ExampleNotesFixture.php
Wrote `/opt/openitc/frontend/plugins/ExampleModule/tests/Fixture/ExampleNotesFixture.php`
Bake is detecting possible fixtures...

Baking test case for ExampleModule\Model\Table\ExampleNotesTable ...

Creating file /opt/openitc/frontend/plugins/ExampleModule/tests/TestCase/Model/Table/ExampleNotesTableTest.php
Wrote `/opt/openitc/frontend/plugins/ExampleModule/tests/TestCase/Model/Table/ExampleNotesTableTest.php`
Done

root @ /opt/openitc/frontend/plugins/ExampleModule - [ExampleModule] #
oitc rights
Das System hat nun automatisch ein neues Table und Entity Objekt erstellt.
Öffnen Sie nun die Datei /opt/openitc/frontend/plugins/ExampleModule/src/Model/Table/ExampleNotesTable.php
<?php
declare(strict_types=1);

namespace ExampleModule\Model\Table;

use Cake\ORM\Query;
use Cake\ORM\RulesChecker;
use Cake\ORM\Table;
use Cake\Validation\Validator;

class ExampleNotesTable extends Table {
    /**
     * Initialize method
     *
     * @param array $config The configuration for the Table.
     * @return void
     */
    public function initialize(array $config): void {
        parent::initialize($config);

        $this->setTable('example_notes');
        $this->setDisplayField('id');
        $this->setPrimaryKey('id');

        $this->belongsTo('Hosts', [
            'foreignKey' => 'host_id',
            'joinType'   => 'INNER',
            'className'  => 'ExampleModule.Hosts',
        ]);
    }

    //... more code ...

}
Das System hat eine association zwischen der neuen Tabelle und der Hosts Tabelle erkannt und daraus eine belongsTo association erstellt.
Um die Hosts Tabelle aus dem Kern zu nutzen, entfernen Sie den ExampleModule Präfix.
$this->belongsTo('Hosts', [
    'foreignKey' => 'host_id',
    'joinType'   => 'INNER',
    'className'  => 'Hosts',
]);
Tabelle über Tabellenobjekt abfragen
Öffnen Sie den Code ihres TestControllers um die Tabelle abzufragen.
Tip
Abfragen wie im folgenden Beispiel direkt zu schreiben, ist nicht empfehlenswert. Sie sollten immer eine eigene Methode pro Abfrage erstellen. Dies hilft den Code zu strukturieren.
<?php
declare(strict_types=1);

namespace ExampleModule\Controller;


use Cake\ORM\TableRegistry;
use ExampleModule\Model\Table\ExampleNotesTable;

class TestController extends AppController {

    public function index() {
        if (!$this->isApiRequest()) {
            // The requested URL was: /example_module/test/index.html
            // The controller only sends the HTML template to the client browser / AngularJS

            /**********************************************************/
            /* DO NOT RUN ANY DATABASE QUERY HERE!                    */
            /* THIS CODE IS ONLY TO SHIP THE TEMPLATE                 */
            /**********************************************************/

            // Pass the variable "message" with the content "Hello World (HTML)" to the view for .html requests
            $this->set('message', 'Hello World (HTML)');
            return;
        }

        // This get executed for API requests
        //  The requested URL was: /example_module/test/index.json

        //Load ExampleNotesTable
        /** @var ExampleNotesTable $ExampleNotesTable */
        $ExampleNotesTable = TableRegistry::getTableLocator()->get('ExampleModule.ExampleNotes');

        //Query data
        $result = $ExampleNotesTable->find()
            ->order([
                'ExampleNotes.id' => 'asc'
            ])
            ->all();


        // Pass the variable "message" with the content "Hello World" to the JSON view
        // Pass the variable "result" to the JSON view
        $this->set('message', 'Hello World');
        $this->set('result', $result);

        // Add the variable "message" to .json output
        $this->viewBuilder()->setOption('serialize', ['message', 'result']);
    }

}
Laden Sie die URL https://example.org/example_module/test/index.json um das Ergebnis im Browser anzuzeigen.
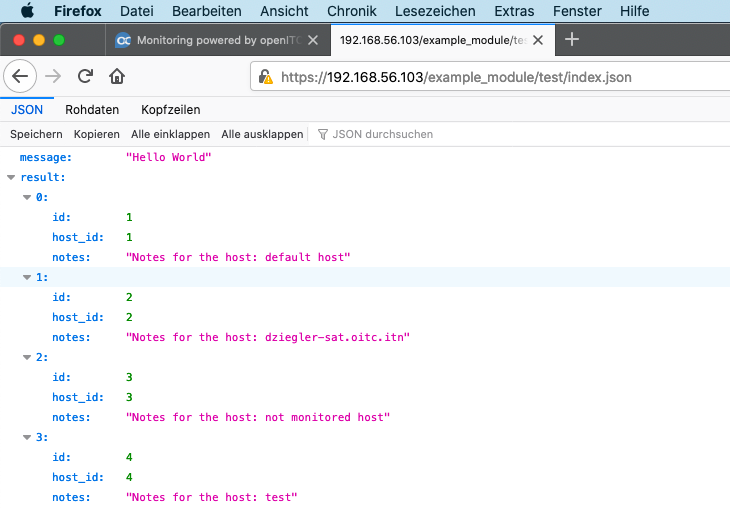
Tabellen Joinen
Solange Sie ihre associations sauber definieren, können Sie ihre Tabellen immer durch die contain Methode joinen.
Um die Hosts Tabelle zu joinen, müssen Sie einfach das "Host" Tabellen Objekt "containen":
Code
/** @var ExampleNotesTable $ExampleNotesTable */
$ExampleNotesTable = TableRegistry::getTableLocator()->get('ExampleModule.ExampleNotes');

//Query data
$result = $ExampleNotesTable->find()
    ->order([
        'ExampleNotes.id' => 'asc'
    ])
    ->contain([
        'Hosts' => function (Query $query) {
            $query
                ->disableAutoFields()
                ->select([
                    'Hosts.id',
                    'Hosts.name',
                    'Hosts.uuid',
                ]);
            return $query;
        }
    ])
    ->all();
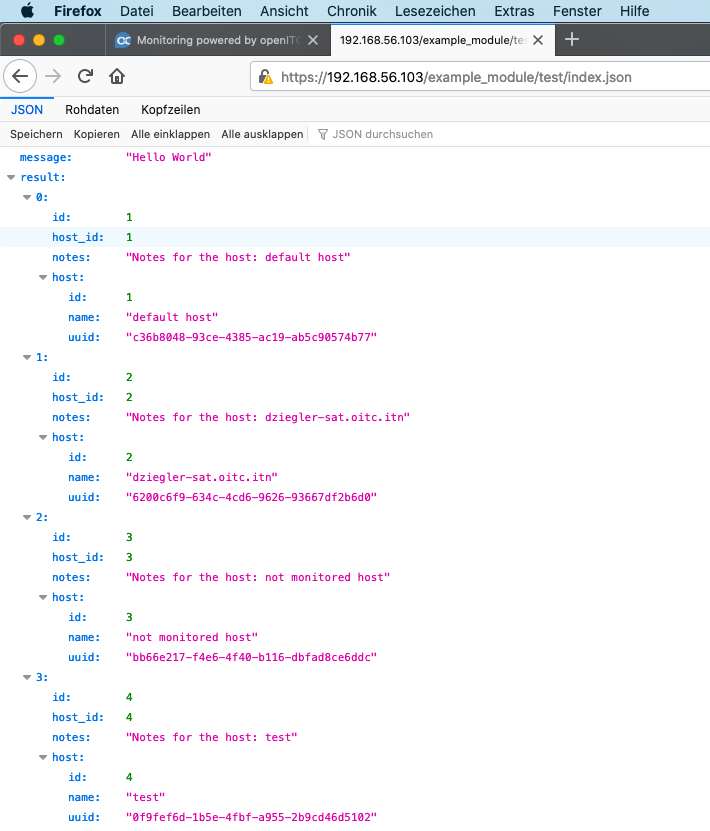
Ergebnis
Host und Servicestatus abfragen
openITCOCKPIT unterstützt mehrere Datenbank-Backends in welchen Statusinformationen gespeichert werden können. Aus diesem Grund müssen zusammenhängende Tabellen immer über das DbBackend Objekt geladen werden.
Das DbBackend Objekt ist standardmäßig in jedem Controller verfügbar.
// Load Hoststatus table
$HoststatusTable = $this->DbBackend->getHoststatusTable();

// Select fields to load
$HoststatusFields = new HoststatusFields($this->DbBackend);
$HoststatusFields
    ->currentState()
    ->output();

//Query Hoststatus Table
$hoststatus = $HoststatusTable->byUuids(
    Hash::extract($result->toArray(), '{n}.host.uuid'),
    $HoststatusFields
);
Code
<?php
declare(strict_types=1);

namespace ExampleModule\Controller;


use Cake\ORM\Query;
use Cake\ORM\TableRegistry;
use Cake\Utility\Hash;
use ExampleModule\Model\Table\ExampleNotesTable;
use itnovum\openITCOCKPIT\Core\HoststatusFields;

class TestController extends AppController {

    public function index() {
        if (!$this->isApiRequest()) {
            // The requested URL was: /example_module/test/index.html
            // The controller only sends the HTML template to the client browser / AngularJS

            /**********************************************************/
            /* DO NOT RUN ANY DATABASE QUERY HERE!                    */
            /* THIS CODE IS ONLY TO SHIP THE TEMPLATE                 */
            /**********************************************************/

            // Pass the variable "message" with the content "Hello World (HTML)" to the view for .html requests
            $this->set('message', 'Hello World (HTML)');
            return;
        }

        // This get executed for API requests
        //  The requested URL was: /example_module/test/index.json

        //Load ExampleNotesTable
        /** @var ExampleNotesTable $ExampleNotesTable */
        $ExampleNotesTable = TableRegistry::getTableLocator()->get('ExampleModule.ExampleNotes');

        // Load Hoststatus table
        $HoststatusTable = $this->DbBackend->getHoststatusTable();

        //Query data
        $result = $ExampleNotesTable->find()
            ->order([
                'ExampleNotes.id' => 'asc'
            ])
            ->contain([
                'Hosts' => function (Query $query) {
                    $query
                        ->disableAutoFields()
                        ->select([
                            'Hosts.id',
                            'Hosts.name',
                            'Hosts.uuid',
                        ]);
                    return $query;
                }
            ])
            ->all();

        // Select fields to load
        $HoststatusFields = new HoststatusFields($this->DbBackend);
        $HoststatusFields
            ->currentState()
            ->output();

        //Query Hoststatus Table
        $hoststatus = $HoststatusTable->byUuids(
            Hash::extract($result->toArray(), '{n}.host.uuid'),
            $HoststatusFields
        );

        // Pass the variable "message" with the content "Hello World" to the JSON view
        // Pass the variable "result" to the JSON view
        $this->set('message', 'Hello World');
        $this->set('result', $result);
        $this->set('hoststatus', $hoststatus);

        // Add the variable "message" to .json output
        $this->viewBuilder()->setOption('serialize', ['message', 'result', 'hoststatus']);
    }

}
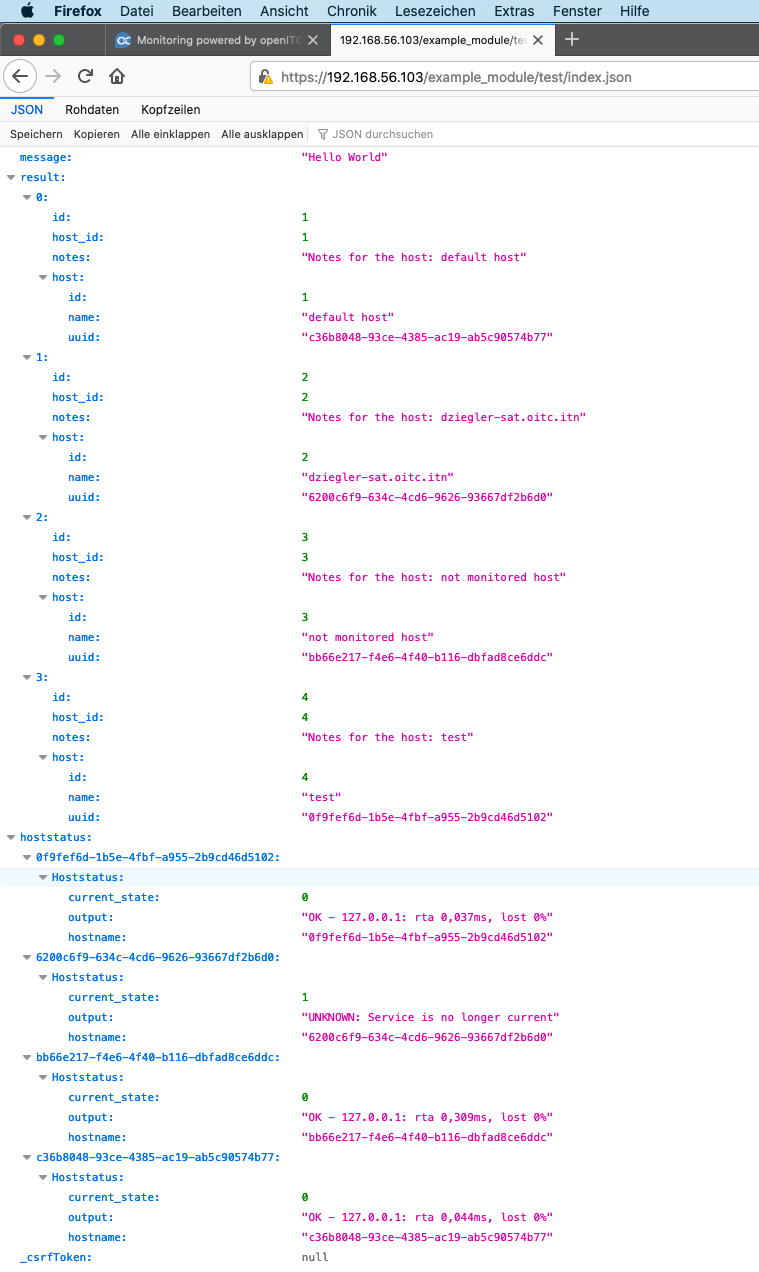
Ergebnis
Daten anzeigen
AngularJS Controller
Zuerst müssen Sie zum Laden der Daten eine Methode in ihren TestIndexController.js Implementieren.
angular.module('openITCOCKPIT')
    .controller('TestIndexController', function($scope, $http){

        //Name TestIndexController same as in ng.states.js
        //Convention: Controller name + Action Name + 'Controller' = TestIndexController


        $scope.load = function(){

            // Query String parameters
            var params = {
                'angular': true
            };

            $http.get("/example_module/test/index.json", {
                params: params
            }).then(function(result){

                //Save notes from json result into local $scope.notes variable
                $scope.notes = result.data.result;

            }, function errorCallback(result){
                if(result.status === 403){
                    $state.go('403');
                }

                if(result.status === 404){
                    $state.go('404');
                }
            });
        };

        //Fire on page load
        $scope.load();

    });
HTML View Updaten
Im zweiten Schritt müssen Sie ihre Template-Logik in ihre View Datei packen templates/Test/index.php.
<?php
/**
 * @var \App\View\AppView $this
 * @var string $message
 */
?>

<div class="row">
    <div class="col-xl-12">
        <div id="panel-1" class="panel">
            <div class="panel-hdr">
                <h2>
                    <?php echo __('Example Module'); ?>
                    <span class="fw-300"><i><?php echo __('Hello World'); ?></i></span>
                </h2>
            </div>
            <div class="panel-container show">
                <div class="panel-content">

                    <!-- Output "Hello World (HTML)" that was set by the controller -->
                    <?= h($message); ?>

                    <table class="table table-striped m-0 table-bordered table-hover table-sm">
                        <thead>
                        <tr>
                            <th><?= __('Host name') ?></th>
                            <th><?= __('Note') ?></th>
                        </tr>
                        </thead>

                        <tbody>
                        <!-- Repeat this TR for each record in $scope.notes -->
                        <tr ng-repeat="note in notes">
                            <td>
                                <!-- Print the content of the variable -->
                                {{ note.host.name }}
                            </td>
                            <td>{{ note.notes }}</td>
                        </tr>
                        </tbody>

                    </table>

                </div>
            </div>
        </div>
    </div>
</div>

Eigene Datenbank nutzen
Müssen Sie Daten speichern, die keinen zusammenhang mit openITCOCKPIT daten haben, wird empfohlen, diese in einer eigenen Datenbank zu speichern. Module können eigene Datenbankverbindungen erstellen und managen.
Eine neue Datenbank verbindung definieren
Erstellen Sie die Datei /ExampleModule/config/datasource.php
<?php
$mcp = new \App\itnovum\openITCOCKPIT\Database\MysqlConfigFileParser();
$ini_file = $mcp->parse_mysql_cnf('/opt/openitc/etc/mysql/mysql.cnf');

return [
    'Datasources' => [
        'plugin_connection' => [
            'className' => 'Cake\Database\Connection',
            'driver' => 'Cake\Database\Driver\Mysql',
            'persistent' => true,
            'host' => $ini_file['host'],
            'username' => $ini_file['user'],
            'password' => $ini_file['password'],
            'database' => 'plugin_database',
             /**
              * You do not need to set this flag to use full utf-8 encoding (internal default since CakePHP 3.6).
              */
            'encoding' => 'utf8mb4',
            'timezone' => 'UTC',
            'flags' => [],
            'cacheMetadata' => true,
            'log' => false,

            /**
             * Set identifier quoting to true if you are using reserved words or
             * special characters in your table or column names. Enabling this
             * setting will result in queries built using the Query Builder having
             * identifiers quoted when creating SQL. It should be noted that this
             * decreases performance because each query needs to be traversed and
             * manipulated before being executed.
             */
            'quoteIdentifiers' => true,
            ]
    ]
];
Dieses Beispiel nutzt den Benutzernamen, Passwort und Host Konfiguration der openITCOCKPIT mysql.cnf. Sie können
eigene Benutzernamen und Passwort kombinationen auch selbst in der Datei eintragen.
Laden und nutzen der eigenen Datenbank Konfiguration
Öffnen Sie die Datei /ExampleModule/src/Plugin.php und laden Sie die neue Datenbank Konfiguration innerhalb der
bootstrap() Methode. Sie können diesen Code kopieren und einfügen:
<?php
class Plugin extends BasePlugin {
    public function bootstrap(PluginApplicationInterface $app): void {
        Configure::load('DistributeModule.datasource');
        $datasources = Configure::consume('Datasources');

        //Check if configuration is already loaded to avoid:
        // => Cannot reconfigure existing key "plugin_test"
        if(ConnectionManager::getConfig(key($datasources)) === null) {
            ConnectionManager::setConfig($datasources);
        }
    }
}
Im letzten Schritt müssen Sie die Datenbank konfiguration in allen Table Klassen eintragen, welche ihre eigene
Datenbankverbindung nutzen sollen.
src/SomeTable.php
<?php
class ExampleNotesTable extends Table {
    public static function defaultConnectionName(): string {
        //debug(Configure::read('Datasources.plugin_test')); // Returns the config
        return 'plugin_connection';
    }
}
Warning
Die Methode defaultConnectionName() muss static sein!